
Installation instructions


41
40
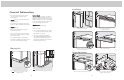
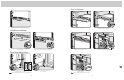
Replace unit top and four side screws.
Attach one 2 x 4 to wall stud (refer to dimensions page
for exact location).
If needed, depending on cabinet and depth,
attach second 2 x 4 to first 2 x 4.
1
2
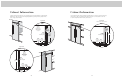
7
8a
Wall
2 x 4
Refrigerator
8b
Wall
2 x 4
Refrigerator
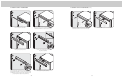
9
Plug in power cord to verify operation.
Note: Make sure power switch and
showroom switch are in the “On” position.
3”3”3”
10a
Place unit within 3” of being flush with cabinets.
Note: To avoid cabinet damage, place cardboard
between cabinets and unit. When moving unit,
DO NOT crimp, kink or crush water supply line.
10b
11
Carefully move unit until semi flush with cabinet
(depending on unit).
Pull supply tubing forward under unit.
Note: DO NOT use plastic water lines.
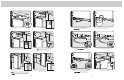
12
13
Flush water line by running two quarts of water
into a bucket. Turn water off
Connect supply tube to water valve using
a 1/2” wrench.
Note: DO NOT overtighten.
Turn on water supply and check for leaks.
14
Lift unit off rollers to desired height
and level unit using a 5/16” head wrench.
Note: DO NOT use an electric device.
Overtightening can cause damage.
Attach positive secure self-tapping bolts
to 2 x 4 using a 22” extension.
15
Wall
2 x 4
Refrigerator
Screw
16