We hope you will enjoy and appreciate the care and attention we have put inch every detail of your new, state-of the-art refrigerator. Your appliance is designed to offer years of liable services. This Use and Care Guide will provide you with the information you need to become familiar with your refrigerator’s care and operation. Your complete satisfaction is our ultimate goal.
RLU Te A WARNING Ta reduce the tek of fire, gastric honk, or | wham using your uni, follow these basic To: ELECTRICAL Nook + Head all instructions before Using the unit. | Plug Ine gins tow « NEVER allow children to operate, play with, or crawl «if a 2.prong wall capillary is side tha unit. . . encountered, contact a qualified + NEVER clan unit parts with flammable fluids.
Getting Started important information 4 Proper Disposal {of oid refrigerator) 5 Features & Product Controls Settings and Functions 8 Operation Refrigerator 10 Automatic lce Maker 12 Food Storage Guide 2 Product Care Cleaning and Maintenance 14 Troubleshooting 7 Service Information 18 Warranty 19 Important Safety Instructions « Install and level your refrigerator on a floor that will hold its weight, plus food weight {approximately 1200 pounds [540kg] and in an area suitable for its size and use.
IMPORTANT: Now that you have a new refrigerator, it is extremely important that you dispose of your oid appliance in a way that minimizes the possibility that children will find it. Thea java been many cases in years past of children crawling inside junked and abandoned refrigerators and becoming trapped or suffocated. Contact your municipal waste disposal authority to find out the best and safest way to dispose of your old refrigerator.
Getting Started ® ProChill™ Temperature Management System The variable speed DC Overdrive™ Compressor is one of the quietest, most technologically advanced compressors availability. Electronic controls with digital temperature readouts, maintain temperatures and the multi-channel airflow system and Odor Eliminator™ Evaporator remove odors and excess humidity.
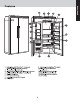
ohn te pe Variable Snead DC Overdrive™ Compressor and Super Clog-Resistant™ Condenser Plasmaciuster™ ion Air Purifier Electronic Controls with digital temperature readouts Spill proof Plus Shelves Wilsonian Technology (2) Spill proof Shelves {2} Dairy Compartments (2) Adjustable Door Bins (4) (Patented) Deli Drawers 9. Adjustable Humidity Zone™ Drawer(s) 10. Gide-Out Freezer Baskets (2) 11. Ice Bucket (1} 12. Non-Adjusting Freezer Shelf (1) 13. Adjustable Freezer Shelves (3) 14.
[flat In order for your new refrigerator to work properly, it is important that you understand its various features, controls, and how to use them. Power On/Off Switch (Power Intervention Switch) The power on/off switch is located behind your refrigerators top grille. It is used to tum the power off when cleaning the refrigerator. Your refrigerator arrives from the factory with the power interruption switch on. To tum power off, remove the center girl switch to the off position. bide.
Max Refrigerator Mode Max refrigerator mode adjusts the refrigerator temperature to the coldest setting for four hours, at the end of which the refrigerators temperatures automatically rectums to its previous setting. To activate the max refrigerator mode, simply press the "ACTIVATE CONTROLS" pad, followed by the "MAX REF” pad. The “MAX REF” light will glow to let you know you've turned on the max refrigerator mods.
Operation Spill proof Plus Shelves with Nona Technology These spill proof shelves contain liquids with no raised edges in order to provide extra shelf capacity. Standard Lightproof Shelves Standard spill proof shelves are constructed of polypropylene moiled around the glass and metal rail. This design means that the shelves are completely enclosed and liquids can’t seep under the glass. This localizes spills and makes clean-up easier.
Deli Drawers To remove drawer, roll the drawer out to the stop. Then, on each side of the drawer, locates the back lever on the glides and lift up until the drawer disengages from the glides. Full the drawer out the rest of the way. To replace the drawer, extend the glides out to the stop. Next, place the drawer onto the glides and push it back until the drawer engages the hook. Lower the front part of the drawer, grasp the glides/drawer and lightly squash until the drawer snaps onto the glides.
Operation Wire Shelf Adjustment You can easily adjust your freezer's shelves. To remove a shelf, simply tilt it up at the front, releasing the hooks from the shelf support. Then, pull the shelf straight out. To replace, guide the rear hooks of the shelf into the sits in the shelf supports. Then, tilt the shelf up ak the front until the hooks drop into the slots. Next, lower the front of the shelf to a level position.
Storing Fresh Food Wrap of store food in the refrigerator in airtight and moisture-prof material. This prevents food odor and taste transfer. For dated products, check use-by date to ensure freshness. To store leafy vegetables, remove store wrapping. Then tear off bruised and discolored areas. Wash the vegetables in cold water and drain, and then place them in a plastic bag or plastic container and store in your produce drawer.
A CAUTION To sold personal injury or property damage, read and follow all cleaning product manufacturer's directions To naval incision shock which can cause seers emotional Injury or death, Lum power disconnect switch fo OFF before scanning Adler cleaning, rein power disconnect switch to Ob position. Your refrigerator is built to give you many years of dependability service. However, there are a few things you can do to help extend its life.
Glass Shelves To clean your refrigerators glass shelves, [ift the shelf out by sifting the front and releasing the hooks from the metal track. Then pull the shelf out. Be sure to allow the glass shelves to adjust to room temperature before cleaning. To clean crevices, dilute mild detergent with water. Brush this solution inch crevices using a plastic bristle brush. Let set for five minutes. Spray warm water into crevices using faucet spray attachment.
Saving Energy You can help your refrigerator use less circularity with these simple tips: + Pan the door as few times as possible. Think about what you need before you open the door. Get everything out at one time. Esp food organized so you will not have to search for what you want. Close door as soon as food is removed. = BO NOT overcrowd the unit so air movement is blocked. = BO NOT set the unit to temperature colder than necessary.
Understanding Sounds You May Hear Your new refrigerator may make different sounds than your oid one. Hand surfaces, such as the ceilings, wails, and cabinets around the unit can make these sounds seem louder. However, these sounds are normal and will soon become familiar; they indicate that your refrigerator is working properly.
if service is required, call your authorized service agency. Have the following information readily available: = Mode! number = Serial number ® Eats purchased = Name of dealer from whom purchased Clearly describe the problem that you are having.
BUILTIN SIDE-BY-SIDE REFRIGERATION WARRANTY THREE YEAR FULL WARRANTY Built-in side-by-side refrigerators and all of their component parts, skeptic us retaliated ballet, are wanted to bs free from defective materials or workmanship in normal residential uss for a period of three (3) years from the date of original retail purchase or closing date for naw construction, whichever paring is longer.
F21444B EN Viking Range, LLC 111 Front Strait Greenwood, Mississippi 38930 USA 662) 455-1200 For product information, call or visit our web site at vikingrange.com in the US or brigade.