
Installation Instructions


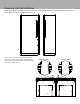
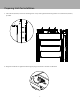


Table Of Contents

8
Installation
WARNING
TIP OVER HAZARD
Appliance is top heavy and tips easily when not completely
installed. Keep doors closed until appliance is completely installed
and secured per installation instructions.
Use two or more people to move and install appliance. Failure to do
so can result in death or serious injury.
5. Remove units from pallets and position together
outside of the cabinet so that top connecting plate
(Item #4) can be installed. If installing on uneven
surfaces, use unit leveling feet to adjust units to that
they are at the same height.
7. Fasten rear connecting plate (Item #5) to the
threaded mounting holes provided on the
rear of the unit using the 1/4”-20 x 3/4” (Item
#6) fasteners. DO NOT install using a drill.
Use manual allen wrench. (See Illustration B).
Loosely attach the bracket allowing it to pivot.
Tightening the screws will result in the bracket
bending and causing misalignment of the rear
of the units.
6. Install top connecting plate to the threaded
mounting holes provided on the top of the
cabinet using the 1/4”-20 x 3/4” (Item #6)
fasteners. DO NOT install using a drill. Use
manual allen wrench. (See Illustration A)
A.
B.
*
A.
B.
Note: *If one or both units have (4)
screw holes, attach using the top
two holes.