Use/Install GUIDE Under-counter Micro Green & Herb Cabinet GCV12
TABLE OF CONTENTS TABLE OF CONTENTS FEATURES AND SPECIFICATIONS UNPACKING AND INSPECTION SAFETY PRECAUTIONS INSTALLATION & STARTUP PROGRAMMING SETTING UP YOUR GROWING CYCLES FUNCTIONS OF THE ZONE SCREEN FUNCTIONS OF THE MAIN RESERVOIR SCREEN PLANTING & GROWING GROWING GUIDE GROWING DO’S AND DON’TS CLEANING AND MAINTENANCE PERIODIC MAINTENANCE PROCEDURES REPLACING THE LIGHTS SANITATION AND FOOD SAFETY FREQUENTLY ASKED QUESTIONS & TROUBLESHOOTING MICRO GREEN PROBLEMS RESOURCES REPLACEMENT PARTS, WIRING & PLU
FEATURES AND SPECIFICATIONS Your Viking Range, LLC Micro Green & Herb Cabinet provides a self-contained environment that is ideal for growing herbs, micro greens and even edible flowers. The lights produce the proper spectrum and an irrigation system delivers water and nutrients to the plants. The automated system provides everything the plants need to grow year round and right in the kitchen. It is preprogrammed for the growing needs for common herbs and micro greens.
UNPACKING AND INSPECTION This appliance should be thoroughly cleaned prior to use. See the CLEANING INSTRUCTIONS in this manual. NOTE: DO NOT discard the carton or other packing materials until you have inspected the appliance for hidden damage and checked it for proper operation. 1. Remove the cabinet from shipping carton, ensuring that all packing materials and protective plastic has been removed from the unit. 2. Inspect all components for completeness and condition. 3.
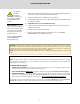
IMPORTANT SAFETY INSTRUCTIONS For your safety and the proper operation of this appliance, please follow these safety guidelines. This manual should remain with the appliance so that new owners and users learn about the product and relevant safety precautions. Carefully read through this manual before installing and using the herb cabinet This appliance is designed to be operated by adults. The water from your unit is not for drinking.
SAFETY PRECAUTIONS WARNING: Risk of personal injury Installation procedures must be performed by a qualified technician with full knowledge of all applicable electrical and plumbing codes. Failure could result in personal injury and property damage. IMPORTANT: Power cord is 6' long If necessary, contact a licensed electrician to install an appropriate 15 amp electrical circuit with correct NEMA receptacle. Ensure that the plug is accessible after installation. DO NOT use an extension cord.
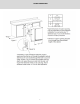
CUTOUT DIMENSIONS 7
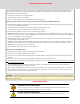
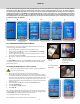
START-UP Note: the cabinet must be plugged in or wired and plumbed by a professional technician to all applicable local and state plumbing and electrical codes. When you power up the unit in, it will turn on and you will see the startup screen (A). The unit runs diagnostics and start-up functions while this screen is visible. You do not need to do anything while the startup screen is showing. The unit will automatically go to the HOME screen following the start up screen.
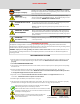
START-UP (continued) CALIBRATE THE pH SENSOR B A 1. 2. 3. 4. C E D Fig. 1 Access the water reservoir; the sensor will be on the left side. Remove the lower grow drawer to access the reservoir (Fig.1) Locate the pH sensor probe on the right side of the reservoir (Fig.2) Fill one cup of water, one cup of pH buffer #4 (Fig. 3) and one cup of pH buffer #7 (Fig. 4) Remove cap from the sensor and gently wash the pH probe in the water and dry on a clean cloth. water #4 5.
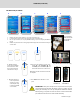
START-UP (continued) CALIBRATE THE TOTAL DISSOLVED SOLIDS (TDS) SENSOR (EC 1000 PPM solution required) B A 1. 2. C D E Remove the lower grow drawer to access the reservoir (Fig.1) Locate the TDS sensor probe on the right side of the reservoir (Fig.2) 3. Fill one cup of water, and one EC 1000 PPM solution water EC PPM 4. Gently wash the TDS probe in the water and dry on a cloth Fig. 1 Access the water reservoir 5.
START-UP (continued) PRIMING THE IRRIGATION PUMP Fig. 1 Access reservoir (Fig. 1) 1. 2. If present, remove the bottom grow tray Slide out drawer to access the reservoir Fill reservoir 1. 2. 3. Make sure that the unit has been connected to the water and power according to local codes From the HOME screen, press SET UP, SET RESERVOIR, AUTO ON, FILL Wait until the reservoir is full with water. Monitor the filling of the reservoir to assure proper fill. Fig. 2 Fig.
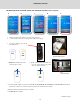
SETTING UP YOUR GROWING CYCLES Note: The cabinet must be plugged in or hard wired and plumbed by a professional technician. Follow these steps to set up your cabinet for the first time. GCV12 2 zones A SET UP THE DATE AND TIME On the home screen, press the date/time in the upper right hand corner. This will take you to the TIME AND DATE SCREEN (A). Using the UP and DOWN arrows, set the date and time. Press DONE when you are finished.
SETTING UP YOUR GROWING CYCLES (continued) PROGRAMMING LIGHTING AND WATERING CYCLES You can change the lighting and watering cycles for specific seeds, or new seeds that are not in the default programming cycles. EDIT CYCLES From the HOME screen (A), press SET UP. On the SET UP SCREEN (B), press EDIT PLANTS. From the SEED LIST SCREEN (C), Select a plant and then the cycle will appear for that zone. On the EDIT SCREEN (D), you will see buttons for temperature, water and lights.
SETTING UP YOUR GROWING CYCLES TO START A GROWING CYCLE On the HOME screen, select a seed for the zone you have just planted (Fig. 1), and you will enter the screen with the settings for that zone (Fig. 2). Press START CYCLE (may also say RESTART CYCLE if the same cycle has been started in the past) and a cycle will begin. Then press the HOME button. Repeat for each zone that you have planted.
LETS’ GROW! PLANTING & GROWING Planting and growing is easy. Follow these simple instructions. See the growing guide for specific plants on the next page. Please refer to the Growing Guide and Growing Tips on pages 16-17 for successful growing and harvesting of specific plants. See Sanitation and Safety Guidelines and FAQ’s on pages 20-21 for safe growing and harvesting.
GROWING GUIDE Seed Sowing Amount seeds per 10”x20” tray Dome On Time (germination) Grow Time (harvest) Watering Schedule¹ (soil) Harvest Yield per Tray* Amaranth 2 tsp 2-3 days 2 weeks 1 every 4 days 3 oz (95g) Arugula 1 tsp 2-3 days 3 weeks 1 every 4 days 4.7 oz (145g) Basil 1 tsp 2-3 days 4-5 weeks 1 every 5 days 7.5 oz (235g) Beet Tops 1/2 cup 2-3 days 2 weeks 1 every 4 days 4.3 oz (135g) Broccoli 1 tbsp. 2-3 days 1 week 1 every 4 days 8.
GROWING DO’S AND DON’T’S DO MAINTAIN TEMPERATURE AND HUMIDITY Keep the room temperature between 55°F and 90°F (13°C and 32°C), and the humidity level in the cabinet between 30 and 60%. DO KEEP IT CLEAN Keep your growing environment clean. Clean the reservoir, reservoir filter and growing shelves every month according to the cleaning instructions on pages 17-19. DON’T OVERWATER Overwatering, especially at the beginning of the growing cycle can bring on mold and mildew.
CLEANING AND MANTENANCE CLEANING THE RESERVOIR & IRRIGATION SYSTEM 1. Make sure cabinet is connected to city drain and water. If you are not hooked up to a drain and city water you will need to manually drain and fill the cabinet; if this is the case, connect the drain fitting to a hose that runs to a drain or sink. Do not activate the DRAIN function until you have a place to drain the water with a hose to a sink or drain, observing all municipal codes. Used water from the cabinet is not potable. 2.
CLEANING AND MANTENANCE (continued) CLEANING THE GROWING DRAWERS Clean your grow drawers between each harvest. However, keep a close eye on the environment and immediately clean any mold or organic matter. Do not use any chemically damaging or toxic cleaning products such as bleach. Do not use stainless steel cleaner on the interior of the cabinet. Using chemical cleaning products can be toxic and also damage the stainless steel drawers and cabinet.
PERIODIC MAINTENANCE PROCEDURES INSIDE THE RESERVOIR A. DRAIN, CLEAN AND FLUSH RESERVOIR (Monthly) SEE INSTRUCTIONS ON PAGE 17 B. CHANGE FILTER (30-45 days*—more often in areas with hard water; filter is washable for extended use) 1. 2. 3. Locate the filter (large blue or white canister in the reservoir) and unscrew the canister counter clockwise. Make sure to support very well the filter mounting bracket while unscrewing filter in order to reduce the risk of breaking mount.
REPLACING THE LIGHTS Occasionally you may need to replace a light bulb. It is a simple process, similar to changing the bulb on an aquarium hood. For part number, see the list on page 26. NOTE: T5 growing lights running at the default time of 18 hours per day is considered high use and the efficiency of the bulbs will reduce approximately 10% after 20,000 hours. Bulbs should be replaced every 18-24 months to ensure best performance.
SANITATION AND FOOD SAFETY GUIDELINES For your health and safety, please read the information Using Calcium Hypochlorite Rate: 3 ounces calcium hypochlorite in 1 gallon of warm below regarding sanitation, safe growing and food water. Mix thoroughly and soak seed for 20 minutes. Rinse safety. seed thoroughly in clean water, then finish soaking time, if required, in clean water. Avoid breathing the fumes of Micro greens and herbs are not sprouts, but rather, baby chlorine.
FREQUENTLY ASKED QUESTIONS & TROUBLESHOOTING How much soil should I put in my trays? You should fill each tray 1/2 to 3/4 full with sterile potting soil. Make sure the soil is well moistened, but not overly muddy or soupy. See Resources page 25 for some brands we have found to be high quality soils. For seeds with a shorter life cycle like pea shoots, radishes, wheatgrass (1-2 weeks), 1/2 full is adequate. For seeds with longer life cycles such as basil, oregano, arugula, etc., go with 3/4 full.
MICRO GREEN PROBLEMS WHITE MOLD Identification Remedy White mold looks like a spider web crawling across the surface of the growing media. It starts out in one area in a small, wispy ball and then expands quickly over the growing media.
RESOURCES The growing cabinet comes with a starter set of domes and trays. An optional starter kit is available and includes growing trays, domes, mats, sifter, TDS calibration solution, PH kit, hydrogen peroxide, 20 gallon plastic tub (for mixing/sifting soil) and measuring syringe (for adding nutrients). Many supplies, including seeds and growing media, can be found at local greenhouses and garden supply sellers. The internet is a great resource for finding everything you need for your growing cabinet.
RESOURCES List of brands for supplies* Growing trays (with drain holes) and vented domes: Mondi™ Super Sprouter™ Sun Systems™ Sterile soil: Fox Farms Happy Frog™ Miracle Gro™ Hydroponic growing media (perlite, rockwool): Handy Pantry™ Miracle Gro™ Therm-O-Rock™ Viagrow™ Plant It™ Grodan™ Growing mats/filters: Handy Pantry™ TDS reader: Milwaukee™ Plastic tub for mixing and sifting soil: Rubbermaid™ pH and TDS Calibration Solutions: Nutradip™ General Hydroponics™ For discussion on hydroponic growing med
REPLACEMENT PARTS - GCV12RSS & GCV12LSS MICRO GREEN & HERB CABINET COMPONENTS 120V, 1.
WIRING DIAGRAM CAUTION: Use only (OEM) original equipment manufacturer replacement parts. Using unauthorized parts may cause serious injury or damage to the cabinet. Replacement parts should be installed by a qualified service technician. Contact Viking Range Preferred Service at 888-845-4641 with your model and serial number for replacement parts.
PLUMBING DIAGRAM CAUTION: Use only (OEM) original equipment manufacturer replacement parts. Using unauthorized parts may cause serious injury or damage to the cabinet. Replacement parts should be installed by a qualified service technician. Contact Viking Range Preferred Service at 888-845-4641 with your model and serial number for replacement parts.
SERVICE INFORMATION If service is required, call your authorized service agency. Have the following information readily available: • Model number • Serial number • Date purchased • Name of dealer from whom purchased Clearly describe the problem that you are having.
HOUSEHOLD PRODUCT WARRANTY MICRO GREEN AND HERB CABINET WARRANTY TWO YEAR FULL WARRANTY Micro green and herb cabinets and all of their component parts, except as detailed below*†‡, are warranted to be free from defective materials or workmanship in normal residential use for a period of two (2) years from the date of original retail purchase. Viking Range, LLC, warrantor, agrees to repair or replace, at its option, any part which fails or is found to be defective during the warranty period.
Viking Range, LLC 111 Front Street Greenwood, Mississippi 38930 USA (662) 455-1200 For product information, call 1-888-(845-4641) or visit the our web site at vikingrange.com in the US or brigade.