
Use and Care Manual / Installation Instructions


9
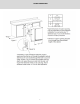
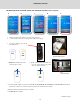
Fig. 1 Access the
water reservoir; the
sensor will be on
the left side.
water
#4
#7
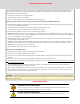
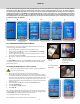
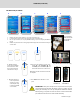
6. Enter the pH calibration screen press
SETUP (A), SET RESERVOIR (B), PH
SENSOR(C), then CALIBRATE (D) and
follow the instructions on the screen.
Calibration will take about three minutes
to complete.
Continued on next page
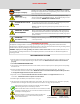
CALIBRATE THE pH SENSOR
1. Remove the lower grow drawer to access the reservoir (Fig.1)
2. Locate the pH sensor probe on the right side of the reservoir (Fig.2)
3. Fill one cup of water, one cup of pH buer #4 (Fig. 3) and one cup of pH buer #7
(Fig. 4)
4. Remove cap from the sensor and gently wash the pH probe in the water and dry on
a clean cloth.
Fig. 2 Blue PH sensor (shown with cap on)
Fig. 3
PH buffer #4
Fig. 4
PH buffer #7
water
5. Gently swish the
probe in the pH buer
#4. Continue to swish
the probe and follow
instructions in step 6.
#4
7. Wash the pH sensor
in the cup of water
and dry on a clean
cloth. Repeat steps
5 and 6 for pH bu-
er #7 solution
IMPORTANT: Safely store the pH sensor cap and use it to stop the
sensor from drying out when the water reservoir is empty. Do not
let the pH sensor dry out. Fill cap with pH #4 calibration solution
before placing it on probe to store the sensor. Failure to follow this
procedure will ruin the sensor and void the warranty.
#7
8. Press DONE when calibration is com-
plete
START-UP (continued)
A
B
C
D
E