Installation Viking Range, LLC 111 Front Street Greenwood, Mississippi 38930 USA (662) 455-1200 For product information, call 1-888-845-4641 or visit the Viking Website at vikingrange.
Table of Contents IMPORTANT– Please Read and Follow! Warnings & Important Information _____________________________________________________________________ 3 RVCH Classic Chimney Wall Hoods w/Standard Ventilator Dimensions & Specifications________________________________________________________________ 5 Clearance Dimensions _____________________________________________________________________ 6 Interior Ventilator Dimensions ______________________________________________________________ 7 Planning Inform
IMPORTANT– Please Read and Follow! Dimensions & Specifications (RVCH Classic Chimney Wall Hoods w/Standard Ventilator) WARNING WARNING ” 12 cm) TO REDUCE THE RISK OF FIRE, ELECTRICAL SHOCK, OR INJURY TO PERSONS Range hoods must be installed with the ventilators that are specified on their carton indicating suitability with this model. Other ventilators cannot be substituted. TO REDUCE THE RISK OF INJURY TO PERSONS IN THE EVENT OF A RANGETOP GREASE FIRE, OBSERVE THE FOLLOWING.
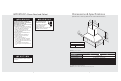
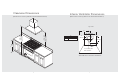
Clearance Dimensions Interior Ventilator Dimensions (RVCH Classic Chimney Wall Hoods w/Standard Ventilator) (RVCH Classic Chimney Wall Hoods w/Standard Ventilator) Top view A 16” (40.6 cm) 66 30 (16 ”m 7.6 in. c 69 to m) (17 ”ma 5.3 x. cm ) (76”mi .2 n. c 33 to m) ” (83 ma .8 x. cm ) A 30”W. 14-15/16” (37.9 cm) 36”W. 17-15/16” (45.6 cm) 4” (10.2 cm) 9-3/4” (24.8 cm) ” 36 cm) (91 .4 120 V 7” (17.8 cm) dia.
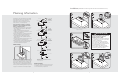
Installation (RVCH Classic Chimney Wall Hoods w/Standard Ventilator) Planning Information Plan where the duct work will be located. Install proper-sized duct work, roof, or wall cap for the type of blower you are using. Adjust your measurements for various heights of ceilings, soffits, cabinets, or ranges/rangetops.
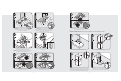
11 6 1 5/16” nut driver 2 CAUTION: If not using a duct cover, using screws provided make sure top mounting screws are secured into soffit or cabinet frame. Use additional mounting screws, if necessary. CAUTION: Secure vent hood to wall using screws provided. Use additional mounting screws and wall anchors, if necessary. 7 3 5/16” nut driver 8 BARE OR GREEN Slide filter front over front lip. Push filter rear up, then slide back over rear lip.
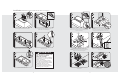
Installation (RVCH Classic Chimney Wall Hoods w/Recirculating Kit) 1 6 2 7 1 2 5/16” nut driver 2 Remove damper and discard with transition. Turn recirculating unit upside down. Place vent hood upside down on recirculating unit. 8 4 3 Flip hood over. Insert 6” of electrical wiring through the top of vent hood and secure using wiring restrain. Refer to local codes. CAUTION: Secure vent hood.
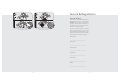
Service & Registration 13 12 1 1 3 3 Service & Parts 2 2 Slide filter front over front lip. Push filter rear up, then slide back over rear lip. Slide spacer front over front lip. Push spacer rear up, then slide back over rear lip. Only authorized replacement parts may be used in performing service on the appliance. DO NOT repair or replace any part of the appliance unless specifically recommended in the manual. All other servicing should be referred to a qualified technician.