Installation GUIDE 3 Series Built-In Electric 30” Single and Double Ovens RVSOE330 / RVDOE330
Table of Contents Warnings & Important Safety Information .............................................................................................................................................................. 2 Dimensions ......................................................................................................................................................................................................................... 4 Specifications ...............................................
IMPORTANT - Please Read and Follow WARNING WARNING DO NOT use the handle or oven door to lift the oven. Remove door before installation to ensure that it is not used to lift the unit. See installation section for door removal. Frame grounded by a 4-conductor cable assembly. See installation section. DO NOT USE AN EXTENSION CORD WITH THIS APPLIANCE. SUCH USE MAY RESULT IN FIRE, ELECTRICAL SHOCK OR OTHER PERSONAL INJURY. WARNING The misuse of the oven door(s) (e.g.
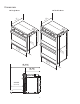
Dimensions 30” Single Oven 30” Double Oven ” 24 cm) ” 24 cm) .0 1.0 (61 (6 29 (74-3/8 .6 ” cm ) 29 (75-3/4 .6 ” cm ) 51 (13 -3/8 0.5 ” cm ) 29 (75-3/4 .6 ” cm ) 45-1/16” (114.5 cm) 22-3/8” (56.8 cm) 21-1/4” (53.
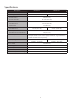
Specifications Description RVSOE3301 RVDOE3301 Overall width Overall height 29-3/4” (75.6 cm) 29-3/8” (74.6 cm) 51-3/8” (130.5 cm) Overall depth To front of door To front of handle 24” (61.0 cm) 25-5/16” (64.3 cm) Cutout width Standard Install Flush mount 28-1/2” (72.4 cm) 30” (76.2 cm) Cutout height Standard Install 28-1/4” (71.8 cm) 50-5/8” (128.5 cm) Cutout depth Standard Install / Flush Mount Electrical requirement Max Amp Usage 24” (61.
Cutout Dimensions 30” Double Oven 30” Single Oven 2” -1/ ) 28.4 cm (6124” .0 cm ) (72 -5 ) 50 .5 cm ) 5” 8 (12 min .7 . cm ) (12 2” -1/ ) 28.4 cm (6124” .0 cm /8” Junction box location (4317” .2 cm 4” m) .2 (10 5” (12 min .7 . cm ) 28 (71-1/4 .8 ” cm ) (72 ) c 4” . -1/ in 15cm) m r .7 oo (38 to fl Junction box location 30” Single Oven Undercounter 4”cm) .2 (10 4” -1/ ) 28.8 cm (71 (6124” .0 cm ) 5” (12 min .7 . cm ) Junction box location (10 4” .
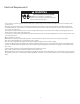
Electrical Requirements WARNING FIRE OR ELECTRICAL SHOCK HAZARD DO NOT use an extension cord with this appliance. Such use may result in fire, electrical shock or other personal injury. •Oven requires a separate, grounded 4-wire, 240V (AC), 30 amp (single ovens) and 50 amp (double ovens) service with its own circuit breaker.
General Information •Keep appliance area clear and free from combustible materials, gasoline and other flammable vapors. •Disconnect the electrical supply prior to servicing or cleaning. •When removing the appliance for cleaning or service, disconnect AC power supply and carefully remove the appliance by pulling forward. •Electrical requirements are listed in the product specifications under the electrical requirements section.
Installation 1 2 Remove wooden brace on front of pallet. 2 1 Open door completely. Rotate door hinge clip as shown in illustration. 3 4 Close the door until it stops. Push in/lift door up/and then out. Repeat for all doors. 5 6 Remove racks. Unscrew pallet screws from side of oven.
Installation 7b 7a Green White Neutral Neutral Green White Red Red Black Black Wiring option 1* (connect the white and green to the incoming neutral) Wiring option 2* (connect the white to the incoming neutral, attach green to grounded junction box) 7c 8 White Neutral Green Red Black Wiring option 3* (connect the white to the incoming neutral, attach green to suitable ground) Lift oven into position. 9 10 Push oven straight in. Attach screws to the side of the framing.
Installation 11 12 Replace racks Replace door 13 14 1 2 Close door Open door completely. Rotate door hinge clip as shown in illustration.
Final Preparation 1. Some stainless steel parts may have a protective wrap, which must be peeled off. All stainless steel body parts should be wiped regularly with hot, soapy water at the end of each cooling period and with liquid cleaner designed for this material when soapy water will not do the job. If build-up occurs, DO NOT use steel wool, or abrasive cloths, cleaners, or powders.
Service Information If service is required, call your authorized service agency. Have the following information readily available. • Model number • Serial number • Software Version • Date purchased • Name of dealer from whom purchased Clearly describe the problem that you are having.
Viking Range, LLC 111 Front Street Greenwood, Mississippi 38930 USA (662) 455-1200 For product information, call 1-888-(845-4641) or visit our web site at vikingrange.