
installation


13
Anti-tip Device Installation - Floor Mount
Connecting Gas & Electric
GAS LEAK HAZARD
To avoid risk of personal
injury or death; leak testing
of the appliance must be
conducted according to the
manufacturer’s instructions. Before
placing appliance in operation, always
check for gas leaks with soapy water
solution.
• DO NOT USE AN OPEN FLAME TO CHECK
FOR GAS LEAKS
WARNING
1
Note: Refer to electrical and gas
requirements section for proper
installation information.
Connect gas and electrical. Before
placing appliance in operation,
always check for gas leaks. This
must be performed by your dealer,
a quali ed licensed plumber, or gas
service company.
1
Ø 1/8”
Ø
1/8”
(.32 cm
)
(.32 cm
)
Ø 1/8”
(.32 cm
)
1-1/2”
1-1/2”
(3.8 cm)
(3.8 cm)
2-1/2”*
(6.4 cm)
8-1/2”
21.6 cm)
1
1
2
2
2
1
x2
3
1
2
4
1
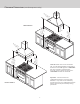
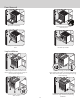
Locate anti-tip bracket hook on the oor 8-1/2” (21.6 cm) from
side cabinet and 2-1/2” (6.4 cm) from rear wall when using an
island trim or high shelf. *If using an 8” (20.3 cm) backguard with
spacers, add 3/4” (1.9 cm) to the 2-1/2” (6.4 cm) for a total of
3-1/4” (8.3 cm). Mark and drill 1/8” (.32 cm) holes where bracket
will be located.
Mount anti-tip bracket hook to oor
using screws provided.
Remove two screws from back of
range.
Attach bracket to back of range
using two screws.