
installation


14
Door Replacement and Adjustment
Final Preparation
All stainless steel body parts should be wiped with hot, soapy water and with a liquid cleaner designed for this material.
If buildup occurs, DO NOT use steel wool, abrasive cloths, cleansers, or powders! If it is necessary to scrape stainless steel
to remove encrusted materials, soak with hot, wet cloths to loosen the material, then use a wool or nylon scraper. DO NOT use a
metal knife, spatula, or any other material tool to scrape stainless steel! Scratches are almost impossible to remove.
Final Installation
1
2
3
3/8”
3/8”
(0.95 cm)
(0.95
cm)
3/8”
(0.95 cm)
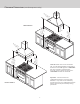
Slide range into place. Be sure
wall anti-tip bracket slides into the
anti-tip opening or oor anti-tip
hook and bracket are engaged
(depending on the one used)
Burner caps and burner bowls are
packed in styrofoam top pack with
the grates. Place burner bowl in
grate support and burner cap on
top of burner. Place burner grate
over burner cap and on top of grate
support.
Check that unit is level side to side
and front to back. The side trim must be
3/8” (0.95 cm) above countertop. If unit
is not level repeat steps 5-7 of “Leveling/
Adjustments/Alignment” section.
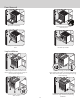
1
step
2
2
step
3
step
Carefully realign door on hinges.
Slide in and down.
Open door completely.
Fold latches forward until locked
in place
Close door