
Installation / Use & Care Manual


INSTALLATION / USE & CARE
|
7
BUILTIN INSTALLATIONS
This built-in grill is designed for easy installation into masonry
enclosures.
NOTE: Built-in grills are intended either for installation in a built-
in enclosure constructed of non-combustible materials or for an
installation in a built in enclosure constructed of combustible
material when installed with a insulating jacket).
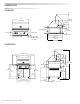
For non-combustible applications, the grill drops into the
opening shown in the cutout detail drawing (See INDEX: “Gas
Requirements”) and hangs from its counter-top trim. A deck is
not required to support it from the bottom.
When using the insulated jacket in a combustible enclosure, the
jacket must be supported from the bottom by a ledge on each
side or a full deck beneath the jacket.
(See INDEX: “Gas Requirements”) Pay special attention to the
provisions shown for gas line hook-up.
The enclosure should have ventilation holes to prevent gas
build-up in the event of a leak. The deck ledges and counter
should be at and level. (refer to ANSI Z21.58 Standard for
Outdoor Cooking Gas Appliances, Section 1.7 Enclosures For
Self Contained LP-Gas Supply Systems)
This grill requires that a 120 volt, 60 hertz, 15 amp GFI certi ed
outlet be installed by a quali ed electrician.
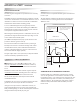
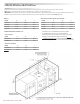
CLEARANCE TO COMBUSTIBLE MATERIALS
Minimum clearance from the sides and back of the grill to
adjacent combustible construction below the counter top
surface is 12” from the sides and 6 1/4” from the back of the
hood.
Minimum clearance from sides and back of grill to adjacent
combustible construction extending above the counter top
surface is 12” from the sides and 6 1/4” from the back.
Do not use this appliance under unprotected overhead
combustible surfaces.
A minimum of 6” of clearance is needed on the left side of the
grill above the counter top for the motor and skewer.
If the grill is to be placed into a combustible enclosure, an
approved insulated jacket is necessary and is available only
from your Viking Range, LLC dealer. Insulated jackets have been
designed and tested speci cally for your grill.
REAR HOOD CLEARANCE
A 3 inch clearance is required behind the grill to allow the front
hood to open.
The grill exhausts combustion products and cooking greases
to the back. Never locate the grill where this exhaust will be
di cult to clean.
OVERHEAD PROTECTION AND EXHAUST REMOVAL
If installed under any combustible construction the cooking
area over the grill must be covered with an exhaust hood. The
hood must provide 3 - 6” of overhange on all exposed sides. The
exhaust hood shall provide no less than 1,200 CFM for proper
exhaust ventilation. The hood must be approved for outdoor
installation and provided with a dedicated GFCI protected
branch circuit
M
Mi
i l f th
id
d
d b k f t
h
ill t
C
CL
EA
A
RA
N
NC
E
T
TO
COMBUST
IB
LE
MAT
ER
IALS
B
EF
O
RE Y
OU
S
TART
...
c
o
n
t
in
u
e
d
Vent Hood
Overhead Construction
R
e
a
r
W
a
l
l
3” overhang on left and right side of grill
36” Minimum
6’ Minimum to
non-combustible
6 1/4” Clearance from the
grill back to above
counter combustibles
3”
Minimum
hood
clearance
12” clearance to combustibles from
surface level right/left/below
Combustible overhead
construction requires a
vent hood
Non-combustible overhead
construction a vent hood is
highly recommended
6 1/4”
Minimum
clearance
to combustibles