
Use & Care Guide

CARE & USE/INSTALLATION
|
33
BURNER GOES OUT
• Location
First determine if the problem is being caused by location.
If the grill is subject to high winds, reposition it to provide
some protection.
• Check the Flame
Check the gas supply and flame characteristics. (See
INDEX: “Flame, Correct Size”)
• Burners Seated
Check to ensure that the burners are correctly positioned
in the grill. (See INDEX: “Burner Placement” for further
details.)
Correctly-installed burners should be seated firmly and
level with no side-to-side movement.
BURNER GOES OUT ONLY WHEN SET TO “LOW”
The valves on the grill feature an adjustable low setting.
Fluctuations in gas pressure, gas conversion and even in
the quality of the gas itself may affect burner performance
at the “LOW” setting. It could be either too high or too
low. (See INDEX: “Burner Adjustment” for further details.)
ROTISSERIE WON’T LIGHT
Follow the same procedure as described for the grill
burners to diagnose problems with the rotisserie burner.
BE CAREFUL! The rotisserie burner flame may be hard to
see in bright sunny conditions.
ROTISSERIE LIGHTS BUT GOES OUT AS SOON AS
CONTROL IS RELEASED
• Check Thermocouple
The control knob must be held in for 30 to 60 seconds after
ignition for the rotisserie burner to stay lit. (See INDEX:
“Lighting Rotisserie Burner” for further details.)
If the burner will not stay lit when you release the control
knob, re-light it and hold the control knob in for at least 60
seconds to allow the thermocouple to heat up.
If, after holding the control knob in for at least 60 seconds,
the burner still will not stay lit when releasing the control
knob, call for service.
(See INDEX: “Obtaining service” for further details.)
LIGHTS WON’T LIGHT
• Check Power
Ensure that the grill is connected to a live AC power source
and check for rotisserie motor operation.
• Reset Transformer
Disconnect power from the grill and wait 5 minutes for the
transformer to cool down and reset. Then reconnect power.
If, after resetting the transformer and replacing bulbs, you
still do not have power, call for service.
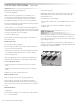
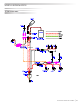
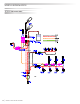
• Replace the Bulb
Replacement bulbs are halogen, 12 volt,
10W max, T3 type with a G4 bi-pin, and
are readily available at most stores. The
glass cover is held in place by two spring
tension tabs. The bulbs are easily removable without the
use of tools. Simply grasp the glass lens at the outer
corners, near the front tension clips and push the lens back.
Then, swing the lens down and pull it loose. You may have
to loosen the screw to remove the lens.
Avoid touching the glass of a new bulb. Halogen bulbs are
very sensitive to the oils found in human skin. Touching the
bulbs may shorten their life.
Pull the bulb straight out from the socket without twisting.
Hold the bulb using a paper towel or other cloth and gently
press it straight into the socket. The glass cover should be
gently snapped back into place.
POTENTIAL PROBLEMS ...continued
Pull on
spring
tabs to
release
light
cover