PROFESSIONAL OUTDOOR GRILLS INSTALLATION/CARE & USE
WARNINGS WARNING • Never use dented, rusty or damaged propane cylinders. Never store additional or empty propane cylinders in the grill cabinet or in the vicinity of this or any other appliance. Do not store propane cylinders indoors or on their sides. • Children should never be left alone or unattended in an area where a grill is located. Place your grill well away from areas where children play.
WARNINGS WARNING READ THIS MANUAL CAREFULLY and completely before using your grill to reduce the risk of: 1. 2. 3. 4. Fire Burn hazard, personal injury or property damage Ruined steaks or other unpleasant cooking experiences Unapproved installation or servicing. THIS PRODUCT IS DESIGNED FOR OUTDOOR USE ONLY. Improper installation, adjustment, alteration, service or maintenance can cause property damage, injury or death. Read this manual thoroughly before installation, use, or servicing of this product.
WARNINGS WARNING 1. Always maintain the required clearances from combustible construction as detailed. The grill is designed for outdoor use only. Never use in a garage, building, shed, breezeway or other enclosed area. This grill shall not be used under any unprotected overhead combustible construction. 2. Gas grills are not design certified for and are not to be installed in or on recreational vehicles, portable trailers, boats or any other moving installation. 3.
TABLE OF CONTENTS USE & CARE GUIDELINES 6 Grill Models 6 HOW TO LIGHT YOUR GRILL 6 HOW TO LIGHT YOUR ROTISSERIE BURNER 6 BEFORE YOU START 7 If Shipment Arrives Damaged 7 Important Notes 7 SPECIFICATIONS & INSTALLATION 9 UNPACKING & ASSEMBLY 10 GAS CONNECTIONS 12 Natural Gas 12 LP Gas 13 Gas Conversion Kits 14 ELECTRICAL CONNECTIONS 15 FINAL CHECKS 16 Leak Testing 16 CHECKLIST BEFORE EACH USE 18 A MESSAGE TO OUR CUSTOMERS 18 IMPORTANT SAFETY PRECAUTIONS 18 GRILLING IN WI
USE & CARE GUIDELINES This use & care manual covers the grill models listed below. Some features and options will vary based upon the model that you purchased. GRILL MODELS BUILT-IN FREESTANDING VQGI5300(N/L)SS VQGFS5300SS VQGI5360(N/L)SS VQGFS5360SS VQGI5420(N/L)SS VQGFS5420SS VQGI5540(N/L)SS VQGFS5540SS HOW TO LIGHT YOUR GRILL 1. Before each use, complete the checklist below. 2. Make sure all burner control knobs are in the “OFF” position. 3.
BEFORE YOU START WARNING • Never install this product into a combustible enclosure without an insulated jacket. Doing so could result in fire, property damage and personal injury. • Never locate the grill under a roof or overhang, in a building, garage, shed or other such enclosed area. • Never locate the grill under unprotected combustible construction. • Installation must conform with local codes or, in the absence of local codes, with either the National Fuel Gas Code, ANSI Z223.
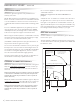
BEFORE YOU START ...continued BUILT-IN INSTALLATIONS This built-in grill is designed for easy installation into masonry enclosures. NOTE: Built-in grills are intended either for installation in a built-in enclosure constructed of non-combustible materials or for an installation in a built in enclosure constructed of combustible material when installed with a insulating jacket (LIJ).
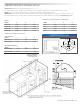
SPECIFICATIONS & INSTALLATION The guides, measurements and dimensions detailed below are designated to assist you with planning your outdoor kitchen. NOTE: Due to continuing product innovation, specifications are subject to change without notice. IMPORTANT: Please reference the Care & Use / Installation manual for details on gas plumbing requirements, electrical specifications and the proper installation of your outdoor kitchen equipment. This manual can be downloaded from our website at www.vikingrange.
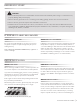
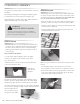
UNPACKING & ASSEMBLY The grill arrives nearly ready to use and requires only minor assembly. By carefully following the uncrating and unpacking steps, you will improve your first experience with the grill. Shipping weight on smaller units is app. 300 pounds and larger units may weigh over 500 pounds. WARNING: EXCESSIVE WEIGHT HAZARD! Use two or more people to move or install this unit. Failure to follow this instruction can result in back or other personal injuries.
UNPACKING & ASSEMBLY ...
GAS CONNECTIONS WARNING NEVER CONNECT A GAS LINE DIRECTLY TO THE GRILL. A PRESSURE REGULATOR MUST BE INSTALLED ON ALL GAS EQUIPMENT. ALL LOCAL CODES REQUIRE THAT THE PRESSURE REGULATOR SUPPLIED WITH YOUR GRILL IS USED. REMOVING OR FAILING TO INSTALL THE PRESSURE REGULATOR CAN RESULT IN FIRE AND SERIOUS PERSONAL INJURY AND WILL VOID THE WARRANTY. The grill is factory set to use either propane (LP) or natural gas (NAT). It is critical that the gas you use matches that which the grill was set up for.
GAS CONNECTIONS ...continued For freestanding units using natural gas, using a metal flex hose is recommended. This is available at your local hardware store or from your dealer. LP GAS Grills set up for LP gas come equipped with an LP hose/ regulator assembly for connection to a standard 20 lb. LP cylinder. (Type 1). All fittings necessary to attach the assembly to the grill are included. WARNING Do not change the regulator/hose assembly or use any other assembly than the one supplied with your grill.
GAS CONNECTIONS ...continued Insert the regulator inlet into the cylinder valve and turn the black coupler clockwise until the coupler is hand tight. Do not over-tighten this connection. To disconnect the coupler, first make sure the main cylinder valve is turned off. Grasp the coupler and turn counter clockwise. The inlet will then disengage. Always leak-test the connection after refilling or exchanging LP cylinders. (See INDEX: “Leak Test” for further details.
ELECTRICAL CONNECTIONS WARNING: ELECTRICAL GROUNDING • Product installation must meet local electric codes or, in the absence of local codes, the latest edition of the National Electrical Code ANSI/NFPA No. 70 or the Canadian Electrical Code CGA 1.6b2005. • Use only a Ground Fault Interrupter (GFI) protected circuit with this outdoor cooking gas appliance. • IMPORTANT: When connecting your rotisserie motor, first connect the motor to the grill and then plug the grill into the outlet.
FINAL CHECKS LEAK TESTING LOW HEAT BURNER ADJUSTMENT FOR MAIN BRASS BURNERS AND SIDE BURNERS ONLY! DANGER! To prevent fire or explosion hazard, DO NOT smoke or allow any potential source of ignition (sparks, electrical arcing, etc) in the area while performing a leak test. Leak tests should be conducted outdoors only. Never conduct a leak test using fire or flame. DO NOT ADJUST THE ROTISSERIE BURNER. The main brass burners and side burners on your grill feature an adjustable low setting.
FINAL CHECKS ...continued BRASS BURNER FLAME/AIR SHUTTER ADJUSTMENT The amount of air that enters a burner is controlled by the air shutter. Each grill burner is tested and adjusted at the factory prior to shipment. However, fluctuations in gas pressure, gas conversion and even in the quality of the gas itself may make it necessary to adjust the burner. • If the flame is noisy (sounds like a torch) and tends to lift away from the burner, indicating too much air, turn the air shutter clockwise.
CHECKLIST BEFORE EACH USE (FOR YOUR SAFETY) • Do you smell gas? If yes, shut off everything and call the gas company or a qualified plumber to check for leaks, if not please continue. • If you are using a portable propane cylinder, is it connected and leak tested? If not, check the connection before continuing. If yes, please continue. • Are you prepared to stay with the grill during the entire cooking process? If not, gather what you need before starting the lighting process. If yes, please continue.
IMPORTANT SAFETY PRECAUTIONS PLEASE REVIEW THESE IMPORTANT SAFETY PRECAUTIONS BEFORE YOU USE YOUR GRILL. 1. NEVER LEAVE THE GRILL UNATTENDED WHILE COOKING. 2. Ensure all tie-down wires have been removed from the burners. 3. Always use caution when operating the grill in a windy area. (See INDEX: “Grilling in Windy Conditions” for further details.) 4. Avoid wearing loose-fitting garments or long sleeves while grilling. They could ignite. 5.
GRILLING IN WINDY CONDITIONS Outdoor grills create more heat than interior kitchen ranges. That’s how they sear and grill steaks and other foods. • If you suspect the grill is overheating, using an oven mitt, open the front hood. Then adjust the burner control knob to a lower setting. These high-performance burners require a constant, steady supply of fresh air to mix with the fuel. Your grill pulls air in • Install your grill with a wind break behind it.
USING YOUR GRILL Grilling requires high heat for searing and low, controlled heat for slow cooking. Some foods are cooked using direct heat and some using indirect heat. Thinner cuts of food are often cooked at a “HI” heat setting with the lid open. Your grill features a variety of professional-level burners and tools for meeting the wide variety of cooking challenges. We will reveal how these features work for you.
PRE-GRILL CHECKLIST ...continued BEFORE EACH USE Before any use, always make sure that: • ... you do not smell gas before you light the grill. If you do smell gas, shut everything off and have a qualified plumber check for leaks. • … the cooking area is free and clear of any combustibles, besides your food, that might ignite. • … the control knobs turn freely. • … if you are using a portable propane cylinder, it is securely connected and leak tested.
LIGHTING YOUR GRILL ...continued COLD WEATHER WARNING: PROPANE Extremely cold temperatures may cause your Trident™ burners to light inside the burners instead of outside. Once lit, if you hear a ‘whooshing’ sound, immediately turn the burner knobs off to extinguish the flame and then immediately re-light the burners. Right-Most Main Burner The right-most main burner does not feature a manual lighting tube.
BASIC GRILLING PRE-HEATING TYPES OF COOKING Pre-heating your grill every time you use it is extremely important. Pre-heating allows the briquettes to properly heat up, providing more even and more consistent cooking results. The main brass burners and the Trident™ burner in your grill are capable of creating a range of heat intensities.
USING THE TRIDENT™ BURNER Never place food over a Trident™ burner before it is fully pre-heated because food particles and grease dripping onto a cold Trident™ burner can clog the tiny ports and damage the burner. For the same reason you should minimize water spills on the Trident™ burner and should not use water to control flare-ups. Take special care to minimize dropping any liquids on the Trident™ burner while cleaning the cooking grids.
USING THE ROTISSERIE BURNER Rotisserie cooking provides an even delivery of heat to your foods. It has no equal. The constant rotation not only cooks foods evenly, it also self bastes. As juices rise to the surface of the food, they naturally flow around it as it rotates. And, by moving the burner out from beneath the food, you avoid scorching flare-ups. Your foods will be more evenly cooked, more tender and juicier when slow-roasted on a rotisserie.
USING THE ROTISSERIE BURNER ...continued Slide the pointed end of the skewer into the motor and rest the other end on the rollers on the other side of the grill. rotisserie lighting procedure. (See INDEX: “Rotisserie Burner, Lighting” for further details.) The notched portion of the skewer must rest on the rollers for proper operation. Once lit, the rotisserie burner should reach cooking temperatures in about 1 minute. It will glow evenly across its surface in about 5 minutes.
CLEANING YOUR GRILL STAINLESS STEEL Our products are known for their attractive appearance. We achieve this by selecting only the finest grades of stainless steel and applying exacting workmanship. In order to maintain this attractive appearance over the life of the grill it is important to take the following steps: • After each use wipe down the exterior of the grill to remove grease and splatters. • Be sure to follow the cleaning instructions for keeping the grates and burners clean and ready for use.
CLEANING YOUR GRILL ...continued To Remove Brass Burners: WARNING DO NOT ALLOW EXCESS GREASE OR LIQUIDS TO ACCUMULATE IN THE DRIP TRAY AS THIS MAY CREATE A FIRE HAZARD. NEVER USE GRILL WITHOUT DRIP TRAY PROPERLY INSTALLED. Remove the grill racks and briquette trays. Lift the burner up until the legs exit the frame. Then pull to the rear of the grill so the burner head comes off the brass orifice at the front. Angle the burner sideways and lift it out. Be careful not to change the air shutter position.
CLEANING YOUR GRILL ...continued TRIDENT™ BURNER It’s easy to keep your Trident™ burner operating at peak performance. Just run it on “HI” with the hood open for 5 minutes after each use to burn away any food particles or drippings. Any ash accumulation on the burner screen can be removed with a light brush or vacuum … BUT WAIT UNTIL THE BURNER IS COOL! Inside View, Orifice all the way into venturi Food debris on the inside of the burner can be gently shaken out. Do not touch the ceramic surface.
POTENTIAL PROBLEMS GRILL WON’T LIGHT First, confirm that the grill is getting electricity by turning on the lights, then: Check The Igniters Your grill uses an electric ignition system that does not spark. Instead, the igniters should glow constantly when a control knob is pushed in. • Ensure that all burner controls are set to OFF. If match lighting doesn’t work, re-check fuel connections for leaks and ensure the supply is of the correct type and is of adequate pressure.
POTENTIAL PROBLEMS ...continued REPLACE any damaged supply lines. • Check line pressure • Check the Regulator Natural gas inlet pressure should be at least 5” W.C. and manifold pressure not less than 4” W.C. under full load (with all burners on.) Make sure that the regulator & hose assembly is the one designed for and supplied with your grill and that it is correctly set up for the type of fuel you are using. (See INDEX: “Regulator Conversion” for further details.
POTENTIAL PROBLEMS ...continued BURNER GOES OUT • Location First determine if the problem is being caused by location. If the grill is subject to high winds, reposition it to provide some protection. • Check the Flame Check the gas supply and flame characteristics. (See INDEX: “Flame, Correct Size”) • Burners Seated Check to ensure that the burners are correctly positioned in the grill. (See INDEX: “Burner Placement” for further details.
CONTACTING CUSTOMER SERVICE Before calling Preferred Customer Service, please make sure you have the following information: • Model number • Date of purchase • Proof of purchase by the original owner Viking Range, LLC Preferred Customer Service 111 Front Street • Serial number Greenwood, Mississippi 38930 The serial number can be located on the rating plate which is located on the underside of the drip tray and on the heat shield behind the front panel.
VIKING RANGE, LLC LIMITED WARRANTY I. Limited Lifetime Warranty The stainless steel grill body, brass grill burners, cooking grates, TridentTM burner and rotisserie infrared burner are warranted to be free from defects in material and workmanship when subjected to normal domestic use and service for the lifetime of the original purchaser. This warranty excludes surface corrosion, scratches, and discoloration which may occur during normal use.
VIKING RANGE, LLC COMMON AREA LIMITED WARRANTY The Viking Range, LLC Limited Warranty covers residential installations only and is non-transferable to any other party. This ‘non-residential’ warranty applies when the product is installed in common areas where more than a single party has rightful access to its use or in locations considered beyond normal residential use such as B&B’s, and private clubs.
WIRING SCHEMATICS 30” ROTISSERIE GRILL CARE & USE/INSTALLATION | 37
WIRING SCHEMATICS 36” & 42” ROTISSERIE GRILL 38 | CARE & USE/INSTALLATION
WIRING SCHEMATICS 54” ROTISSERIE GRILL CARE & USE/INSTALLATION | 39
MODEL-SPECIFIC BTU OUTPUTS & MAX.
INDEX A Air Shutter Adjustment ................................................. 17 B Before Each Use............................................................ 18 Before You Start .............................................................. 7 BTU Outputs, Model Specific ....................................... 40 Burner Adjustment, Low................................................ 16 Burner Adjustment, Main.............................................. 16 Burner Appearance..............................
Viking Range, LLC 111 Front Street Greenwood, Mississippi 38930 (662)-455-1200 Service: (888) 845-4641 www.vikingrange.