
User Care Guide


14
|
SIDE BURNER ACCESSORY CARE & USE/INSTALLATION
TE
S
TING THE IN
S
TALLATI
O
N
Before turning the gas suppl
y
on, check for proper installation
using the
f
ollowing test
:
1
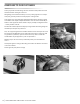
. Plug the transformer back into the receptacle
.
2
.
Push in the gas control knob on
y
our accessor
y
and watch
the igniter. It should glow bright and steady
.
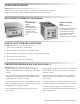
3.
T
urn on the light switch on the grill. Both the grill and the
grill accessory lights should operate together. This indicates
a proper assembly.
T
urn the gas on to all appliances.
4
. Perform a leak test if
y
ou have not done so since plumbing
the
u
nit
.
5.
Check all burners
f
or proper i
g
nition. Re
f
er to the Li
g
htin
g
Instr
u
cti
o
ns
fo
r Si
d
e B
u
rners
.
L
EAK TE
S
TING
Le
a
k Test Pr
o
ce
du
re
:
1.
Create a soap
y
solution of 1 part soap and 3 parts water.
2
.
Con rm that all control knobs are in the o position.
3.
T
urn on the fuel suppl
y
. For natural gas, turn the valve
handle 1/4 turn to ali
g
n with the
g
as ow.
4.
For LP, turn the c
y
linder valve knob counter clockwise one
full rotation.
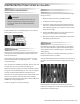
5.
Appl
y
the soap solution generousl
y
b
y
paint brush or squirt
bottle on all connections and ttin
g
s.
6. If bubbles appear to “grow” on an
y
of the connections,
y
ou
have a gas leak. IMMEDIATELY turn o the gas suppl
y
.
F
IXING A GA
S
LEAK
DANGER!
To prevent
re or explosion hazard, DO NOT smoke or
allow any potential source o
f
ignition (sparks, electrical
arcin
g
, etc) in the area while per
f
ormin
g
a leak test. Lea
k
tests should be conducted outdoors only. Never conduct
a leak test using
re or
ame
.
1
. Shut o the gas suppl
y
2. Turn a
ll
gri
ll
contro
l
s to t
h
e “ON” position to purge t
h
e gri
ll
of an
y
gas build-up, then turn the controls back “OFF”.
3
. Wash o the soapy solution with cold water and dry.
4. Tighten the loose joint, or replace the faulty part with
manufacturer-recommended replacement parts.
5. DO NOT attempt to repair the LP cylinder valve if it is dam-
aged. The only way to safely resolve a damaged cylinder is
t
o
REPLACE IT
.
6.
Repeat the leak test to ensure that no leaks are present
.