Installation GUIDE 5 SERIES Warming Drawer VWD527 VWD530 1
Table of Contents Important Safety Instructions __________________________________________________________________________ Dimensions _________________________________________________________________________________________ Specifications _______________________________________________________________________________________ Cutout Dimensions___________________________________________________________________________________ Electrical Requirements ____________________________________________________________
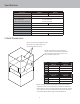
Dimensions VW D5 VW 2 D5 7 2230 3/4 25 -3/ ” (57 .8 c 4” ( m) 65 .4 c m) 10-1/4” (26.0 cm) VW D5 VW 2 D5 7 2630 1/2 29 -1/ ” (67. 3c 2” ( m) 74 .9 c m) ” 1/4 21- cm) 0 . (54 /4” 3 22 cm) .8 (57 ” 1/2 25- cm) 7 . (64 1-1/2” (3.8 cm) Side View 25-1/2” (64.8 cm) Rear View 2” (5.1 cm) 21-1/4” (54.0 cm) VWD527 24-3/4” (62.9 cm) VWD530 27-3/4” (70.5 cm) 9” (22.9 cm) 120 VAC Electrical Connection 2-1/2” (6.4 cm) 1-3/4” (4.
Specifications Description Overall width VWD527 VWD530 26-1/2” (67.3 cm) 29-1/2” (74.9 cm) Overall height 10-1/4” (26.0 cm) Overall depth To end of handle With drawer fully extended 25-1/2” (64.8 cm) 48-1/4” (122.6 cm) Interior width 19-1/8” (48.6 cm 22-1/8” (56.1 cm) Interior height 5-1/2” (14.0 cm) Interior depth 20-1/4” (51.4 cm) Electrical requirement 120V/15 amp power cord included with the unit Max Amp Usage 4.08 Amps Approx. shipping wt. 80 lb. (36 kg) 90 lb. (40.5 kg.
Electrical Requirments -Check your national and local codes regarding this unit. -Use 120V/15 amp power cord included with the unit. Electrical Connection WARNING ELECTRICAL SHOCK HAZARD This appliance is equipped with a 3-prong power cord with a grounding plug for your protection against shock hazard and should be plugged directly into a properly grounded receptacle. Do not cut or remove the grounding prong from this plug.
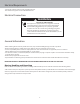
Installation 2 1 2 1 Pull out warming drawer pan until fully extended Slide finger along right and left side until you reach the hand latches (located approximately in the center of the rail). Pull up on on the left side latch and push down on the right side latch at the same time. Pull out the drawer pan. 4 3 x4 Attach cord to the back of the control panel and plug into receptacle in cutout. Slide warming drawer cavity into the cabinet opening.
Final Preparation All stainless steel body parts should be wiped with hot, soapy water and with a liquid cleaner designed for this material. If buildup occurs, DO NOT use steel wool, abrasive cloths, cleansers, or powders! If it is necessary to scrape stainless steel to remove encrusted materials, soak with hot, wet cloths to loosen the material, then use a wool or nylon scraper.
Viking Range, LLC 111 Front Street Greenwood, Mississippi 38930 USA (662) 455-1200 For product information, call 1-888-845-4641 or visit our website at vikingrange.