
Installation Guide

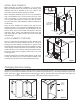


Hinge Adjustment
It usually is necessary to adjust your hinges once you have finished
the installation of your cabinets (Figure 6). You must do this before
installing any decorative hardware.
Drawer Adjustment
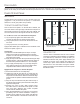
DRAWER GLIDES
To remove the drawer from the cabinet, extend the drawer to the
outer most location. Then reach underneath the drawer to the
attaching clips located at the front of the drawer box. Then squeeze
the clips pulling toward the sides which will release the glides from
the drawer box (Figure 7). The drawer will now be ready to be
removed. Lift the drawer away. To reinstall the drawer, make sure
glides are pushed in all the way into the cabinet. Set the drawer
back in the glide tracks and push the drawer all the way into the
cabinet. When the clips attach to the glide you will hear a click. The
glides will align automatically when the drawer is pushed back in.
DRAWER FRONT ALIGNMENT
If there is a need to adjust the drawer front, locate the drawer
clips attached to the underside of the drawer box, where it is
connected to the drawer glides. Slide the noted tab on the clip to
raise or lower as needed (Figure 7). Typically, only one side needs
to be adjusted and can be done by touch without removing the
drawer from the glides.
Standard Fillers/Decorative Fillers
Decorative Fillers: In contrast to standard fillers, which are
trimmed for a proper fit to complete a cabinet run, decorative
fillers require a 3 in. spacing between cabinets.
STANDARD CABINET INSTALLATION
a) Remove doors and drawers.
b) Using 3/16 in. drill bit, pre-drill holes through face frame,
minimum of 2 holes per side.
a. If you like, you can remove hinge plate(s) and drill holes
so that they will be covered by the hinge plate.
c) Clamp filler in place. To prevent possible wood splitting,
drill pilot hole with 1/8 in. drill bit into filler
d) Secure filler in place with #8 x 2½ in. countersunk screws
(Figure 8).
a. Reinstall the hinge plate to cover the countersunk screws.
Toe Kick Installation
Note: Flush-fit end panel(s) should be installed before attaching
the toe kick.
The toe kick should be attached once all of your cabinets have
been installed and secured to the wall. Cut the toe kick to your
exact dimensions. Use small finishing nails to attach the toe kick
to your cabinets. It is recommended that a bead of high quality
caulking material be used to seal the toe kick to the floor (Figure 9).
Loosen screw
for adjustment
of door up and
down
Loosen screw for
adjustment of door
left from right
Figure 6
Side panel
Face frame
Decorative filler
Figure 8
Figure 9
Finishing nail
Toe kick
Figure 7
Squeeze
to release
from glides
Slide Up
and Down