
Installation Guide


0 5
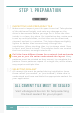
SOLID
BORDER
TILES
PATTERNED
BORDER
TILES
PATTERNED
FIELD TILES
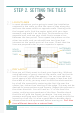
Step 2. setting the tiles
2.1
LAYOUT LINES
In most situations, you're going to want the installation
centered in the room, so that the rows of tiles along the
walls are the same width on opposite walls. Starting with
the longest walls, find the center point with your tape
measure, and mark it on the floor. Do the same on the
opposite wall, and use your chalk line to snape a line
between the two points. Then repeat the process on the
other two walls, and you should have two lines that
intersect at the center point of the room. Check that the
lines are perpendicular to your carpenter's square.
2.2
DRY LAYOUT
Now you will likely want to check your layout dry. Without
using adhesive or grout, start at the center, and lay the tile
out to the wall, using tiles spacers. You can now see how
much space is left at the wall. If the space is less than half
the width of a tile, you may want to shift the whole section
by a half tile, essentially centering the first tile over the
center line, rather than starting at the edge. This may not be
desired for some patterns and layouts. Repeat the process in
the other direction. You will have an "L" of tile from the
center, outlining one quadrant of the floor. Double-check
that this will give the layout you desire. You may want to
measure and snap new chalk lines, if you choose to shift the
layout by a half-tile. It's also a good idea to double-check
measurements and squareness before moving on. Pull tiles
from different boxes for a natural look.
© 2 0 0 8 - 2 0 2 1 , V I L L A L A G O O N T I L E . A L L R I G H T S R E S E R V E D .