Vincent Bedienungsanleitung deutsch Instructions for use english Manuel d‘utilisation français STU-3 RDS-Tuner RDS Tuner Tuner RDS
Sehr geehrter Kunde, wir danken Ihnen für das Vertrauen, welches Sie uns durch die Entscheidung für dieses hochwertige AudioProdukt, das Ihrem hohen Anspruch an Klang- und Verarbeitungsqualität gerecht wird, entgegenbringen. Auch wenn Sie verständlicherweise sofort beginnen wollen, das Gerät zu verwenden, lesen Sie bitte vor dem Aufstellen und Anschließen dieses Handbuch sorgfältig durch.
INHALTSVERZEICHNIS/CONTENTS/SOMMAIRE Sicherheitshinweise Weitere Hinweise Lieferumfang Beschreibung des Gerätes Fernbedienung Installation Bedienung des Gerätes Weitere Tipps Fehlersuche Technische Daten Lexikon/Wissenswertes 4 5 6 6 9 12 14 17 18 20 21 deutsch Safety guidelines Other instructions Included in delivery Description of the appliance Remote control Installation Operating the appliance Tips Search for errors Technical specifications Glossary 22 23 24 24 27 30 32 35 36 38 39 english Consignes
SICHERHEITSHINWEISE Dieses Gerät wurde unter strengen Qualitätskontrollen gefertigt. Es entspricht allen festgelegten internationalen Sicherheitsstandards. Trotzdem sollten folgende Hinweise vollständig gelesen und beachtet werden, um eine Gefährdung zu vermeiden: Das Gerät nicht öffnen! Gefahr des elektrischen Schocks! Es befinden sich keine vom Benutzer zu wartenden Teile im Gerät.
WEITERE HINWEISE Aufstellen des Gerätes Die Art der Aufstellung der Anlage hat klangliche Auswirkungen. Stellen Sie diese deshalb nur auf eine dafür geeignete, stabile Unterlage. Um das Klangpotential Ihres Systems optimal auszunutzen, empfehlen wir, die Geräte auf Vincent Racks zu platzieren und nicht aufeinander zu stellen.
LIEFERUMFANG Bitte prüfen Sie den Inhalt der Verpackung, diese sollte zusätzlich zum Gerät folgendes Zubehör enthalten: • 1 Netzkabel • 2 Cinchkabel für die Verbindung zum Verstärker • 1 Fernbedienung „TU-RC3” • 2 Batterien vom Typ AA (LR6) • 1 Drahtantenne • 1 Rahmenantenne für Mittelwelle • dieses Handbuch BESCHREIBUNG DES GERÄTES Obwohl die Entwicklung stetig in Richtung digitaler Tonformate und mehrkanaliger Audio-VideoSysteme geht, erfreuen sich hochwertige Stereoanlagen weiterhin großer Beliebtheit.
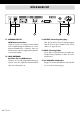
VORDERANSICHT 5 1 2 3 6 4 7 8 9 10 1. POWER: Netzschalter Schaltet das Gerät ein und aus, das Gerät ist im ausgeschalteten Zustand vom Netz getrennt. 6. Nummerntasten des Tuners Zahlenblock für die Eingabe von Senderfrequenz oder Stationsspeicher-Nummer. 2. RDS MODE Mit dieser Taste können die verschiedenen RDSDienste in der Anzeige dargestellt oder das RDSSystem abgeschaltet werden. 7. AM/FM Diese Taste schaltet zwischen Empfang von UKWSendern (FM) und Mittelwelle-Sendern (AM) um. 3.
RÜCKANSICHT 11 12 13 11. ANTENNA FM 75Ω: UKW-Antennenanschluss Schließen Sie hier ein koaxiales Antennenkabel für den UKW-Empfang des Radioteils an. Ist kein Antennen-Wandanschluss vorhanden, kann eine Zimmerantenne oder die mitgelieferte Drahtantenne verwendet werden. 12. LOOP ANTENNA: Anschluss für eine MW-Antenne Schließen Sie hier, falls Mittelwellenempfang gewünscht wird, die mitgelieferte Rahmenantenne oder eine Außenantenne an. 8 Vincent 14 15 13.
FERNBEDIENUNG Richten Sie die Fernbedienung mit deren Vorderseite direkt auf die Gerätefront, zwischen Fernbedienung und Gerät dürfen sich keine Gegenstände befinden. Achten Sie darauf, dass Sie die Fernbedienung nicht schräg auf das Gerät richten, außerhalb eines Winkels von ±30° zur Mittelachse reagiert das Gerät eventuell schlechter auf Bedienversuche.
TASTEN DER FERNBEDIENUNG 16 21 17 18 23 19 22 20 25 10 Vincent 24
TASTEN DER FERNBEDIENUNG 16. DIMMER: Helligkeitseinstellung der Anzeige Schaltet die Anzeige dunkler oder ab. 21. Nummerntasten Zahlentasten 0-9 für direkte Frequenzeingabe oder Auswahl des Senderspeicherplatzes. 17. DIRECT Nach Betätigung dieses Knopfes kann im Radiobetrieb unter Verwendung der Zahlentasten (6) (21) eine bekannte Senderfrequenz direkt eingegeben werden, welche der Tuner danach einstellt. 22. MEMORY Mit dieser Taste und den Zahlentasten können die Stationsspeicher belegt werden. 18.
INSTALLATION Stellen Sie die Kabelverbindung in der nachfolgend genannten Reihenfolge her. Bringen Sie erst zuletzt das Netzkabel an und verbinden es mit der Steckdose. ZUR BESONDEREN BEACHTUNG Entfernen der Schutzkappen Vor der ersten Installation müssen von allen verwendeten Anschlüssen an der Geräterückseite die Kunststoff-Schutzkappen entfernt werden. 1 Kabel und Steckverbindungen Achten Sie darauf, dass alle Steckverbindungen fest sitzen.
ANSCHLUSS DER ANTENNE Ist eine Wanddose für den UKW-Antennenanschluss von Satellitenempfang, Kabelempfang oder Dachantenne vorhanden, verbinden Sie deren Radio-Anschluss mit der Eingangsbuchse „FM 75Ω“ (11) am Gerät. Benutzen Sie dafür ein 75Ω Antennenkabel. Ist eine solche Anschlussdose nicht vorhanden, kann die mitgelieferte Drahtantenne oder eine im Fachhandel erhältliche Zimmerantenne angeschlossen werden.
BEDIENUNG DES GERÄTES Aktion Ein- und Ausschalten Wahl des Frequenzbandes Umschaltung stereo/mono Auswahl einer Senderfrequenz im manuellen Suchlauf Auswahl einer Senderfrequenz im automatischen Suchlauf 14 Vincent Taste(n) Beschreibung POWER (1) Das Gerät wird an der Gerätevorderseite ein- und ausgeschaltet. Ist der Schalter in der Ausschaltposition, ist das Gerät vom Stromnetz getrennt. Das Gerät besitzt keine Funktion der Betriebsbereitschaft (Standby).
BEDIENUNG DES GERÄTES Aktion Auswahl eines Radiosenders durch numerische Eingabe seiner Senderfrequenz Taste(n) Beschreibung Um eine bekannte Senderfrequenz direkt einzugeben, können Sie folgendermaßen vorgehen (die Tasten finden sich sowohl am Gerät als auch auf der Fernbedienung): Drücken Sie die Taste „DIRECT”. Der Receiver erwartet in den folgenden Sekunden eine Eingabe unter Verwendung der Zahlentasten.
BEDIENUNG DES GERÄTES Aktion Taste(n) Beschreibung RDS (Radio Data System) ermöglicht es, von UKW-Sendern übertragene Textinformationen anzuzeigen. Allerdings bindet nicht jeder Sender RDS in sein Sendesignal ein. Bietet der Sender diesen Dienst an, erscheint die Abkürzung „RDS“ im Display.
WEITERE TIPPS Einspielzeit / Aufwärmen Ihre Audio-Geräte benötigen eine gewisse Zeit bis sie ihre klangliche Höchstleistung erreichen. Dieser Zeitraum ist für die verschiedenen Komponenten Ihres Systems sehr unterschiedlich. Bessere und gleichförmigere Leistung erhalten Sie während der Zeit, die das Gerät eingeschaltet bleibt.
FEHLERSUCHE Symptom Mögliche Fehlerursache Abhilfe Keine Funktion nach Betätigung des Netzschalters Netzkabel nicht an eine betriebsbereite Steckdose angeschlossen. Stellen Sie eine Verbindung zu einer funktionierenden Steckdose mit der geeigneten Netzspannung her. Netzkabel nicht fest in die Steckdose und die Gerätebuchse gesteckt oder defekt.
FEHLERSUCHE Symptom Mögliche Fehlerursache Abhilfe Kein RDS Es wurde ein AM-Sender (Mittelwelle) ausgewählt, nur einige FM-Sender (UKW) unterstützen RDS. Verzichten Sie auf diesen Dienst oder stellen Sie einen FM-Sender (UKW) ein. Der Sender unterstützt kein RDS. Verzichten Sie auf diesen Dienst oder stellen Sie einen anderen FM-Sender (UKW) ein. RDS-Funktion abgeschaltet. Schalten Sie die Funktion mit der Taste „RDS MODE“ (2)(25) ein.
TECHNISCHE DATEN 20 Allgemein Ausgänge: Netzanschluss: Maße (BxHxT): Gewicht: Farbe: 1x Stereo Cinch analog 230 V / 50 Hz Wechselspannung 430 x 72 x 330 mm 5,2 kg schwarz/silber UKW-Tuner Empfangsbereich: Empfindlichkeit: Frequenzgang: Kanaltrennung: Klirrfaktor (1 kHz): Signal Rauschabstand: Antenneneingang: 87 MHz – 108 MHz (50 kHz Schritte) 5 dBµ mono 30 Hz - 15 kHz, +1 dB/-1,5 dB >40 dB mono: 0,4%, stereo: 0,5% mono: 72 dB, stereo: 70 dB 75Ω AM-Tuner Empfangsbereich: Empfindlichkeit: Klirrfaktor (
LEXIKON/WISSENSWERTES Audio-Quellen/Audio-Quellgeräte Komponenten Ihrer HiFi-Anlage und alle weiteren Geräte, deren Ton Sie über das System hören möchten und dazu an den Vor-, Vollverstärker oder Receiver anschließen. Dazu gehören CD-Player, DVD-Player, Tuner (Radios), Kassettenspieler, DATRecorder, Personalcomputer, Schallplattenspieler, portable Audiogeräte und viele weitere.
SAFETY GUIDELINES This appliance was produced under strict quality controls. It complies with all established international safety standards. Nonetheless, the following instructions should be fully read and observed in order to prevent any hazard: Do not open the appliance! Risk of electric shock! There are no parts in the appliance that require maintenance by the user.
OTHER INSTRUCTIONS Setting up the appliance How the system is set up has an effect on the sound quality. Therefore only place it on a suitable, stable surface. To make the most of your system’s sound quality, we recommend placing the equipment on Vincent racks and not putting them on top of each other. Old electronic equipment This appliance is subject to the conditions set out in the European Directive 2002/96/EC. This is identified by the symbol of a crossed out waste bin on the appliance.
INCLUDED IN DELIVERY Please check the contents of the packaging, which in addition to the appliance should contain the following accessories: • 1 power cable • 1 stereo set of RCA cables to connect the main amplifier • 1 remote control “TU-RC3” • 2 battery cells size AA (LR6) • 1 loop antenna • 1 FM (VHF) wire antenna • this manual DESCRIPTION OF THE APPLIANCE Despite the fact that development is constantly moving in the direction of digital audio format and towards audio video systems with an increasing n
FRONT VIEW 5 1 2 3 6 4 1. POWER This is the main power switch for turning on and off the device. The tuner is separated from the mains voltage when switched off and cannot be set into a standby state. 2. RDS MODE With this button the various RDS services can be displayed on the front panel or the RDS system can be switched off. 3.
REAR VIEW 13 14 16 11. 75Ω FM ANTENNA: VHF antenna socket Connect a coaxial antenna cable here for FM radio reception. If there is no antenna wall socket a room antenna or the wire antenna supplied can be used. 12. LOOP ANTENNA: Socket for the AM antenna Connect the loop antenna supplied or an outdoor antenna here if you require medium wave reception. 13. OUTPUT: Stereo Audio Output Via this high-level output, the tuner is connected to an amplifier, preamplifier etc.. 26 Vincent 17 18 14.
REMOTE CONTROL Point the front of the remote control directly at the front of the appliance, making sure there are no objects between the remote control and the appliance. Make sure that you do not point the remote control at an angle to the appliance, as beyond an angle of ±30° to the centre axis the appliance may not respond as well to the remote control.
BUTTONS OF THE REMOTE CONTROL 16 21 17 18 23 19 22 20 25 28 Vincent 24
BUTTONS OF THE REMOTE CONTROL 16. DIMMER: brightness setting of the display Use this button to lower the brightness of the display (5) or switch off the display. 21. Number keys Buttons 0-9 let you input the frequency or select a station from the memory. 17. DIRECT Once this knob is pressed, a known radio station frequency can be input directly using the numerical keys (6)(21) when in radio mode. 22. MEMORY This button enables the presets in the memory to be stored in tuner mode. 18.
INSTALLATION Set up the cable links in a sequence as follows. Connect the power cable between device and power supply only after all other connections have been made. DURING INSTALLATION PLEASE OBSERVE THE FOLLOWING ADVICE: Protective caps Prior to the first installation the protective plastic caps must be removed from all the connections used at the rear of the unit. 1 Cable connections Make sure that all plugs fit tightly. Inadequate connections can cause noise interference, failures and malfunctions.
CONNECTING THE ANTENNA If a wall socket is available for the VHF antenna connection of satellite, cable or a roof aerial, connect its radio socket with the input socket “FM 75Ω” (11) on the appliance. Use a 75Ω antenna cable for this purpose. If such a socket is not present, the wire antenna supplied or a room antenna available from a local stockist can be connected. If you wish to receive medium wave stations (AM), connect the loop antenna supplied to the terminal marked “LOOP ANTENNA” (12).
OPERATING THE APPLIANCE Operation Button(s) Description Switch on and off POWER (1) The appliance does not have a standby switch, it is switched on and off at the front. When switched off it is disconnected from the power supply. Before switching on, the volume setting on the amplifier/preamplifier/receiver should, as a precaution, be reduced. Select the frequency band AM/FM (7)(19) This button is found on both the remote control and the front of the appliance.
OPERATING THE APPLIANCE Operation Button(s) DIRECT Select a radio station by (10)(17) inputting its radio frequency numerically Number keys (6)(21) Description To input a known station frequency directly, you can proceed as follows: Press the “DIRECT” button. The tuner waits for an entry using the numerical keys in the next few seconds. In FM mode, 4 or 5 numbers need to be entered, two of which come after the decimal point of the frequency in MHz.
OPERATING THE APPLIANCE Operation Button(s) Description RDS (Radio Data System) enables text information transmitted from VHF stations to be displayed. However, not every station includes RDS in its transmission signal. By pressing (maybe repeatedly) the “RDS” button, you can switch the service on and off as well as select the different types of text information.
TIPS Burn in/ Warm up Your audio components need a certain time period until they reach maximum performance. The duration of this “warm up“ time is very different for the various elements of your audio system. Higher and homogeneous sound quality is achieved while keeping the device switched on. Your audio specialist dealer has enough experience to give you more information.
SEARCH FOR ERRORS Symptom Possible Cause Countermeasure Unit does not work after pressing the power button Mains cable is not connected to a suitable mains wall outlet. Connect to a functioning socket using a suitable mains voltage. Mains cable has not been firmly inserted into wall power socket and the device’s socket. Otherwise it may be defective. Check the power cable. If necessary, exchange it with a suitable mains cable and push its plug firmly into wall socket and the device's power connector.
SEARCH FOR ERRORS Symptom Possible Cause Countermeasure No RDS An AM station has been selected, only FM stations support RDS. Live without this service or tune to another FM station. The FM station does not support RDS. Live without this service or tune to another FM station. RDS function is switched off. Switch on the function with the button “RDS MODE” (2)(25). Poor sound quality The cable connections are not tight, the connectors are dirty or a cable is defective.
TECHNICAL SPECIFICATIONS 38 General Specifications Outputs: AC power connection type: Dimensions (W x H x D): Weight: Colour: 1x stereo RCA analog 230 V / 50 Hz AC 430 x 72 x 330 mm 5,2 kg black/silver FM Tuner Frequency range: Sensitivity: Frequency Response: Channel Separation: Total Harmonic Distortion (1 kHz): Signal to noise ratio: Antenna input: 87 MHz – 108 MHz (50 kHz steps) 5 dBµ mono 30 Hz - 15 kHz, +1 dB/-1,5 dB > 40 dB mono: 0,4%, stereo: 0,5% mono: 72 dB, stereo: 70 dB 75 Ω AM Tuner Frequ
GLOSSARY Audio Sources/Source devices These are the components of your HiFi system and all other appliances, whose sound you want to hear over the system and are thus connected to the preamplifier, amplifier or receiver. This includes CD players, DVD players, FM tuners, cassette players, DAT recorders, personal computers, record players, portable audio devices and many more.
CONSIGNES DE SECURITE La construction de cet appareil a été soumise à des contrôles de qualité très stricts. Il répond à toutes les normes internationales de sécurité. Il est cependant nécessaire de lire entièrement les consignes suivantes et de les appliquer pour éviter tout danger : Ne pas ouvrir l'appareil! Danger de décharge électrique! Aucune pièce à entretenir par l'utilisateur ne se trouve dans l'appareil.
AUTRES CONSIGNES Montage de l'appareil Le site de montage de l'appareil a une incidence sur le son. Posez l'appareil uniquement sur une surface appropriée et stable. Pour profiter pleinement du potentiel sonore de votre système, nous vous recommandons de placer les appareils sur des racks Vincent et de ne pas les poser l'un sur l'autre. Appareils électroniques usagés Cet appareil est soumis aux dispositions fixées dans la directive européenne 2002/96/ CE.
CONTENU DE LA LIVRAISON Veuillez contrôler le contenu de l'emballage.
FACADE AVANT 5 1 2 3 6 4 1. POWER : Interrupteur secteur Met l’appareil en MARCHE ou à l’ARRET, à l’ARRET, l’appareil est coupé de l’alimentation secteur. 2. RDS MODE Avec cette touche les différents services RDS peuvent être affichés sur l’écran ou le système RDS peut être coupé. 3. TUNING MODE Avec ces touches, validez la fonctionnalité des touches « TUNING PRESET » : soit en recherche manuelle, soit en recherche automatique ou en basculant entre les stations sauvegardées. 7 5.
FACADE ARRIERE 13 14 16 11. ANTENNA FM 75Ω : Branchement de l'antenne FM Branchement du câble coaxial d'antenne pour réception radio FM. S'il n'existe pas de possibilité de branchement mural d'antenne, on peut utiliser une antenne intérieure ou l'antenne-fil fournie. 12. LOOP ANTENNA : Branchement de l'antenne-cadre Branchement de l'antenne-cadre fournie ou d'une antenne externe pour la réception des ondes moyennes. 44 Vincent 17 18 13.
TELECOMMANDE Orientez la partie avant de la télécommande directement vers la face de l'appareil. Aucun obstacle ne doit se trouver entre la télécommande et l'appareil. La distance entre la télécommande et l'appareil ne doit pas être supérieure à 7m, car la fiabilité de la télécommande diminue au-delà de cette portée.
TOUCHES DE LA TELECOMMANDE 16 21 17 18 23 19 22 20 25 46 Vincent 24
TOUCHES DE LA TELECOMMANDE 16. DIMMER: réglage de la luminosité de l’écran Diminue la luminosité ou bien éteint l’écran. 17. DIRECT Après actionnement de ce bouton, possibilité d'entrée directement la fréquence d'un émetteur connu en mode radio par le biais des touches numériques (6)(21). 21. Touches numériques de commande du tuner Touches numériques 0-9 pour l'entrée directe de la fréquence Radio ou la sélection de la position de la mémoire de l'émetteur. 22.
INSTALLATION Réalisez d’abord le raccordement des câbles pour la sortie du signal du lecteur. Raccordez alors seulement le cordon secteur et reliez-le à la prise secteur. VEUILLEZ TENIR COMPTE DES INSTRUCTIONS SUIVANTES LORS DE L’INSTALLATION : Dépose du capot de protection Avant la première installation, retirez les capuchons de protection des connecteurs à utiliser, situés sur la façade arrière de l’appareil. 1 2 Câbles et fiches de raccordements Veillez à ce que les jonctions soient bien fixées.
BRANCHEMENT DE L'ANTENNE Si une prise murale pour branchement d'antenne FM par réception satellite, câble ou antenne extérieure existe, reliez leur connexion radio au jack d'entrée « FM 75Ω » (11) de l'appareil. Pour cela, utilisez un câble d'antenne 75Ω. Si une telle prise n'existe pas, il est possible d'utiliser l'antenne-fil fournie ou une antenne intérieure disponible dans les magasins spécialisés.
UTILISATION DE L’APPAREIL Action Touche(s) Description Mise en marche et arrêt POWER (1) L’appareil n‘a pas de mise en veille, il est mis en marche et arrêté par le commutateur en façade avant. En position arrêt, il n‘est plus sous tension. Avant de mettre l’appareil en marche, prenez la précaution de réduire le réglage du volume sonore de l’amplificateur. AM/FM (7)(19) Ce bouton se trouve sur la télécommande comme sur la face de l'appareil.
UTILISATION DE L’APPAREIL Action Sélection d'un émetteur radio par entrée numérique de la fréquence Touche(s) DIRECT (10)(17) Touches numériques (6)(21) TUNING MODE (3)(20) Changement d'un émetteur enregistré (Preset) Touches numériques (6)(21) TUNING PRESET UP/DOWN (9)(24) MEMORY (8)(22) Enregistrement des émetteurs (Presets) Commutation du volume sur « muet » pendant la recherche des fréquences Touches numériques (6)(21) AUTO MUTE (18) Description Procédez comme suit pour enregistrer directement
UTILISATION DE L’APPAREIL Action Touche(s) Description RDS permet d'afficher des informations de texte transmises par les émetteurs FM. Chaque émetteur RDS n'en joint pas à son signal d'émission.
CONSEILS Temps de rodage / échauffement Vos appareils audio demandent un certain temps pour atteindre leurs performances maximales. Ce laps de temps est très différent pour les différents composants de votre système. Vous obtiendrez un son de meilleure qualité et plus homogène en laissant l’appareil sous tension. Profitez de l’expérience de votre revendeur! Une autre cause possible du ronflement est une interférence électromagnétique entre l’alimentation d’autres appareils (p. ex.
RESOLUTION DE PROBLEMES Symptôme Cause possible du défaut Remède Pas de fonctionnement après mise en marche du commutateur secteur Le cordon secteur n’est pas relié à une prise opérationnelle. Réalisez une liaison à une prise opérationnelle avec la tension appropriée. Le cordon secteur est défectueux ou il n’est pas entièrement enfoncé dans la prise secteur ou celle de l’appareil.
RESOLUTION DE PROBLEMES Symptôme Cause possible du défaut Remède Aucun RDS Un émetteur AM (ondes moyennes) a été sélectionné, seuls quelques émetteurs FM assistent le RDS. Renoncez à ce service ou réglez un émetteur FM. L'émetteur FM n'assiste pas le RDS. Renoncez à ce service ou réglez un autre émetteur FM. La fonction RDS est désactivée. Activez la fonction RDS avec la touche « RDS MODE » (2)(25).
CARACTERISTIQUES TECHNIQUES 56 Généralités Sorties : Alimentation : Dimensions (L x H x P) : Poids : Variante de couleur : 1x stéréo RCA analog 230 V / 50 Hz AC 430 x 72 x 330 mm 5,2 kg noir/argent Tuner FM Plage de réception : Sensibilité: Plage de transmission : Séparation des canaux stéréo : Facteur de distorsion : Rapport signal/bruit : Entrée antenne : 87 MHz – 108 MHz (Pas de 50 kHz) 5 dBµ mono 30 Hz - 15 kHz, +1 dB/-1,5 dB > 40 dB mono: 0,4%, stéréo: 0,5% mono: 72 dB, stéréo: 70 dB 75 Ω Tuner A
GLOSSAIRE Sources audio/lecteurs sources Composants de votre chaîne hi-fi et tous les autres appareils dont vous voulez écouter le son via le système en les branchant au préamplificateur ou à l’amplificateur intégré. Cela comprend les lecteurs de CD, les lecteurs de DVD, les tuners (radios), les lecteurs de cassettes, les enregistreurs DAT, les ordinateurs personnels, les platines tourne-disque, les lecteurs audio portables et bien d’autres.
NOTIZEN / NOTES 58 Vincent
NOTIZEN / NOTES Vincent 59
Vincent Bewahren Sie die Kaufquittung zusammen mit der Bedienungsanleitung auf. Die Kaufquittung dient Ihnen als Nachweis für den Beginn der Garantiezeit. Die Seriennummer befindet sich an der Rückseite des Gerätes. Please keep the receipt, store it together with this manual. The receipt is your proof for the beginning of the warranty period. Note the serial number in the following box, you can read it from the rear side of the device. Gardez soigneusement la facture d'achat et le mode d'emploi.