WINEMATE Split System Installation, Operation & Care Manual WM 2500SSH, 4500SSH WM 6500SSH, 8500SSH Vinotemp International Corp. www.vinotemp.
TABLE OF CONTENTS Important Safety Information…..........................................2 Feature Description…………………………….……………..3 Installation Instruction………………………………………..5 Use and Temperature Control……………………………….9 Care Guide……………………………………………………11 Troubleshooting……………………………………………..12 Customer Support……………………………………………14 Warranty……………………………………………………….
Important Safety Information • • DO NOT USE A GROUND FAULT INTERRUPTER (GFI). A DEDICATED 20 AMPCIRCUIT IS HIGHLY RECOMMENDED.
Feature Description • • • • • WineMate cooling unit is designed and used to provide a stable temperature between 52~62 °F for suitable space at a normal environment. The refrigerated space will maintain humidity of 50~70% RH even when the environment becomes dry and humid. These temperatures and humilities are optimized for long term storage of wine, fur and tobacco. SSH units are designed to provide chilled air to wine rooms and can be located up to 25 ft away to reduce noise.
Evaporator Unit Condensing Unit -4-
Installation Instruction Federal law requires that WINEMATE split cooling systems be installed by an EPA certified refrigeration technician. 1. Location • • • • • Place the condensing unit in a properly ventilated location. If it is not, heat exhausted by the condensing unit will build up and the cooling system will not operate properly. Leave minimum 3 feet clearance between the exhaust side and the wall. Leave minimum 1 foot clearance for the fresh air supply side.
Installation of the system must be done in accordance with all state and local building codes. The condensing unit and unit cooler are connected by a liquid line and an insulated suction line that are supplied by the installer. These lines must be properly sized for the distance between the two units. After the units and the lines are installed, the system must be pressure tested. If no leaks are found, evacuate and charge system with R134A. Refrigerant amount will vary depending on the length of line set.
• • • • If the air sensor can not reach the wine room because of the distance between the cooling unit and wine room, you need to remount the electrical box. Remove the 3 black, white and green wires that come from the cooling unit in the electrical terminal Remove the electrical box and mount it close to the wine room so the air sensor can reach the wine room Use extra wires to connect the terminal in the electrical box and the 3 white, black and green wires from the cooling unit.
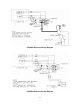
6500SSH Electrical Wiring Diagram 8500SSH Electrical Wiring Diagram -8-
Use & Temperature Control 1. Temperature Setting • • • Set the temperature at 55 °F for the optimum aging of wine On initial start-up, the time required to reach the desired temperature will vary, depending on the quantity of bottles, temperature setting and surrounding temperature. Allow 24 hours to stabilize the temperature for each new temperature setting operation 2.
1) Set Point Rotate the circular selector in correspondence with the arrow placed nearby. The selector represents -33°F to 50°F (-35°C to +10°C) for low temperature models, and 14°F to 68°F (-10°C to +20°C) for medium temperature models. “10” is the coldest setting, “1” is the warmest. 2) Differential It is possible to modify the differential from 1°F minimum to 12.5°F maximum. Simply shift the first two dip-switches to the ON or OFF position according to the wanted value.
Care Guide In general, always unplug system or disconnect power while doing care. 1. Coil Cleaning • • • • Clean the condenser coil regularly. Coil may need to be cleaned at least every 6 months. Unplug the system or disconnect power. Use a vacuum cleaner with an extended attachment to clean the coil when it is dusty or dirty. Plug cooling system or reconnect power. 2. Moisture Removing • Remove the extra condensate if it is accumulated in the wine cellar at high ambient temperature and humidity.
Troubleshooting This Troubleshooting Chart is not prepared to replace the training required for a professional refrigeration service person, not is it comprehensive Complaint 1. Unit not running a. b. c. d. e. f. g. Troubleshooting Chart Possible Causes Power cord unplugged No power to unit Temperature setting high Low voltage. Incorrect or loose wirings. Defrost light blinking Running light blinking a. b. c. d. e. f. g.
g. Low voltage h. Operating 60 Hz unit at 50Hz i. Sealed system problem j. Undercharge or overcharge g. Check power supply h. Use proper 60 Hz i. Call service for checking loss of refrigerant or restrictions j. Call service to add or remove refrigerant 7. House circuit tripping a. Incorrect fuse or breaker b. Incorrect wirings c. Failed components a. Check for proper fuse or breaker b. Check for wirings and connections c. Call service 8. Noisy operation a. Mounting area not firm b. Loose parts c.
Customer Support If you still have problems, please contact us at: Vinotemp International 17631 South Susana Road Rancho Dominguez, CA 90221 Tel: (310) 886-3332 Fax: (310) 886-3310 Email: info@vinotemp.
Warranty Thank you for choosing a Vinotemp wine cellar. Please enter the complete model and serial numbers in the space provided: Model_________________________________________________________ Serial No.______________________________________________________ Attach your purchase receipt to this owner’s manual. 1. Limited Warranty VINOTEMP warrants its products, parts only, to be free from defects due to workmanship or materials under normal use and service for twelve months after the initial sale.
VINOTEMP will, at its discretion, repair or replace the unit and return it free of charge to the original retail customer. If the unit is found to be in good working order, or beyond the initial twelve month period, it will be returned freight collect. 2. Limitation of Implied Warranty VINOTEMP’S SOLE LIABILITY FOR ANY DEFECTIVE PRODUCT IS LIMITED TO, AT OUR OPTION, REPAIRING OR REPLACING OF UNIT.