
Manual


1
0
10
W W W . V I N O T E M P . C O M
INSTALLATION
Remove all packing material before using your appliance.
IMPORTANT: Before connecting the unit to a power source, let it stand upright for
approximately 24 hours. This will reduce the possibility of a malfunction in the cooling
system from handling during transportation.
Clean the interior surface with lukewarm water and a soft cloth.
This unit is designed for freestanding or built in installation and indoor or outdoor use.
Position the unit in a dry and well-ventilated place. Avoid placing the unit near any source
of heat or moisture, or in direct sunlight. Do NOT install the unit in a location with an
ambient temperature that will fall below 44°F.
For freestanding installation, 5 inches of space between the back and sides of the unit are
suggested, which allows the proper air circulation to cool the compressor and condenser for
energy saving. Even for built-in installation, it is a must to keep ¼” space on each side and
at the top to ensure proper service access and ventilation. And the air vent at the front of
the appliance must never be covered or blocked in any way.
Place the unit on a level surface strong enough to support it when it is fully loaded. To
level the appliance, adjust the front leveling legs at the bottom of the appliance.
For best performance it is recommended that you install the appliance in a location with
an ambient temperature between 44°-106°F. If the ambient temperature is above or
below recommended temperatures, the performance of the unit may be affected.
REVERSING THE DOOR SWING OF YOUR APPLIANCE
This unit has the capability of the door opening from either the left or right side. The unit is
delivered to you with the door opening from the left side. Should you desire to reverse the
opening direction, please follow the reversal instructions shown below.
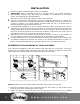
NOTE: All parts removed must be saved to allow the door swing to be reversed.
1. Remove the bottom hinge (2) by unscrewing the four lock screws (1). Be careful to hold
the door firmly after removing the screws. (Fig. 1)
2. Gently pull down to remove the door from the right top hinge and place it on a padded
surface to avoid the risk of damage. Then remove the right top hinge (7). (Fig. 2 & 3)