VPMAXX Manual Installation, Operation, Maintenance Instructions & Parts List For Outdoor Use Only
Table of Contents Safety Burners Warranty Safety Instructions 0 Assembly 0 Battery Installation 0 Additional Safety Practices & Precautions 0 Conversion Kit 0 Liquid Propane Gas Connection 0 Natural Gas Connection 0 To Light 0 Match Lighting 0 Warranty Registration 0 Warranty Information 0 Appliance Cutout Dimensions 0 Wiring Diagram 0 Message to the Proud Owner........ Congratulations on the purchase of your high quality, high performance grill.
Safety Instructions WARNING! Read this manual carefully and completely before using your Power Maxx burner to reduce risk of fire, burn hazard or other injury. Make sure all installation and service guidelines are followed. Do not store or use gasoline or other flammable liquids or vapors near this or any other appliance. Do not store unconnected LP cylinders in the vicinity of this or any other appliance. FOR OUTDOOR USE ONLY! If stored indoors, detach and leave any fuel cylinders outdoors.
Additional Safety Practices & Precautions Have an ABC Fire Extinguisher readily accessible. Never attempt to extinguish a grease fire with water or other liquids. Keep electrical supply cords and fuel supply hoses away from heated surfaces. Do not heat unopened food containers as they may explode. Never store additional or empty fuel cylinders in the side burner cabinet or near the side burner. Do not store cylinders indoors or on their sides. Never use dented, rusty or damaged cylinders.
Safety Practices & Precautions continued: Gas Power Maxx burner are not designed/certified for and are therefore not to be installed in or on recreational vehicles, portable trailers, boats or any other mobile vehicle. Children should never be left alone or unattended in an area where a Power Maxx burner is located. Install your side burner well away from areas where children play. Do not store items that may draw the interest of children in or around the side burner, island or masonry enclosure.
Burners To light: Remove Power Maxx burner cover. Turn on gas supply to the Power Maxx burner. Turn burner knob to “High” then push and hold the ignition button for 5 seconds. You should hear a rhythmic “clicking” sound. If you do not, turn all knobs to “Off”, check ignition battery and ensure the burner base and burner cap are properly positioned. If burner does not light after 5 seconds, turn knobs to off and wait 5 minutes before retrying.
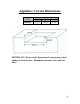
Appliance Cut-out Dimensions POWER MAXX VPMAXX24 W Cutout Dimensions D H 21 1/2" 22 1/2" 10 1/4" IMPORTANT: Please verify dimensions by measuring actual appliance from the box.
Wiring Diagram 8
VPMAXX24 - Parts Breakdown 2 1 3 4 5 6 11 10 9 8 7 43 12 42 44 13 38 37 45 14 41 40 39 46 36 15 35 34 33 32 16 29 26 17 30 27 28 31 18 25 23 19 24 22 20 21 9
S/N Part # Components 1 2 3 4 5 6 VPMAXX24-01 VPMAXX24-02 VPMAXX24-03 VPMAXX24-04 VPMAXX24-05 VPMAXX24-06 7 Qty Handle Hood plate Rubber block Inside grate Outside grate Body assembly LP 1 1 8 1 1 1 NG 1 1 8 1 1 1 VPMAXX24-07 Basin frame rear joint board 1 1 8 VPMAXX24-08 Fixing channel steel 1 1 9 VPMAXX24-09 Basin frame mid connection board 1 1 10 11 VPMAXX24-10 VPMAXX24-11 Drip tray guide Basin frame left side panel 2 1 2 1 12 VPMAXX24-12 Basin frame right side panel 1 1
VINTAGE GAS GRILL - OUTDOOR APPLIANCE WARRANTY (RESIDENTIAL USE ONLY) LIMITED TWO-YEAR WARRANTY Outdoor Gas Grills and all their component parts, except as detailed below “**” are warranted to be free from defective materials or workmanship when subjected to normal domestic use for a period of twenty-four (24) months from the date of original retail purchase. Vintage agrees to repair or replace, at its option, any part which fails or is found to be defective during the warranty period.