
Installation Guide

Stemware Rack (WS-SR) Installaon Instrucons
Wine Master Cellars, LLLP • 10645 E 47th Ave, Denver, CO 80239 • phone: 866.650.1500 • fax: 866.650.1501 • vintageview.com
Required tools: •Phillips Head Screw Driver •Level •Pencil •Tape Measure •Drill •1/2 inch (12.7mm) & 3/32 inch (2.4mm) drill bits
Included Parts: •1 Stemware Rack •1 Plastic Coupler •4 Screws •2 Spiral Drywall Anchors •2 Toggle Bolts •4 Mounting Hole Caps
Fasteners:
There are four pre-drilled mounting holes in each rack. Appropriate fasteners for your wall surface must be utilized in
every mounting hole for proper installation. Fasteners for drywall or wood wall surfaces are included with your rack. We
recommend the following fasteners for these surfaces:
• Attaching to drywall, use 2 of the included Spiral Drywall Anchors and 2 Screws along with 2 Toggle Bolts
• Wood wall surfaces at least 1/2 inch (19mm) thick can use the 4 included Screws
• Concrete, Brick or Stucco: 3/16” x 1 ¼” masonry screw or #8 x 1 ¼” screw with appropriate size expanding
concrete anchor
• VintageView® Floor to Ceiling Frame (FCF-HD): Each FCF-HD comes with self-drilling screws to attach WS series
racks to the frames
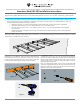
1. Mark the mounting hole locations - Position the rack on the
wall where it is to be installed. Make sure there is adequate space
underneath the rack for your stemware to hang. Use a level to
ensure the rack is perfectly horizontal. Using a pencil, mark all 4
mounting hole locations (Figure A) and set the rack aside.
Before you begin: Ensure that the area you plan to install the racks in has enough clearance below the unit to hang your stemware.
When plans call for installing multiple WS-SR next to one another, we recommend removing the end caps from the sides to be coupled
together prior to installing for ease of access.
Figure A
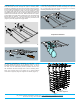
2. Install the anchors - For the bottom row of holes, simply use
a Phillips head screw driver to screw the Spiral Drywall Anchors
into the wall at the marked hole locations until the head of the
anchor is ush with the wall surface (Figure B). For the top row of
mounting holes, drill a 1/2 inch (12.7mm) hole (Figure C) for use
with the supplied toggle bolts.
Note: If a marked hole location is over a stud, the Spiral Drywall
Anchors or Toggle Bolts should not be used. Drill a pilot hole in the
stud with a 3/32 inch (2.4mm) drill bit and use the extra Screws
supplied to fasten directly into the stud.
Figure B
Figure C