
Installation Guide
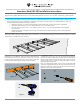

3. Hang the rack - Remove the expnading nuts from the Toggle
Bolts and insert the bolts through the upper 2 mounting holes.
Thread the expanding nuts back onto the bolts until the tip of the
bolt is slightly protruding from the nut with the wings positioned
so they will fold toward the head of the bolt (Figure D). Align
the Toggle Bolts with the holes in the wall and gently push the
Toggle Bolts through the wall, ensuring that both wings of the nut
expand on the back side of the wall. When both bolts are in place,
gently tighten the Toggle Bolts, keeping the lower mounting holes
aligned with the anchors. Finish securing the rack to the wall
through the bottom 2 mounting holes using the provided Screws
(Figure E) and fully tighten the Toggle Bolts.
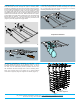
4. Install the mounting hole caps - With the rack fastened
to the wall, simply press the provided mounting hole caps into
the 1/2 inch holes in the face of the rack (Figure F) to cover the
mounting hardware and you’re done!
Figure E
Figure F
13"
13"
*Alternate Installation* Attaching to FCF-HD - Place
the rack against the FCF-HD in the position where it is to be
installed and ensure that it is horizontal using a level. To secure
the rack, use the Self Drilling Screws provided with the FCF-
HD and fasten the rack through each of the 4 mounting holes.
Note: The FCF-HD need to be spaced at 13 inches between
centerlines to properly align the edges of the WS-SR (Figure G).
Figure G
For product warranty information, please visit: www.VintageView.com/support/warranty
We’re here to help, call us at 866-650-1500 with any questions.
Figure D
Completed Installation