32" Internet-Connected 1080p LCD Television LC32VF60CN 14 Ver.
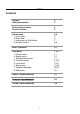
Contents Contents Caution Safety Information 2 3 Unit and Accessories Product Feature 4 4 Introduction 1. Front View 2. Rear View 3. Instruction for Wall Mount 4. Remote Control 5-9 5 6 7 8-9 Basic Operation 10 OSD Menu 1. Picture menu 2. Sound menu 3. Entertainment menu 4. Channels menu 5. Lock menu 6. Setup menu 7. Software Upgrade 8.
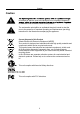
Caution Caution is intended to alert the user to the presence of un-insulated "dangerous to constitute a risk of electric shock to the persons. The exclamation point within an equilateral triangle is intend to alert the user to the presence of important operating and maintenance (servicing) instructions in the literature accompanying the appliance.
Safety Information Safety Information Electrical safety Physical safety 3
Unit and Accessories and Product Feature Unit and Accessories POWER SOURCE 1 2 3 4 5 6 7 8 9 0 -/-- SLEEP FAV EPG + MUTE + VOL DISPLAY CH HOME RETURN NETWORK - OK MENU TV set EXIT MEDIA PICTURE SOUND ASPECT CC MTS Power Cord Wi Fi USB Adapter Remote control Batteries: 2xAAA LC32VF60CN Stand Installation Guide Step 1.
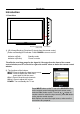
Introduction Introduction 1. Front View INPUT MENU CH+ CHVOL+ VOLPOWER Remote Control window (Keep clear) Led Indicator 1). (IR) Infrared Receiver: Receives IR signals from the remote control. (Power on/Standby)LED Indicator: Press POWER to turn on and off.
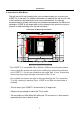
Introduction 2. Rear View Master Power Switch AC POWER IN RJ45 USB HDMI1 HDMI2 HDMI3 VGA PC audio Coax Pr Pb R-IN L-IN Y VIDEO R-IN L-IN Master Power Switch: Switch on or off the power supply. AC POWER IN: Connect to an earth 100-240V~ 50/60Hz outlet by using the supplied power cable.. RJ45 : Connect to the network. USB : For service, Multimedia and Wireless network. HDMI1/2/3 : Connect it to the HDMI output of the external device. COAX : Digital Audio Output.
Introduction 3. Instruction for Wall Mount The wall mount kit (not included) with your purchase allows you to mount your VIORE TV on the wall. For detailed information on installing the wall mount, refer to the instructions provided by the wall mount manufacturer. It is strongly recommended to contact a technician for professional assistance for wall mount installation. VIORE is not responsible for any damage to the product or injury to yourself or others resulting from the wall-mounting.
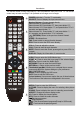
Introduction The remote control is using Infra-Red(IR). Point it towards the front of the LCD TV. The remote control may not work correctly if it is operated out of range or out of angle. POWER SOURCE 1 POWER(red button): Turn the TV on/standby. SOURCE: Press to display the input source menu. 2 Number Buttons: Choose channel directly.
Remote Control Introduction Installing Batteries 1. Open the battery compartment cover on the back of the remote control. 2. Insert two 1.5V AAA size batteries observing the polarity markings inside the battery compartment. Don’t mix different types or used batteries with new ones. 3. Close the cover. - The remote control should be operated within 30 feet(7m) and 300 to the left and right of the IR receive at the front of the TV. - Used batteries should be disposed properly.
Basic Operation Power on/off 1. Connect to the power supply with the power cord, and turn on the switch. 2. -To turn on the TV Press POWER button on the TV or remote control. -To turn off the TV Press POWER button on the TV or remote control. Input Source select Press INPUT/SOURCE button on the TV set or remote control to display button input source menu, and use CH+/- button on the TV set or on remote control to select the input source, press OK button on the remote control to enter.
OSD MENU 1. Picture menu Standard 10 Description Picture Mode: Select your desired picture mode. You may select the picture mode directly by pressing the PICTURE button on the remote control. Note 1: the values of the Contrast, Brightness, Color, Tint and Sharpness are Unchanged in Standard, Movie, Sport, Energy Saving picture mode. Note 2: when select the "Energy Saving", the machine is in energy-saving status. Contrast: Adjust image contrast. Brightness: Adjust image brightness.
OSD Menu OSD MENU 2. Sound menu Standard Description Sound Mode: Select your desired sound mode. You may select the sound mode directly by pressing the SOUND button on the remote control. Note: the values of the Bass, Treble and Balance are Unchanged in Standard, Music, Movie, and News sound mode. Bass: Adjust the level of the lower-pitched sounds. Treble: Adjust the level of the higher-pitched sounds. Balance: Adjust the audio output between left and right speakers.
OSD MENU 3. Entertainment menu Description NETFLIX: Enter the Netflix Apps. VUDU: Enter the Vudu Apps. USB Multimedia: Enter the USB multimedia menu when there’s USB device connected. Note: You can not enter the menu when there’s no network connected or no USB device connected. Netfilx, Vudu and Media operation Use the Vudu and Netflix buttons to enter the Vudu and Netflix applications. Before using these buttons, make sure your TV has a stable internet connection.
OSD Menu OSD MENU 4. Channels Description Tuning Band: Allow you to select antenna between Air and Cable. Channel Auto Scan: Enter the Channel Auto Scan menu to start auto scan. The receivable channels will be stored automatically. When searching channels, press OK to stop and exit. It will take a while to auto scan DTV and ATV channels, please wait patiently. Add/Skip Channels: Enter the Add/Skip Channels menu to edit the channels.
OSD Menu OSD MENU Favorite Channels Setting: Enter the Favorite Channels Setting menu to edit the channels. Select the channel by / button, and press OK button to add(Yes) the channel to the favorite channel list or delete(No) it. You could press the FAV button on the remote control to display the favorite channel list.
OSD Menu OSD MENU 5. Lock menu Description You must enter the password to gain access to the Lock menu. The default password is 0000. Lock On/Off: Allow you to turn on or off the system lock. If deactivated, the functions described below don’t work. This option menu allows you to lock any TV channel or adjust the Movie rating filter. US Ratings: V-Chip settings for USA. Use buttons to select, and press OK buttons to confirm.
OSD Menu OSD MENU Advanced Ratings: Use buttons to select, and press OK buttons to confirm. Select OK item to store and exit, Select Cancel item to exit without storing the settings. Change PIN: Change the password, you must enter the new password twice to confirm it. Note: Do not forget the password.
OSD Menu OSD MENU 6. Setup menu Description Menu Language: Select OSD menu language. Closed Caption: Off Off Mode: Allow you to select the CC Mode among: CC On, CC Off and CC on Mute. Digital Caption: Allow you to select the digital caption among: off, Service1, Service2, Service3 Service4, Service 5 and Service 6. Analog Caption: Allow you to select the analog caption among: off, CC1, CC2, CC3, CC4, T1, T2, T3 and T4. CC Settings: Setup the Details Closed Caption settings.
OSD Menu OSD MENU Input Labeling: Use buttons to select, and press OK buttons to confirm. Select OK item to store and exit, Select Reset item to reset the settings. PC Setting: If the video input signal comes from your PC, you may adjust the Vertical Position, Horizontal Position, Clock Phase, Sampling Clock or even perform an Auto adjust. Time Setting: Enter the Time Setting menu to setup the Auto Daylight and Time Zone.
OSD MENU 7. Software Upgrade Software Upgrade via Internet: You can update your TV by downloading and installing the newer version software via internet. Note: 1. Your TV detects the availability of the newer version software via internet. 2. If the newer version software is not available, upgrading is NOT necessary. 3. Before starting, make sure that you have a stable wired or wireless internet connection. 4. DO NOT turn the power off during this upgrade process. 5.
OSD MENU If the menu for upgrading is not displayed or upgrading failed during the process, you can try the following procedure. (A) Check your internet connection. Make sure that you have a stable internet connection. (B) Press MENU button on the remote control to display the OSD menu shown in the right. Select "Software Upgrade" and press OK button. The TV displays the following Software Upgrade menu. (C) Press OK button to test the internet connection.
OSD MENU 8. USB menu 1). Insert the USB device. 2). Press MEDIA button on the remote control. The TV will search and detect the device automatically, and display the menu as shown below. Note: You can also enter the menu by selecting "USB Multimedia" in the Entertaiment menu. Note: The TV will display the USB menu automatically when you insert the device. Buttons for playing the music: RETURN: Return to the upper menu. Select the picture and press OK button to view it in full screen. : Play or pause.
Simple Troubleshooting Simple Troubleshooting If the display fails or performance dramatically deteriorates check the Display in accordance with the following instructions.Remember to check the peripherals topinpiont the source of the failure. If the display still fails to perform as expected,connect your helpline for assistance. No power - Check all connections to the TV. - Press either the power button or the Standby button on the Remote control. - Make sure the Master power button is on.
LCD Panel Input Connector Output Connector Panel Size 32 inch (diagonal) Brightness 450 cd/m2 Dynamic Contrast 10000:1 Resolution 1920x1080 Video 1 Audio(L/R) 2 VGA 1 PC Audio 1 HDMI 3 YPbPr 1 RF 1 RJ45 1 USB 1 Headphone 1 COAX 1 Power Source 100-240V~ 50/60Hz Max Power consuption 140W * Product specifications and appearance are subject to change without notice.
VIORETM LIMITED WARRANTY FLAT PANEL TELEVISION This VIORE brand Product, as supplied and distributed by VIORE and delivered new in the original carton to the original purchaser is warranted by VIORE against manufacturing defects in materials and workmanship for a limited warranty period of one (1) year on parts and labor. However, there will be only a 90 day parts and labor limited warranty for commercial use.
VIORE, Inc.