9" LED Backlight LCD Television with Bulit-in DVD Player LED19VH65D 19
Contents Contents Caution Safety Information 2 3 Unit and Accessories Product Feature 4 4 Introduction 1. Front View 2. Rear View 3. Remote Control 5-8 5 6 7-8 Connection 9-11 Basic Operation 12-13 OSD Menu 1. Picture menu 2. Audio menu 3. Time menu 4. Setup menu 5. Lock menu 6.
Caution Caution 7KH OLJKWHQLQJ ÀDVK ZLWK DUURZKHDG V\PERO ZLWKLQ DQ HTXLODWHUDO WULDQJOH LV LQWHQGHG WR DOHUW WKH XVHU WR WKH SUHVHQFH RI XQ LQVXODWHG GDQJHURXV YROWDJH ZLWKLQ WKH SURGXFWV HQFORVXUH WKDW PD\ EH RI VXI¿FLHQW PDJQLWXGH WR FRQVWLWXWH D ULVN RI HOHFWULF VKRFN WR WKH SHUVRQV 7KH H[FODPDWLRQ SRLQW ZLWKLQ DQ HTXLODWHUDO WULDQJOH LV LQWHQG WR DOHUW WKH XVHU WR WKH SUHVHQFH RI LPSRUWDQW RSHUDWLQJ DQG PDLQWHQDQFH VHUYLFLQJ LQVWUXFWLRQV LQ WKH OLWHUDWXUH DFFRPSDQ\LQJ WKH DSSOLDQFH Correc
Safety Information Safety Information 7R HQVXUH UHOLDEOH DQG VDIH RSHUDWLRQ RI WKLV HTXLSPHQW SOHDVH UHDG FDUHIXOO\ DOO WKH LQVWUXFWLRQV LQ WKLV XVHU JXLGH HVSHFLDOO\ WKH VDIHW\ LQIRUPDWLRQ EHORZ Electrical safety 7KH 79 VHW VKRXOG RQO\ EH FRQQHFWHG WR D PDLQV VXSSO\ ZKLFK PDWFKHV WKDW VWDWHG RQ WKH ODEHO RQ WKH PDLQV DGDSWRU 7R SUHYHQW RYHUORDG GRQ W VKDUH WKH VDPH PDLQV VXSSO\ VRFNHW ZLWK WRR PDQ\ RWKHU LWHPV RI HTXLSPHQW 'R QRW SODFH DQ\ FRQQHFWLQJ ZLUHV ZKHUH WKH\ PD\
Unit and Accessories and Product Feature Unit and Accessories TV set INPUT 1 2 3 4 5 6 7 8 9 0 PICTURE SOUND SLEEP DISPLAY CH+ VOL+ MUTE CH- VOL- MENU EXIT OK SETUP User's manual CC MTS EPG LANGUAGE ZOOM SUBTITLE SLOW MENU ANGLE TITLE GOTO FAV PROGRAM INTRO REPEAT A-B Mains adaptor Remote control Batteries: 2xAAA Mains cable Product Feature • 19” (measured diagonally) wide screen for a complete home theater experience • Energy Saving TV – more natural color
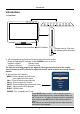
Introduction Introduction 1. Front View Remote Control window LED Indicator Please insert a 12cm disc by following this instruction. 1). (IR) Infrared Receiver: Receives IR signals from the remote control. (Power on/Standby)LED Indicator: Press POWER to turn on and off.
Introduction 2. Rear View 11 10 9 8 Service 1 2 3 4 5 6 7 1).POWER: Connect to the mains adaptor. 2).Service : For software update only. 3).HDMI1/2: Connect it to the HDMI of DVD or other equipment. 4).VGA: For PC display.Connect it to the D-Sub 15 pins analog output connector of the PC. 5).PC-IN: Connect it to the audio output terminal of PC. 6).Coax: Digital coaxial output. 7).Headphone: Connect it to your headphone or other audio equipment. 8).
Introduction 3. Remote Control The remote control is using Infra-Red(IR). Point it towards the front of the LCD TV. The remote control may not work correctly if it is operated out of range or out of angle. INPUT Press to display the input source menu INPUT POWER Press to turn the TV on/standby PICTURE Press repeatedly to cycle through the available video picture modes. 1 2 3 4 5 6 SOUND Press to cycle through the different sound settings.
Introduction INPUT 1 2 3 4 5 6 7 8 0 PICTURE SOUND Number buttons for DVD. Pressing “-/--”button to display “SELECT 10+”, and press a number button to play the program. DISPLAY( In DVD) Press to display the current mode’s information. 9 LANGUAGE Select DVD disc language. SLEEP DISPLAY CH+ VOL+ MUTE CH- VOL- DVD eject. MENU EXIT Play/Pause DVD program. Stop DVD program. OK SETUP DVD system setup. DVD fast reverse. DVD fast forward. DVD previous chapter. DVD next chapter.
Connection Connection Power Cord Connection Service - Connect to the power supply correctly as shown with the mains cable and mains adaptor. - When you connect the power, the TV set comes into standby mode and the LED indicator (Page 5) lights red. - You could bring the TV out of standby mode by press the POWER button on TV set (page 5) or remote control(page 7), and the LED indicator lights green.
Connection AV Input Connection Note: All cables shown are not included with the TV. RCA Video Cable RCA Audio Cable DVD or VCR - Connect the VIDEO and AUDIO output jacks on the DVD or VCR to the AV IN jacks on the TV set with a RCA cable. - Match the jacks colors: Video=yellow, Audio left=White, Audio right=red. - Turn on the DVD/VCR, and select “AV” in the input source menu. YPbPr Connection Note: All cables shown are not included with the TV.
Connection HDMI Connection Note: All cables shown are not included with the TV. Service HDMI cable DVD or VCR - Connect the HDMI jack on the DVD to the HDMI jack on the TV set with a HDMI cable. - Turn on the DVD, and select “HDMI1/2” in the input source menu. A/V interface that supports uncompressed standard. One jack supports both video and audio information. PC Connection Note: All cables shown are not included with the TV.
Basic Operation Basic Operation Power on/off 1. Connect to the power with a mains cable and an adaptor (page9). 2.-To turn on the TV Press POWER button on the TV or remote control. -To turn off the TV Press POWER button on the TV or remote control. Input Source select Press INPUT button on the TV set or remote control to display the input source menu, and use CH+/- button on the TV set or Ĥ / ĥ button on remote control to select the input source, press OK button on the remote control to enter.
Basic Operation Basic OSD Menu operation Press MENU button to display the OSD menu as below: Main menu Picture, Audio, Time, Setup, Lock, Channel Submenu (Picture menu for example) Hint you should operate the OSD menu according to the hint. Use =!/ ? button to select the main menu, and press ĥ!button to enter the submenu.
OSD Menu OSD Menu 1. Picture menu Description Picture mode: Select between Standard, Dynamic, Mild, Sports and User. You may select the picture mode directly by pressing the PICTURE button on the remote control. Contrast: Control the difference between the bright and dark regions of the screen picture. Brightness: Adjust brightness of the picture. Color: Adjust color of the picture. Tint: Control the fresh tones to make them appear natural. Sharpness: Color Temp.: Select between Normal, Cool and Warm.
OSD Menu 2. Audio menu Description Sound Mode: Select your desired picture mode as follow: Flat, Music, Movie, Sports and User You may select the sound mode directly by pressing the SOUND button on the remote control. Bass: Low frequencies intensity. Treble: High frequencies intensity. Balance: Left and right stereo audio channels balance. Surround: Activate or deactivate the Surround function. SPDIF Type: Select spdif type between PCM and RAW. Audio Language: Select audio language.
OSD Menu 3. Time menu Description Sleep timer: You may set the automatic shutdown timer choosing from 5 to 240 minutes, or deactivate this function. Time zone: Daylight Saving Time: Select between On and Off. Clock: User can not change time manually during DTV mode, for time is from signal source directly.
OSD Menu 4. Setup menu 16:9 PC SETUP Closed Caption Description Menu Language: Select OSD menu language. Transparency: Turn on or off the transparency menu function. Zoom Mode: Select the zoom mode between 16:9, 16:9 zoom, 4:3, 4:3 zoom. Noise reduction: Select the noise reduction mode between Strong, Off, Weak and Middle. PC SETUP: If the video input signal comes from your PC, you may adjust the V-Position, H-Position, Clock, Phase or even perform an Auto adjustment.
OSD Menu 5. Lock menu
OSD Menu 6. Channel menu Description Air/Cable: Allow you to select antenna between Air and Cable. If you selet “Cable”, the following items(Favorite, Show/Hide, Channel NO, Channel Label and DTV Signal) are unable to use. Auto Scan: Enter the Auto Scan menu to start auto scan. ƾ If you select “Cable” as input signal in Antenna item, allows you to select Cable System among: Auto, STD, IRC and HRC. Use Ģ button to highlight the “Start to Scan”, then press ! button to search the channels automatically.
OSD Menu Show/Hide: $OORZ \RX WR VKRZ RU KLGH WKH FKDQQHOV 8VH Ĥ 0 ĥ EXWWRQ WR KLJKOLJKW WKH GHVLUHG LWHP WKHQ SUHVV OK EXWWRQ WR VKRZ RU KLGH WKH KLJKOLJKWHG FKDQQHO Channel No.
DVD Operations DVD basic operation Press the Power button on the TV or the remote control, then press the INPUT button to select DVD mode. Place a disc Insert a disc with the mirror side facing towards you. If the disc is double sided, place the title you want to play facing you. Do not touch the playing surface. Hold the disc around the outside with your fingers and place the disc into the slot. The player will automatically draw the disc into the player.
DVD Operations 4. According to the Direction Indicator on the menu, you can press Arrow buttons to highlight where you want to enter. 5. During Program Playback, if program button is repressed, the program order and the contents will be displayed on the screen, and the Program Playback will be stopped; also you can press Stop and Play to resume normal playback. 6. Notes: To clear the program order, use Arrow buttons to highlight the "CLEAR" item, then press Enter.
DVD Operations 2. While a disc is playing, press Repeat button once and the repeat banner appears to show current repeat mode. a) In CD, HD-CD, WMA or Digital Audio disc/JPEG sequence playback mode. Press Repeat button again to turn on repeat mode. Press the button again on the remote to turn to the next repeat mode. There are three repeat options: Off, Track Repeat and Disc Repeat. With each consecutive press of the button, the repeat mode switches.
DVD Operations Subtitles 1. Compatible with DVD discs. 2. Press the Subtitle button on the remote once, and the subtitle info banner appears 3. When a DVD is recorded with subtitles, you can use the Subtitle feature to view the subtitles on-screen. By default, subtitles are off. The info banner will display Subtitle Off. 4. To display subtitles, press the Subtitle button again.
DVD Operations DVD System Setup change them again. General Steps of Setup Menu 1. Pause or Stop the player. Press SETUP on the remote control. The main menu will be shown as below. 2. Press the Ĥ!0!ĥ button to select the Icon of the desired section, e.g. “TV System" and press !!!?!button to open that section. 3. Press Ĥ!0!ĥ to select the desired feature and again press!?!button to open that section. 4. Press Ĥ!0!ĥ to select the desired feature and then press "OK" to select the new setting.
DVD Operations "0000". Using the Ĥ!0!ĥ button, move the highlight to "PASSWORD", press!?!the button and enter "0000". You will see the padlock symbol open. You may now change the RATING or put in a new password number. If the Lock symbol is BLUE you must press!?!the button to enter the Please remember or write down the new Password and keep safe. RATING The Rating feature is a rating limit feature, like movie ratings. This helps you to control what DVD the family watches.
DVD Operations Disc Care About Disc Terms Title Generally, pictures or music compressed on a DVD are divided into several sections, "title". Chapter The smaller section unit of picture or music in a DVD under the title, usually one title is comprised of one or more chapters and each of them is numbered for easy searching, but some discs may not have a recording chapter. Track A segment of picture or music on a CD, Each track is numbered for searching.
Simple Troubleshooting Simple Troubleshooting If the display fails or performance dramatically deteriorates check the Display in accordance with the following instructions.Remember to check the peripherals topinpiont the source of the failure. If the display still fails to perform as expected,connect your helpline for assistance. No power - Check all connections to the TV. - Press either the power button or the Standby button on the Remote control.
LCD Panel Input Connector Output Connector Panel Size 19 inch (diagonal) Brightness 250 cd/m2 Contrast 1000:1 Resolution 1440x900 Video 1 Audio(L/R) 1 VGA 1 PC Audio 1 HDMI 2 YPbPr 1 RF 1 Coax 1 Headphone 1 Power Source DC 12V 4.16A Power Consumption 50W * Product specifications and appearance are subject to change without notice.
INSTRUCTION FOR WALL MOUNT The wall mount kit (not included) with your purchase allows you to mount your VIORE TV on the wall. For detailed information on installing the wall mount, refer to the instructions provided by the wall mount manufacturer. It is strongly recommended to contact a technician for professional assistance for wall mount installation. VIORE is not responsible for any damage to the product or injury to yourself or others resulting from the wall-mounting.
31
VIORE, Inc.