
Installation guide


36 © 2003 Directed Electronics, Inc. Vista, CA
3. Choose. Within 10 seconds, press and release the Program switch the number of times cor-
responding to the desired channel listed below. Once you have selected the channel, press
the switch once more and HOLD it. The LED will flash and the horn will honk (if connected)
to confirm the selected channel. Do not release the Program switch.
■ More than 15 seconds elapses between programming steps.
One long horn honk indicates that Learn Routine has been exited.
T
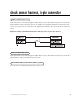
4. Transmit. While HOLDING the Valet/Program switch, press the button on the transmitter
that you would like to control the selected receiver channel. The unit will chirp to confirm
that the code has been successfully programmed. It is not possible to teach a transmitter
button to the system more than once.
5. Release. Once the code is learned, the Valet/Program switch can be released.
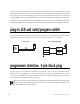
You can advance from programming one channel to another by releasing the Valet/Program switch and tapping
it to advance channels and then HOLDING it. For instance: You have programmed Channel 1 and you want to
program Channel 2. Release the Valet/Program switch. Press it one time and release it to advance from Channel
1 to Channel 2. Now, press and HOLD the Valet/Program switch. The LED will flash two times and the horn will
honk twice (if connected). As before, do not release it.
If you want to program Channel 3 after programming Channel 1, release the Valet/Program switch, press it twice
and release it to advance to Channel 3. Then press it once more and HOLD it. The horn will honk three times (if
connected) and the LED will flash three times to confirm it is ready to receive the code from the transmitter.
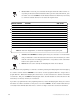
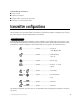
CHANNEL NUMBER FUNCTION WIRE COLOR
1 Auto Learn Standard Configuration* (default)
2 Arm only
3 Disarm only
4 Silent Mode™/Remote Valet®/Trunk Release RED/WHITE
5 Remote Start
6 Channel 4 VIOLET/BLACK
7 Channel 5 WHITE/BLACK
8 Short Run/Turbo
9 Timer Mode
10 Arm/Disarm/Panic
11 Panic only
12 Delete all transmitters
*NOTE: For Auto Learn Configurations, see Transmitter Configurations section of this guide.