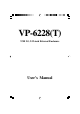
VP-6228(T) USB 2.0, 5.
PROPRIETARY NOTICE We makes no warranty of any kind with regard to this material, including, but not limited to, the implied warranties of merchantability and fitness for a particular purpose. We shall not be liable for errors contained herein or for incidental or consequential damages in connection with the furnishing, performance, or use of this material. This document contains proprietary information which is protected by copyright. All rights are reserved.
Contents 1. Introduction ................................................................................. 4 1-1 Features and Specifications ........................................................... 4 1-2 USB 2.0 External Drive ................................................................ 5 1-3 Package Checklist ......................................................................... 5 2. Hardware Installation .................................................................
1. Introduction Congratulation on your purchase of VP-6228(T) USB2.0, 5.25” External Enclosure. This External Enclosure has been designed to provide hot-swapping and Plug-n-Play operations of internal 5.25” IDE devices and 3.5” MobileRocks. Supplied with this external enclosure is a USB 2.0 cable, power vertival-holder adapter, stand for enclosure and a CD containing installation driver(s). The USB 2.0 cable enables connection of the external enclosure to your PC, Notebook or MAC.
. Supports ATA PIO modes 0-4: ATA interface operation mode is automatically selected during device initialization or manually programmed with configuration data 6. Supports UDMA modes 0-4 7. Supports 48-bit LBA (large HDD), when the VP-6228(T) connects with one 3.5” HDD installed in the MobileRACK 1-2 USB 2.0 External Drive The USB 2.0 External Drive is a portable compact storage drive that incorporates the USB 2.0 (Universal Serial Bus 2.0) high speed interface. The USB 2.
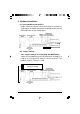
2. Hardware Installation 2-1 Analog Audio Connector(JP1) Bulid-in connector (JP1) has two channels,right(“R”) and left (“L”) audio outputs, and allows you to direct audio output from your CD/ DVD-ROM Drive to your sound device. L GNDGND R JP1 2-2 Jumper Settings 2-2.1 Jumper Settings for assembling with MobileRack Jumper JP6, located on the rear PCB panel of the VP-6228(T), is used to set running the VP-6228(T) external enclosure. The producer setting is JP6 pins 1-2 ON.
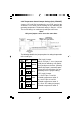
2-2.2 Temperature Control Jumper Settings (Only VP-6228T) Jumpers JP7 and JP8, located on the rear PCB panel of the VP-6228T, are used to set the cooling fan for controlling the operating temperature. The default setting is JP8 pins 1-2 ON. The fan will always run continuously to disperse the heat. Note: Only one jumper can be set at the same time. The following identifies the jumper options for setting the operation of the cooling fan.
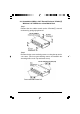
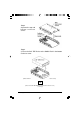
2-3 Assemble the USB 2.0, 5.25” External Enclosure VP-6228(T) With One 5.25” IDE Device or One Mobile Rack Step1. Remove the four rubber stands on the VP-6228(T) external enclosure by gently prying them off. Step2. Remove the four cover retaining screws securing the top enclosure cover. (The four cover retaining screws are located in the mounting holes on the Top enclosure cover.
Step3. Separate the top and bottom enclosure covers. Step4. a) Place the 5.25” IDE Device or the Mobile Rack in the bottom enclosure cover. (Place one 5.25” IDE Device in the bottom enclosure cover) OR (Place one 5.
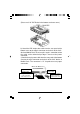
(Place one 5.25” IDE Device in the bottom enclosure cover) b) Attach the IDE 40-pin data cable from the rear panel of the bottom cover to the 40-pin connector on the back of the 5.25 “ device or Mobile Rack. To ensure pin-1 to pin-1 connection, orient the cable so the colored stripe edge is closest to the power connector. c) Attach the 4-pin power cable from the rear panel of the bottom cover to the 4-pin connector on the back of the 5.25” device or Mobile Rack.
Step5. a) Make sure the the 5.25” IDE device’s front face panel or the MobileRack’s front face panel should be flush with the front corners (positioned in front of the guide flanges) of the bottom enclosure cover. b) Align the 5.25” IDE device or the Mobile Rack mounting holes with the mounting holes on the bottom cover and secure with four drive retaining screws (two on each side).
Step6. Place the top enclosure cover over the drive assembly.
Step7. Align the 5.25” IDE device or the Mobile Rack mounting holes with the mounting holes on the bottom cover and secure with four cover retaining screws (two on each side).
Step8. (Assemble the VP-6228(T) with one 5.25” IED Device) Replace the four rubber stands, one on each of the four corners. Orient each stand so the raised nub is on the bottom.
( OR Assemble the VP-6228(T) with one MobileRACK) Replace the four rubber stands, one on each of the four corners. Orient each stand so the raised nub is on the bottom.
Step9. A vertical-holder stand is also provided as a convenient, spacesaving method for setup of the VP-6228(T) external enclosure on your desktop. Simply align the grooves of the VP-6228(T) external enclosure with the guides on the stand and slide together. VP-6228(T) External Enclosure with Vertical-Holder Stand (Assembled with one 5.
2-4 Connect the USB 2.0, 5.25” External Enclosure VP-6228(T) to Your Computer Computer system requirements Hardware Notebook or desktop computer with support for USB or USB 2.0. Operating System Windows 98SE/Me/2000/XP, and Mac OS 9.0 or above. Proceed the following steps to connect to Your Computer Step1: Boot-up your computer. Make sure the USB/USB 2.0 host adapter and driver are installed in your computer. Step2: Connect one USB connector end of the USB cable into the USB Port of your USB 2.0, 5.
3. Drivers Installation 3-1 Windows 98SE If this is the first time using your USB 2.0 External Drive, you must first run the [SETUP.EXE] from the USB 2.0 “Drivers and Utility Installation” CD after you connect your USB 2.0 External Drive to your computer. Then proceed with the following: 1. Connect your USB 2.0 external drive to an available USB port on your computer. 2. An “Add New Hardware Wizard” screen will appear. Click [Next]. 3. Select “Display a list of all drivers” then click [Next].
4. Click [Browse]. 5. Double click on the ViPowER CD icon of the [My Computer] directory. 6. Select “Win98” under the “Drivers” directory, then click [OK].
7. Click [Next]. 8. Click [Next]. 9. The system will request you to restart your computer. Click [FINISH].
10. After the system restart, the installation is complete. You can now connect your USB 2.0 External Drive to the computer. 11. After connecting the USB 2.0 External Drive, double click on [My Computer]. A new drive [Usbdisk] icon should have been added. This identifies the USB 2.0 External Drive you just installed. 12. A green Unplug or Eject hardware icon will also be added in the system tray. Note: If the new drive does not appear in [My Computer], it means this USB 2.
3-2 Windows Me/2000/XP Step1: If you are plugging the USB External Drive into your computer for the first time, the system will detect a USB 2.0 Storage Device and install the [USB Mass Storage Device] driver from system files automatically. Step2: After the system installs the USB mass storage device driver,double click on [MyComputer]. A new drive [Usbdisk] icon should have been added. It is the USB 2.0 External Drive which just installed. Notes: a). This USB 2.
4. Using The USB 2.0, 5.25” External Enclosure VP-6228(T) After the first time installation, you can connect or disconnect the USB 2.0, 5.25” External Enclosure VP-6228(T) without powering off the computer. Please follow the steps below when using the VP-6228(T). 4-1 Connect the USB 2.0, 5.25” External Enclosure VP-6228(T) to Computer Step1: Plug the first USB port connector of the USB cable into the USB port of your USB 2.0, 5.25” External Enclosure VP-6228(T).
4-2.2 Windows Me/2000/XP Step1: Double-click on the [Unplug or Eject Hardware] icon in the system tray. A dialog box appears. Step2: Highlight the [USB Mass Storage Device] in the dialog box, click [STOP]. Choose the USB 2.0 External Enclosure VP-6228(T) that you want to disconnect, then click [STOP] again on the next screen. Step3: Wait a few seconds until the system prompts “You may safely remove this device”. Then, disconnect the USB 2.0 External Drive from the computer. 4-2.
5. Partitioning the External USB 2.0 Hard Disk 5-1 Partition Under Windows 98/ME Boot-up the computer into Windows 98/ME. Next, connect your USB 2.0 Hard Disk Drive to the USB port. There are two methods to partition and format your USB 2.0 Hard Disk Drive. Method 1 Step1: Click on [Start], select [Control Panel]in [Settings], double click [System] and open [Hard disk controllers]. Step2: You should see the USB 2.0 Hard Disk you just added.
Step4: For the first screen of FDISK, answer the question: Do you want to enable large disk support? [Y] if you want to build a partition larger than 2GB. [N] if you want to build a partition small than 2GB. Step5: The next screen is [FDISK OPTIONS]. Type [5] to select the disk. Important: You must type [5] in this screen to change the current fixed disk drive to build a partition. The default fixed drive set by FDISK is your internal hard disk drive.
5-2 Partition under Windows 2000/XP Step1: To partition the USB 2.0 Hard Disk Drive under Windows 2000, connect the USB 2.0 Hard Disk to the USB port on your computer. Next, click [Start], select [Control Panel], [Settings], open [Administrative Tools] and double click [Computer Management]. Step2: Click on [Disk Management]. All connected disk drives will be listed. Find the USB 2.0 Hard Disk that you added and to the right of the disk, view the status of the partitions of this disk drive.
Step3: Right-click on the partition status area of the USB 2.0 Hard Disk Drive. Click on [Create Partition….] and the “Create partition wizard” will appear. Step4: Follow the instructions of the wizard to partition and format your USB 2.0 Hard Disk Drive. After you have completed the partitioning and formatting of the USB 2.0 Hard Disk Drive, you can write data to it.