
Installation guide


Operation guide
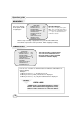
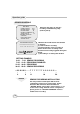
MAIN MENU
CAMERA SELECT 1234
RECORD SELECT 1234
RECORD MODE 田
RECORD FRAMERATE 30
VIDEO QUALITY HI
RECORD SCHEDULE
SUB MENU
HARD DRIVE SETUP
SENSOR SETUP
NETWORK SETUP
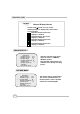
Operation Buttons
---
press to display menu option.
ST--- press to change menu field or
change the unit’s configuration values.
--- press to select menu item or
confirm the selection.
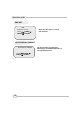
Press to display
menu option shown
as right figure.
MAIN MENU
CAMERA SELECT
¾Please stop recording or playback before you enter into OSD menu.
¾You will be requested to enter password, while stopping recording.
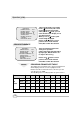
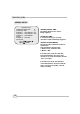
MAIN MENU
¾ CAMERA SELECT 1234
RECORD SELECT 1234
RECORD MODE 田
RECORD FRAMERATE 30
VIDEO QUALITY HI
RECORD SCHEDULE
SUB MENU
HARD DRIVE SETUP
SENSOR SETUP
NETWORK SETUP
The unit provides 4 camera inputs.
You can use channel buttons on
the front panel to select specified
channel for real-time display.
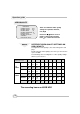
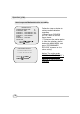
You can use “” button or channel buttons for different combinations for
channel display.
Example:
1. When you choose (----), all cameras are off
2. When you choose (1234), all cameras are displayed.
3. When you choose (---4), only the fourth channel is displayed.
NOTICE
VIDEO LOSS !
“VIDEO LOSS” signal will be displayed, and the
built-in alarm buzzer will be triggered to sound,
while no video connection or connection failure.
10