
Installation guide
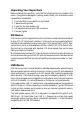

Super Rack 1-9
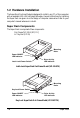
Perform the following steps to enable the USB function of the Super Rack.
1. With the computer cover removed, ensure the power is OFF, and all power
cords and cables from the back of the computer are unplugged.
2. Select an unused I/O expansion slot at the back of your computer and remove
its slot cover. Save its screw for securing the USB slot bracket.
3. Install the USB slot bracket and secure with the previously removed screw.
4. Connect the small 5-pin connector on the bracket to the USB connector on
the back of the Super Rack out-frame.
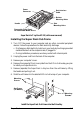
5. Replace the computer’s cover and reconnect the power and other cable
connections.
6. Plug the bracket mounted USB connector into any available USB port
on your computer.
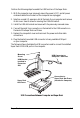
The following figure illustrates the USB connectors used to connect the installed
Super Rack to the USB port on the computer.
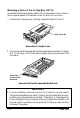
USB Connections Between Computer and Super Rack
Connection to
Super Rack Out-Frame
(Installed in Computer)
Mounting
Screw
USB Bracket
Installed in
Expansion
Slot
USB Connector to
Computer’s USB Port
Super Rack
Out-Frame