
Installation guide

1-10 Super Rack
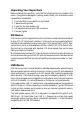
Mounting a Drive in the In-Tray Box (VP-15)
Proceed with the following steps to install a 3.5-inch drive device in the in-tray box.
(Note: a special adapter kit is required in order to install a 2.5-inch drive.)
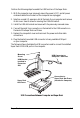
1. Remove the in-tray box cover by sliding it towards the back of the unit.
Remove the In-Tray Box Cover
Slide Cover Off
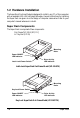
2. If you plan to install a drive that features removable media such as a zip, TR-4 tape,
MO, LS-120 drive, or ATA Flash memory reader, remove the center part of the
front panel.
Remove Front Panel for Removable Media Drives
Center Part
of Front Panel
Removed
IMPORTANT
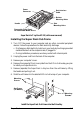
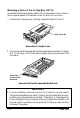
3. If you are installing a new hard drive into the in-tray box, you may need to
configure the drive before you install it. Refer to the drive manufacturer’s docu-
mentation and configure the drive as ‘Master’, ‘Cable Select’, or ‘Slave’ depending
on the configuration of your computer. After you complete this installation, you
may also need to re-configure the computer’s BIOS Setup to make the drive
functional in the system.