
Installation guide


Super Rack 1-11
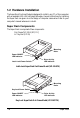
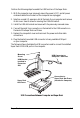
4. Connect the cables from the in-tray box to the appropriate pin connectors
of the drive.
The in-tray box’s 40-pin IDE cable supports 3.5-inch drives. Attach the power
and IDE cables from the in-tray box to the drive. The power connector is ‘D’
shaped to correctly orient the connector. The colored stripe on the IDE cable
should be closest to the power connector.
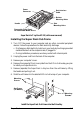
To install a 2.5-inch drive, you must purchase a ‘44-pin to 40-pin’ connector
adapter from your local computer dealer.
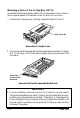
5. Carefully position the drive inside the in-tray box.
6. Secure the drive in place using the supplied mounting screws. Use the mounting
holes on the sides or bottom, depending on the design of the drive.
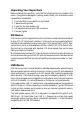
Install the Drive in the In-Tray Box
Colored Stripe
Mounting
Screws
Data Cable
Power Cable
Mounting
Screws
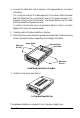
7. Slide the in-tray box’s cover back on.
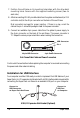
In-Tray Box Ready for Use
The hardware installation is complete. Your in-tray box is ready to use.