USER GUIDE USB MODEM virginbroadband.com.
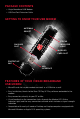
Package Contents • Virgin Broadband USB Modem • USB One Port Extension Cable Getting to know your USB modem ANTENNA SOCKET STATUS INDICATOR LIGHT SIM CARD SLOT MICRO SD CARD SLOT PROTECTIVE CAP USB INTERFACE Features of your Virgin Broadband USB Modem • MicroSD card slot so your modem can work as a USB drive as well • Easy Installation, thanks to the Zero CD Plug ‘N’ Play software embedded in the modem • Easy connection, directly to your PC or Mac • Visual feedback on the connection status through th
Disclaimer Virgin Mobile (Australia) has tried its best to make sure all information, graphics and other items appearing in this document (“Content”) are correct and up to date at the time of publication. We do not represent or warrant the accuracy or completeness of the Content and are not liable for any errors, omissions or defects.
TABLE OF CONTENTS WELCOME TO VIRGIN BROADBAND SYSTEM REQUIREMENTS 3 3 MAC OS X 10.
Welcome to Virgin Broadband Virgin Broadband offers a simple, easy to use connection: simply plug it into a compatible Desktop or Laptop computer (meeting the system requirements below) via its USB connector and shortly thereafter you are ready to surf the Web using the latest HSPA wireless network technology (where available). Your Virgin Broadband USB Modem combines the convenience of high-speed wireless connectivity with extreme ease of use.
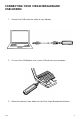
Connecting your Virgin Broadband USB Modem 1. Connect the USB extension cable to your Modem. 2. Or insert the USB Modem in to a spare USB port on your computer. 3. Follow the relevant steps below to install the Virgin Broadband Software. V2.
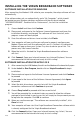
Installing the Virgin Broadband software Software installation for Windows After connecting the Modem’s USB cable to your computer, the setup software will run automatically. If the software does not run automatically, go to “My Computer”, which should be located on your Windows desktop, and browse to the disk drive labelled “VIRGINBROADBAND”. Double-click on “Autorun.exe”, to start the installation program. 1. Choose Install and then click Continue 2.
Your First Connection The first time you connect, you will be taken to a special page to activate your broadband service. Enter your first name, last name and specify your preferred Virgin Broadband e-mail address. This will become the primary e-mail address that Virgin will send notifications to from time to time. You will also have 4 additional e-mail addresses available.
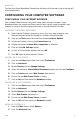
MaC OS X To close the Virgin Broadband Connection software, click the red circle in the top left of the application. Configuring your computer software Configuring your Internet Browser Your Internet (Web) Browser may need some small settings changed. Virgin Broadband does not require anything specific to be set but some computers may already be setup to use old information from an earlier Internet Provider. Microsoft Internet Explorer: 1. Open Internet Explorer.
3. In the Network tab, click on the Settings button 4. Select the Direct Connection to the Internet button 5. Click OK, and OK again to finish Setting up your E-mail You can access your email via our web mail page at: http://webmail.virginbroadband.com.au Your Username is your full email address including the “@virginbroadband.com.au” part. Simply enter your Username and your Email Password to send and receive email. You can access this from any Internet connection on any computer.
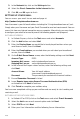
The name you would like to be displayed to others when you send them an email Email Address: Your Virgin Broadband email address Incoming Mail server: mail.virginbroadband.com.au Outgoing Mail server smtp.virginbroadband.com.au User Name: Your full email address (username@virginbroadband.com.au) Password: The password you created with the email address 5. Ensure Remember Password is ticked Your Name: 6. Leave Require logon using Secure Password Authentication (SPA) un-ticked 7. Click Next to continue 8.
Windows Mail (Vista) 1. In Windows Mail, click on the Tools menu and select Accounts 2. Click the Add button 3. Select E-mail Account and click Next 4. Enter a Display Name and click Next 5. Enter your Virgin Broadband E-mail address and click Next 6. Ensure that POP3 is selected in the Incoming e-mail server type field and enter the following server details: 7. Incoming Mail server: Outgoing Mail server Click Next to continue mail.virginbroadband.com.au smtp.virginbroadband.com.au 8.
10. Confirm that the settings are correct and click Continue 11. Click Done You have now completed setting up your mailbox and are ready to start sending and receiving e-mail! Apple Mail OS X 10.5 (Leopard) 1. Open Apple Mail and select Add Account from the File menu 2. Enter the following Account information: The name you would like to be displayed to others when you send them an email Email Address: Your Virgin Broadband email address Password: The password you created with the email address 3.
Using the Virgin Broadband Services Checking Your Data Usage To check your usage, go to http://mybroadbandusage.virginbroadband.com.au and log in using your full Virgin Broadband email address and email password. Using Webmail To check your account details, go to http://www.virginbroadband.com.au/ and log in using your Virgin Broadband Service Number and your 6 digit Account Security PIN which you set when you opened your account.
Troubleshooting SYMPTOM POSSIBLE CAUSE POSSIBLE SOLUTION No Active LED on USB Modem USB Modem is not connected to a working USB port Check if the USB Modem is firmly plugged into the USB Port or check the connection of the USB extension cable if you are using one. Perhaps try the double ended USB cable or another USB port. LED does not Start blinking (USB Modem does not attach to GPRS or UMTS) No SIM inserted Disconnect the USB Modem. Insert the SIM and reconnect the USB Modem to a USB port.
Software Error Codes Sometimes you will get a popup message box with an error code when you try to connect. Here is what you should do: Error 31 • This is a temporary error and will resolve itself, give it a minute and try again. Error 619 • The APN is possibly wrong. The APN should be: virginbroadband. • There is no network signal. Move around until you can see UMTS in the bottom left of the Connection Software. • The SIM card isn’t set up for data. Please call Customer Service on 1300 555 100.
Error 797 • A background program is trying to establish a connection and the Modem is not connected (plugged in), has no network connection or a very poor signal. Virgin Broadband USB Modem information SIM Card Information • To help protect against damage from electronic discharge (e.g. static electricity) please do not touch the SIM card connectors.
problem, consult your hearing aid service provider • If you are using an electronic medical device, consult your doctor or device manufacturer to confirm whether the radio waves emitted by the Modem may affect the operation of this medical device Inflammables and Explosives To prevent explosions and fires, do not use your wireless device in areas where inflammable and explosive devices may be stored.
hazardous substances in electrical and electronic equipment Directive 2002/95/EC (RoHS Directive). Laws and Regulations Observe laws and regulations when using your wireless device. Respect the privacy and legal rights of others. Care and Maintenance It is normal for your wireless device to get hot during operation.
Regulatory Information The following approvals and notices apply in specific regions as noted. CE Approval (European Union) The wireless device is approved to be used in the member states of the EU. The wireless device is in compliance with the essential requirements and other relevant provisions of the Radio and Telecommunications Terminal Equipment Directive 1999/5/EC (R&TTE Directive).
NOTES V2.
NOTES V2.
IMPORTANT NOTES Email Address: @virginbroadband.com.au Email Password: Service Number: PIN Number: V2.
Please recycle me virginbroadband.com.