OWNER’S MANUAL VRCD500-SDU AM/FM Receiver, CD/MP3/WMA Player with SD Card Slot, USB Port, Aux In, & Detachable Face • AM/FM MPX STEREO • MP3 / WMA WITH ID3 DISPLAY • F/PS MEMORY CONTROL • AUTO SEEK UP / DOWN • FM STEREO / MONO • 30 PRESET MEMORY • VOL/ BAS / TRE / BAL / FAD • AUTO CD PLAY / RADIO • LOUDNESS CONTROL • MUTE SOUND CONTROL • USB PORT • SD CARD SLOT • WIRE HARNESS ON PLUG • DIGITAL LCD DISPLAY • DUAL CHANNEL LEVEL METER • TIME CLOCK DISPLAY • PRESET EQ (POP, ROCK, FLAT, CLASSIC) • BUILT IN N
Welcome! Dear Customer, CONGRATULATIONS. The VRCD500-SDU Compact Disc Player and AM/ FM Stereo Receiver with SD Card Slot, USB Port and AUX In, when used as described, will give you years of dependable service in your car, truck, RV, or mini-van. We have taken numerous measures in quality control to ensure that your product arrives in top condition and will perform to your satisfaction.
Precautions • This unit will only play the following discs. Type of disc Label on the disc CD, MP3, & WMA • Do not attempt to modify the unit. • Modifying the unit will void the warranty. • Stop the vehicle before carrying out any operation that could interfere with your driving. Recorded material Size of disc Audio only 12 cm • Do not operate in extremely high or low temperatures. The temperature inside the vehicle should be between 32º F (0º C) and 100º F (37º C) before turning on your unit.
Notes on Installation • Disconnect negative battery terminal before starting installation. Consult the vehicle’s owner’s manual for proper instruction. • The unit is designed for a 12Volt DC negative ground operation system only. Before installing the unit, make sure your vehicle is a 12Volt DC negative ground system. • Mark the polarity of the existing speaker wires before disconnecting the old unit. • Be sure to connect the color coded leads according to the diagram.
Before You Install Automotive audio equipment installations can be troublesome at times, even to the most experienced of installation technicians. If you are not confident working with electrical wiring, removing and reinstalling interior panels, carpeting, dashboards or other components of your vehicle, please call our toll-free help line 1-800-445-1797 and our in-house technical service team will answer your installation questions.
INSTALLATION DIN FRONT-MOUNT (Method A) Bend the tabs to secure the Mounting Sleeve in the dashboard. 1. Dashboard After inserting the Mounting Sleeve into the dashboard, select tabs on top, bottom, and sides, then bend them to secure the mounting sleeve in the dash board.(Fig. 1) 3. Screw 2. Mounting Sleeve Fig. 1 Follow the diagram in Fig. 2 for installing the rear mounting strap to the head unit. The rear mounting strap will help keep the head unit from moving around inside the dashboard. 1.
INSTALLATION DIN REAR-MOUNT (Method B) Installation using the screw holes on both sides of the unit. 1. Screw holes on the side of the unit. 2. Screws. Use either truss screws (5 x 8mm) or flush surface screws (4 x 8mm), depending on the shape of the screw holes in the bracket. 3. Vehicle’s Factory Mounting Bracket 4. Dashboard or Console 5 Hook (Remove this part) Note: The mounting sleeve, outer trim ring, and the mounting strap are not used for this method of installation.
INSTALLATION WIRING CONNECTIONS 10 Amp Fuse 1 Amp Fuse 7
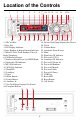
Location of the Controls 1 2 3 4 5 6 8 10 11 12 7 9 13 14 15 16 32 31 30 29 28 27 26 25 24 23 22 21 20 19 18 17 1. SD Card Slot 19. Previous Track/Change Frequency/Fast Reverse 2. Disc Slot 20. Clock 3. ID3 Display Indicator 21. Volume Knob 4. Intro, Random, & Repeat Function Indicators 22. Automatic Scan & Store 5. Main LCD for Track Number, Time, & 23. Mute Radio Frequency 24. Equalizer ON Indicator 6. FM Stereo Indicator 25. Pre-set #6/ UP 10 7. Number of Stored Pre-set for AM/FM Bands 26.
REMOTE CONTROL This unit comes with a full remote control system. The CR-2025 Lithium battery is an included item with the remote control Operating the remote control Aim at the face panel of the CD Receiver, the maximum distance at which signals can be received is about 6 meters. Make sure that the signal path is not obstructed. Do not drop or throw the remote control. Do not place the remote control in a location that is exposed to direct sunlight or next to a heating unit or other heat source.
Basic Operation 1. Tuning the Unit On / Off Press any button to turn the unit on, the display will show a message WELCOME to indicate it is ready for use. Press and hold the POWER button again to turn the unit off. 7. Treble Press the Volume knob on the faceplate or the “SEL” button on the remote until the display shows TRE 0. Rotate the volume knob on the faceplate or press the “+ or ” button on the remote to adjust the treble level. 2.
Basic Operation adjust the hour. 2. Rotate the volume knob to the left to adjust the minute. 3. Press the “CLK” Button again or leave the unit idle for new setting to effect. Press the “CLK” Button anytime to view the time clock display. 13. Preset Equalizer Function On the faceplate press and hold the Volume knob or press the “SEL” button on the remote for 2 seconds, the display will show “DSP OFF”.
Radio Operation 4. Mono/Stereo Reception Control In FM radio mode, press MONO button on the remote control to toggle between mono reception or stereo reception. The display will show "MONO" or "STEREO". Improvement of reception of distant stations can be done by selecting “MONO” operation which may cut down some reception noise. The “MONO/STEREO” function only works in radio mode. 1. Choose a Radio Frequency Choose American or European Frequency by selecting the A/E switch.
CD Operation 4. Play/ Pause CD On the Remote or Head Unit, press the No.1/ PAU Button to pause the CD. Press this button again to resume playback. 5. Scanning Tracks On the Remote or Head Unit, press the No.2/INT Button to play the first 10 seconds of each track. Press this button again to resume playback. 1. Insert/Eject CD Insert a disc into CD slot with label side up. The disc will be automatically loaded into the unit, even when it is off or in radio mode.
MP3/WMA Operation 1. Insert/Eject CD Insert a disc with MP3 and or WMA files into the CD slot with label side up. The disc will be automatically loaded into the unit, even when it is off or in radio mode. The word “MP3 DISC” will be displayed as the CD is loaded. The first file in the root folder will be played. As the file is playing "ROOT" will be displayed first, then any ID3 information available will be displayed as the file is playing. Press the “EJECT” Button to eject the disc from the slot.
MP3/WMA Operation Search Modes There are 4 search modes to help find your favorite MP3 & WMA tracks. THESE SEARCH MODES ONLY WORK WITH MP3/WMA FILES ON CDS, USB FLASH MEMORY, AND SD CARDS. These search modes do not work with any other CD types. folder will be opened. D. Character Search Character Search is for searching for files by their file names. On the faceplate press the F/PS button, or on the remote press the ABS button three times, “CHAR SCH” will be displayed.
USB Flash Memory Operation To play MP3 / WMA files from a USB Flash Memory Drive, remove the cover from the USB port, insert the USB Flash Memory Drive into the USB port. The unit will start playing MP3/WMA files on the USB Flash Memory Drive automatically. Or press the MODE Button to select USB when the unit has a USB Flash Memory Drive already inserted into the USB port 5. UP 10 Press the No.6/UP10 Button to advance 10 files at a time. 6. DN 10 Press the No.5/DN10 Button to go back 10 files at a time. 7.
SD Memory Card Operation To play MP3 / WMA files from a SD Memory Card, fully insert the SD Memory Card into the SD Memory Card slot, on the left side of the unit, until you hear and feel a click. MEM-CARD will be shown on the LCD and the unit will start playing the MP3/ WMA files on the SD Memory Card. If the unit already has a SD Memory Card inserted into the SD Memory Card slot. press the MODE Button to select MEM-CARD. Press the SD card again to eject the card from the slot.
AUX IN, RCA OUT, & SUBWOOFER 1. Auxiliary Input The Auxiliary Input Jack is on the front of the unit on the right side. Insert the supplied AUX IN cable's into the AUX IN jack. Press the Mode button to choose AUX. Connect any portable audio device such as a DVD player or VCD player to the AUX IN cable. Use the volume control to adjust the volume. 2. RCA Line Out The RCA Output Jack is on the back of the unit on the right side.
Simple Troubleshooting Guide CAUSE/SOLUTION PROBLEM No Power Check wiring connections. Check and make sure the fuse is not blown. Replace with the proper rating/size fuse. Some errors occur in the LCD or nothing functions when buttons are pressed. Press the RESET Button. Unable to receive stations Check and make sure the antenna is connected properly. Poor radio reception Check and make sure the antenna is the correct length. Make sure the antenna is not broken. If the antenna is broken, replace it.
Specifications GENERAL Operating Power ....................................................12 Volts DC, Negative Ground Output Wiring ............................................ Designed for using four speakers only RCA line out ..............................................................low-level outputs - 1000MV Output Impedance .............................................Compatible 4 to 8 Ohm Speakers Fuses ........................................................................................
Limited Warranty VIRTUAL REALITY SOUND LABS® products are designed and manufactured to provide a high level of trouble-free performance. VIRTUAL REALITY SOUND LABS® warrants, to the original purchaser, that its products are free from defects in material and workmanship for 30 days from the date of original purchase, as part of our commitment to product excellence. VIRTUAL REALITY SOUND LABS® and/or it’s affiliates routinely improves the designs, materials or production methods of its existing products.
©2006 Virtual Reality Sound Labs® All designs, logos and images are the exclusive property of Virtual Reality Sound Labs® and/or its affiliates. All rights reserved.