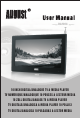
DA100C 10 INCH DIGITAL/ANALOGUE TV & MEDIA PLAYER TV NUMERIQUE/ANALOGIQUE 10 POUCES & LECTEUR MEDIA 10 ZOLL DIGITAL/ANALOG TV & MEDIA PLAYER TV DIGITALE/ANALOGICA & MEDIA PLAYER 10 POLLICI TV DIGITAL/ANALGICA 10 PULGADAS & LECTOR MEDIA
User Manual Safety To ensure your safety and the safety of others, please ensure you read the Safety Instructions before you use this product. Disposal Please ensure the product and its accessories are disposed in compliance with WEEE (Waste Electrical and Electronic Equipment) Directive and other regulations. Please check with your local authority for disposal regulations. Customer Service If you need help, please contact our Customer Service: Telephone: +44 (0) 845 250 0586 Email: service@augustint.
Quick Start Guide DA100C 1. When scanning for channels for the first time, it is suggested to use a rooftop aerial. If any channels are saved, the information will be saved to your TV and you can then switch to the portable antenna and change your location to find the best place to receive a signal. 2. Connect the device to the mains power then press power on the remote or press and hold the POWER button on the device for 1.5 seconds to switch the device on. 3.
7. Please note that the signal strength in some areas may not be sufficient to support TV reception using a portable aerial. The distance from the closest transmitter and other factors such as surrounding buildings, the walls of your house, weather and electromagnetic interference caused by power and telecommunication infrastructure may affect signal strength. Changing location may improve signal reception but a rooftop aerial designed for digital TV should be used to achieve the best possible reception. 8.
Contents 1 2. Accessories 2 3. Part Names and Functions 3 4. Connection 6 5. Basic Operation 8 6. Digital Freeview TV (DVB-T) 9 7. Digital TV Recording 15 8. Card Reader & USB Functions 16 9. Games 18 10. Analogue TV (ATV) 18 11. Battery Compartment 19 12. Specifications 21 13. Troubleshooting 22 14. Warranty 23 English 1.
1. Safety Instructions 1.1 Storage and Use Keep this TV set away from water or damp environments. Never expose this TV set to moisture, dust, oil or smoke. Never drop or expose this device to impact. Always secure this device during transport to avoid damage. Never strike this TV set or scratch with sharp objects. 1.2 Maintenance Please unplug all connection wires before cleaning this machine. Please wipe the display screen and buttons with a softcloth.
Operation Precautions 1. Use only the supplied power adaptor, failure to do so can damage the device and may cause personal injury. 2. When the device is not in use, turn off the AC adaptor or remove the car power adaptor from the 12V socket. Warning Do not watch this TV whilst driving. Never try to repair or modify this device yourself, this will invalidate the warranty, may cause further damage to the device and could cause personal injury.
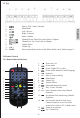
3. Part Names and Functions 3.1 Front 2 English 1 1. IR receiver window 2. LCD display 3.2 Back 1 1 2 3 4 9 5 6 7 8 10 1. Speakers 2. Antenna input 3. USB port 4. SD/MMC card slot 5. Headphone socket 6. AV in/out 7. Standby power indicator 8. 12V DC IN 9. Battery compartment 10. Stand slot *Note: The standby power indicator lights red when the device is in standby mode and connected to an external power source. When the device is switched on, the light turns off.
3.3 Top 1 3 4 5 6 7 8 9 10 Power / Play / Pause / Resume Main Menu Left / Reverse Right / Forward Enter/ Confirm Channel Down/ Down/ Previous Track or Chapter Channel Up/ Up / Next Track or Chapter Volume Down Volume Up Press repeatedly for mode switch. More details can be found on page 8 MENU VOLVOL+ MODE 3.4 Remote Control 3.4.1 Remote Button Functions 2 3 1 4 5 6 7 10 11 12 13 16 17 20 21 8 9 14 15 18 19 22 23 24 25 1. 2. 3. 4. 5. 6. REC 7. 8. 9. 10. 11. 12. MOVE 13. 26 14.
17. 18. 19. 20. 21. 22. 23. 24. 25. 26. English 27. 28. Next track or chapter Previous track or chapter Left / confirm or change settings in ATV mode Confirm settings Right / confirm or change settings in ATV mode Down / Channel Down Rewind in media player mode Forward in media player mode Switch subtitles on or off 7 day electronic program guide Use RIGHT, UP and DOWN to navigate today's program information. Use to view next day’s program information, use to come back.
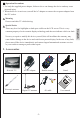
*Note: 1. Please ensure proper disposal of used batteries. 2. To prevent leakage of fluid from the lithium battery, remove the battery when not using the remote control for a long period of time. If the battery leaks fluid, carefully wipe it out of the battery case, then insert a new lithium battery. 4. Connection 1 2 4.2 Connecting headphones Connect your headphones to the headphone socket on the device.
4.3 Connecting to a TV set via AV Output Turn off all devices before connecting or disconnecting any cables. Audio/Video output Black AV cable (Included) TV Signal flow *Note: The AV output function is only available in Freeview (DVB-T) and Media player mode. 4.4 Connecting to an Audio/Video device via AV Input Turn off all devices before connecting or disconnecting any cables.
5. Basic Operation 5.1 Switching the device off or on 5.1.1 Switching on Connect the device to mains power, then either press and hold the power button on the device for 1.5 seconds, or press the power button on the remote control to switch the device on. 5.
6. Digital Freeview TV (DVB-T) 2. If there are no channels saved on the TV, Channel Organizer cannot be accessed, and "Channel not available" will be displayed. If the device is not set to the Digital TV mode, press MODE repeatedly until DTV appears on the screen, then press LEFT or RIGHT to confirm. 6.1 Channel Manager Channel Manager allows the user to sort, edit, delete, and classify the channels. 4.
2. If there are no channels saved on the TV, Channel Sorting cannot be accessed and "Channel not available" will be displayed. 3. Use UP/DOWN to select the channel, and then select the category by pressing the numbers (1-8). 3. Press UP/DOWN to select: 4. Press MENU to save. "Successfully updated" will display to confirm. ① First Option: Sorting by area, press RIGHT to enter the area list, use UP/DOWN to select, 6.1.4 Edit Channels press ENTER to confirm.
⑥PCR PID: can be changed by pressing the numbers. ⑦Once all settings have been made, press ENTER to confirm. “Successfully Updated” will show before you are returned to Edit Channels. ⑧During setup, press MENU at any time to cancel and exit to Edit Channels. 1. Use UP/DOWN to select TV channels and press ENTER. It will ask “ Delete all TV channels?”, select “Yes” to confirm and delete all channels, select “No” to cancel. 2. Use UP/DOWN to select Radio channels and press ENTER.
6.2.2 Manual Search If you know a channel's broadcasting frequency and bandwidth, using manual search to find the channel can be quicker. Select Manual Search, press ENTER, it will ask you to provide two parameters: After setting, press ENTER to start the search. After searching, the system will automatically exit the searching page, save program information and return to Installation menu, press MENU to exit. 1. OSD: supports 5 menu patterns, press LEFT/RIGHT to select between Theme1-5. 2.
2. Aspect Ratio: press LEFT/RIGHT to select between 16:9, 4:3 Pan Scan, 4:3 Letter Box, press ENTER to confirm and exit the setting. Or press UP/DOWN to select another option. 7. After setting, press ENTER to confirm, press MENU to exit the setup, it will show “Successfully updated”. 3. Brightness: press RIGHT to enter the list, use UP/DOWN to select, press ENTER to confirm, press ENTER again to exit the setting, or press UP/DOWN to select another option. 6.3.
In Manual timer mode, press UP/DOWN to select an option, use RIGHT/LEFT or numbers to change the Date or Time. (GMT Offset and Summer Time options are greyed out and not available in Manual timer mode). ①Wakeup Message: use LEFT/RIGHT to select between Birthday, Anniversary or General. ②Wakeup Channel: use LEFT/RIGHT to select a channel from the channel list. 4. Wakeup Date: press RIGHT to enter the Calendar, use UP/DOWN/LEFT/RIGHT to select a date. 6.3.
Enter the old password, if it is correct, the cursor will move to Enter New Password option, enter and confirm the new password. The system will show “Password changed”. 7. Digital TV Recording The device supports recording Freeview TV to a USB memory stick or external hard drive (FAT32, USB2.0) via the USB port. Before starting the recording, connect a USB stick or external hard drive, which has sufficient space left, to the device first. 7.1 Real Time TV Recording The system default password is 0000. 6.
8. Card Reader & USB Functions This player has built-in SD/MMC card reader and USB port. It supports the playback of MP3, JPEG and MPEG4 (AVI) files. Insert a SD/MMC card or an USB memory stick to the card slot or USB port on the player. 8.1 Movie Press MENU, select Movie, press ENTER, the Movie menu will show: Use UP/DOWN to select a subtrack. Please note the scheduled recording can only be activated when the device is ON and is in the Freeview TV mode.
Press press to play the previous movie, for the next one. Press to play the previous music file, press for the next one. Press MENU to stop at any time, press again to exit the playback. Press ZOOM to zoom in or zoom out. Press LEFT or RIGHT to move the picture. Press MENU to stop at any time, press again to exit the playback. 8.3 Photo Press MENU, select Photo, press ENTER, the Photo menu will show: Use UP/DOWN to select a subtrack. Use UP/DOWN to select a subtrack.
9. Games 10. Analogue TV (ATV) Games can be accessed by selecting Menu-> Game-> Native Games. To search for Analogue TV, press MODE repeatedly until it shows ATV, press LEFT or RIGHT to switch to the Analogue TV mode. Press MENU, the ATV SETUP menu will show as follows: English Press UP/DOWN to select the game you want to play, press ENTER to confirm. The games are played using UP/DOWN/LEFT/RIGHT buttons. To exit the game, press ENTER to pause, and then select Exit Game.
10.3 SKIP SWITCH The SKIP SWITCH allows you to hide any channels, and they will be skipped when selecting channels using CH+ or CH-. Move to the channel you want to skip, press MENU, then select SKIP SETUP, the following menu will show: 10.4 FINE TUNE The device will tune the program finely if selecting FINE TUNE.
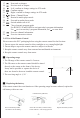
Caution: 1) Open the battery compartment Make sure the device is switched off and disconnected with the power lead. Slide to remove the battery compartment cover as shown below. Press and slide out 2) Place the batteries with “+” and “-“ poles in right direction as shown on the device. 3) Replace the battery cover, slide and push it back. -20- English Use AA 1.2V rechargeable batteries only. Use normal AA 1.5V batteries may cause permanent damage to the device and will invalidate the warranty.
12. Specifications Decode Standard DVB-T MPEG2 DVB-T Band Width 6, 7, 8 MHz DVB-T Frequency VHF: 177.5~226.5 MHz UHF: 474~858 MHz PAL-I , DK, BG SECAM-L, DK Analogue TV Format Analogue TV Frequency VHF: 48.25 ~ 160.25 MHz 168.25 ~ 456.25 MHz UHF: 464.25~863.25 MHz AV In System: PAL, NTSC, SECAM CVBS Input: 1.0Vp-p/75ohm Audio Input: 1Vrms~2Vrms AV Out CVBS Output: 1.0Vp-p/75ohm System: PAL, NTSC Antenna Input Impedance: 75ohm Card Reader Support SD/MMC card up to 8GB USB Port USB 2.
Music player Photo viewer Caption DIVX(4.0, 5.0), XVID File Type MP3,WMA Bit Ratio 32Kbps~320Kbps File Type JPG,JPEG(not include non--interlace) Resolution Up to 4000 x 3000 pixels 13. Troubleshooting Problems Possible Causes and Solutions No picture and no sound Check the connection with the AC adaptor or car adaptor. Use of an unauthorized power supply. Press POWER on the remote to turn on the device, or press and hold POWER on the device for 1.5 seconds to turn it on.
Warning No user serviceable components are fitted inside this TV. Do not attempt any repairs, as this will invalidate the warranty. Any repairs must be carried out by either the manufacturer or their nominated service centre. Parts inside this set are subject to high voltage. 14.
August International Ltd United Kingdom Telephone:+44 (0) 845 250 0586 www.augustint.