OWNER’S GUIDE GENERAL WARRANTY T10 Non-Folding Treadmill
Congratulations on choosing a Vision Fitness® treadmill. You’ve taken an important step in developing and sustaining an exercise program! Your treadmill is a tremendously effective tool for achieving your personal fitness goals.
Table of Contents GENERAL SAFETY INSTRUCTIONS.............................................. 2 GROUNDING INSTRUCTIONS, POWER REQUIREMENTS........................................... 3 OTHER SAFETY TIPS..................................................... 4 POWER SWITCH & SAFETY KEY.......................... 8 QUICK SPEED & ELEVATION KEYS...................... 7 CONTACT HEART RATE.............................................. 8 GENERAL ASSEMBLY & PLACEMENT........................................
IMPORTANT SAFETY INSTRUCTIONS This treadmill is intended for household use only. When using this treadmill, basic precautions should always be followed, including the following: Read all instructions before using this treadmill: DANGER: GENERAL TO REDUCE THE RISK OF ELECTRIC SHOCK: • A lways unplug the treadmill from the electrical outlet immediately after using and before cleaning.
GROUNDING INSTRUCTIONS This treadmill must be grounded. If it should malfunction or breakdown, grounding provides a path of least resistance for electric current to reduce the risk of electric shock. This treadmill is equipped with a cord having an equipment-grounding conductor and a grounding plug. The plug must be plugged into an appropriate outlet that is properly installed and grounded in accordance with all local codes and ordinances.
OTHER SAFETY TIPS FOR YOUR VISION FITNESS TREADMILL CAUTION: RISK OF INJURY TO PERSONS To avoid injury, stand on the siderails before starting treadmill. Read Instruction Manual before using. GENERAL CAUTION: If you experience chest pains, nausea, dizziness or shortness of breath, stop exercising immediately and consult your physician before continuing. • Do not wear clothing that might catch on any part of the treadmill. • Read this Owner’s Guide before operating this treadmill.
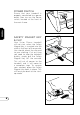
ASSEMBLY Vision Fitness recommends this treadmill be assembled and delivered by qualified personnel. If you have elected to assemble this treadmill yourself, for your safety please read and follow each of the steps in the enclosed Assembly Guide. It is recommended, when possible, that assembly be performed by an authorized Vision Fitness retailer. If you have any questions regarding any part or function of your treadmill, contact your Vision Fitnes retailer.
Power SWITCH GENERAL Ensure that your treadmill is properly connected to a power outlet, then turn on the Power switch, located at the front of the main frame. SAFETY Magnet KEY & CLIP Your Vision Fitness treadmill will not start unless the Safety Magnet Key is inserted into the circle in the front of the console. You should attach the clip end to your clothing. If at any time you need to stop the treadmill quickly, simply pull the Safety Magnet Key off the console.
T10 QUICK Speed and quick elevation keys Use the QUICK SPEED and QUICK ELEVATION keys as an option to increase and decrease the speed and elevation to your desired setting. First press the QUICK SPEED or QUICK ELEVATION key, then press the numbered keys (0-9). HEART RATE TIME DISTANCE CALORIES SPEED GENERAL ELEVATION PACE Change Display Hold to Scan QUICK Speed* Examples of the QUICK SPEED key operation: to change the speed to 4.0 mph/kph, press QUICK SPEED, then 4. To change the speed to 4.
Contact Heart Rate Hand Pulse Heart Rate Sensors GENERAL The Contact Hand Pulse Sensors are included on this treadmill to monitor your heart rate. To use, grasp both of the sensors with a comfortable grip during your workout. The console will display your heart rate. Although your signal will be displayed immediately, it may take the system a few seconds to zero in on your actual heart rate.
GENERAL CONSOLE HANDLEBARS SIDE RAILS MOTOR COVER RUNNING BELT LEVELERS TRANSPORT WHEELS 9
MOVING YOUR VISION FITNESS TREADMILL Your Vision Fitness treadmill has a pair of transport wheels built into the front legs. To move, firmly grasp the back end of the frame, carefully lift and roll. CAUTION: GENERAL Our treadmills are well-built and heavy, weighing up to 300 pounds! Use care and additional help if necessary. LEVELING Your treadmill should be level for optimum use.
CONSOLE INTRODUCTION Simply press the START key to begin exercising, or you can select a workout time and enter your weight. T10 HEART RATE ELEVATION TIME DISTANCE CALORIES SPEED PACE Change Display Hold to Scan CONSOLE Start Press for Easy Start Stop Hold to Reset CHOOSING A TIME Use the number keys or either set of arrow keys to select a workout time. Press START to start the workout or ENTER to enter your weight.
CONSOLE DISPLAY SCAN FUNCTION To scan through the functions during your workout, press the ENTER key. To continuously scan, press and hold ENTER until the console double-beeps (about twoT10 seconds). The selected function is displayed when the function light is on above the word. HEART RATE CONSOLE ELEVATION TIME DISTANCE CALORIES SPEED PACE Change Display Hold to Scan ELEVATION Shown as a percentage of incline.
User Engineering Mode Your treadmill offers a User Engineering Mode that can access certain data and help to troubleshoot your treadmill. The User Engineering Mode is designed for you to access functions that will not affect important treadmill settings. To access this mode, please hold down the SPEED DOWN and ENTER keys while the treadmill is at the start-up mode. When in User mode, “USER” is displayed in the data window. Press ENTER. Use either set of arrow keys to access the available functions/data.
USER ENGINEERING MODE (CONTINUED) PAUSE TIME P14 represents the pause time. The default pause time is five minutes. You can modify the pause time from 20 seconds to 10 minutes. You can modify this time by using the number keys or the SPEED arrow keys. Press and hold ENTER to save the new value. CONSOLE DEFAULT TIME P15 represents the program default time. You can modify this time by using the number keys or the SPEED or ELEVATION arrows. Press and hold ENTER to save the new value.
AUTO-CALIBRATION DO NOT STAND ON THE BELT WHEN PERFORMING THE AUTO CALIBRATION! “AUTO” appears in the data window for the auto-calibration function. To begin auto-calibration, press START. The treadmill will run through minimum and maximum speed and elevation. The autocalibration will take three to five minutes. When auto-calibration is complete, “End” will appear in the data window. The treadmill will reboot and return to the start-up screen. EXIT USER ENGINEERING MODE P16 represents exit mode.
LIMITED HOME USE WARRANTY* Vision Fitness extends the following exclusive, limited warranty, which shall apply only to the use of the device in the home, for residential, non-commercial purposes only. Any other use of the device shall void this warranty.
EXCLUSIVE REMEDY The exclusive remedy for any of the above warranties shall be repair or replacement of defective Parts, or the supply of Labor to cure any defect, provided that Labor shall be limited to one year. All Labor shall be supplied by the local Retailer who sold the Product and the Product must be located within that Retailer’s service area. Products located outside the Retailer’s service area will not be covered by the Labor warranty.
T10 1600 Landmark Drive • Cottage Grove, WI 53527 toll free 800.335.4348 • fax 608.839.8731 www.visionfitness.com 2012 Vision Fitness. All Rights Reserved. REV 1.