O w n e r’s Guide T 9 6 0 0 H R T P L AT F O R M T R E A D M I L L
C ongratulations on choosing a VISION FITNESS Treadmill. You’ve taken an important step in developing and sustaining an exercise program! Your Treadmill is a tremendously effective tool for achieving your personal fitness goals.
Table of Contents T9600HRT SAFETY INSTRUCTIONS . . . . . . . . . . 4 MOVING & LEVELING . . . . . . . . . . . 7 POWER & SAFETY KEY . . . . . . . . . 8 PROGRAM DETAILS . . . . . . . . . . . . . 9 PROGRAM DETAILS - FAT BURN . . . 10 PROGRAM DETAILS - SPEED TRAINING 11 PROGRAM DETAILS - ENDURANCE . . 12 FEEDBACK DISPLAY . . . . . . . . . . . .13 FEATURES . . . . . . . . . . . . . . . . . . 16 CHOOSING PROGRAM . . . . . . . . . 18 ABOUT HEART RATE TRAINING . . . . 20 HEART RATE TRAINING - FAT BURN .
CONSOLE HANDLEBARS SIDE RAILS RUNNING BELT MOTOR COVER LEVELERS TRANSPORT WHEELS 3 T9600HRT F U L L P L AT F O R M T R E A D M I L L
IMPORTANT SAFETY INSTRUCTIONS SAVE THESE INSTRUCTIONS When using an electrical product, basic precautions should always be followed, including the following: Read all instructions before using this exercise product. WARNING! To reduce the risk of burns, fire, electrical shock or injury to persons: • Use this exercise product for its intended use as described in this Owner’s Guide. Do not use attachments not recommended by the manufacturer. • Never drop or insert any object into any opening.
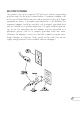
WALL POWER TO TREADMILL This product is for use on a nominal 120-volt circuit, and has a grounding plug that looks like the plug illustrated below. A temporary adapter such as the one illustrated below may be used to connect this plug to a 2-pole receptacle as shown, if a properly grounded outlet is not available. The temporary adapter should be used only until a properly grounded outlet can be installed by a qualified electrician.
OTHER SAFETY TIPS FOR YOUR VISION FITNESS TREADMILL CAUTION!: If you experience chest pains, nausea, dizziness or shortness of breath, stop exercising immediately and consult your physician before continuing. • Do not wear clothing that might catch on any part of the Treadmill. • Read this Owner’s Guide before operating this Treadmill. CLEANING • 6 Clean with soap and slightly damp cloth only; never use solvents.
MOVING YOUR VISION FITNESS TREADMILL Your VISION FITNESS Treadmill has a pair of transport wheels built into the front legs. To move, firmly grasp the back end of the frame, carefully lift and roll. CAUTION: Our Treadmills are well-built and heavy, weighing up to 325 lbs.! Use care and additional help if necessary. PLACEMENT IN YOUR HOME It is important that you place your Treadmill in a comfortable and inviting room. Your Treadmill is designed to use minimal floor space.
POWER Ensure that your Treadmill is properly connected to a power outlet, then turn on the Power switch, located at the front of the main frame. SAFETY KEY CLIP & TETHER Your VISION FITNESS Treadmill will not start unless the Safety Key is inserted into the keyhole in the center of the console case. You should attach the clip end to your clothing. If at any time you need to stop the Treadmill quickly simply pull the Safety Key off the console.
T9600HRT PROGRAM DETAILS PROGRAM QUICK-KEYS We have made choosing a program simple and easy with our program Quick-Key feature. All you need to do is press one of the pre-set program Quick-Keys and you are on your way to starting your program. We have divided our programs into three categories; Fat Burn, Speed Training, and Endurance. By doing this you now have a quick reference on what type of workout you will be doing. PROGRAM LEVELS All programs, except for Heart Rate Training programs, have 9 levels.
T9600HRT PROGRAM DETAILS - FAT BURN The Fat Burn programs use gradual changes in speed or elevation to increase your calorie burn, yet keep you within your Target Heart Rate Zone. Great for people who want to drop a few pounds, or just to keep a consistent exercise program moving along. Set the speed you want to exercise at, and the program will change the elevation to keep you in your Target Heart Rate Zone. The program default time is 32 minutes.
T9600HRT PROGRAM DETAILS - SPEED TRAINING The Speed Training Programs use effort intervals and recovery intervals to help with your performance training. These programs are great for building speed and peak performance for all athletic activities. Set your heart rate goal, as well as effort and recovery interval times, and the program will adjust your speed to reach the goal. The program default time is 32 minutes. Challenge yourself with this effort and recovery speed interval program.
T9600HRT PROGRAM DETAILS - ENDURANCE TRAINING The Endurance Training Programs uses gradual increases in elevation and/or speed to develop endurance. These programs are great training tools for those who have set a personal goal of competing in a race, or for those who want to increase their endurance in other activities. Increases your endurance by changing speed and elevation, while keeping at the Target Heart Rate that you set. The program default time is 32 minutes.
T9600HRT FEEDBACK DISPLAY ALPHANUMERIC MESSAGE CENTER This is a display that will scroll the operation instructions in the top center display window. It will also display your feedback when the LED next to the appropriate word is lit. TIME Shown as Minutes:Seconds. View the Time remaining or the Time elapsed in your workout. DISTANCE Shown as Miles. View Distance traveled during workout. CALORIES Shown as estimated accumulated Calories burned during workout. HEART RATE Shown as Beats-per-Minute.
T9600HRT FEEDBACK DISPLAY ELEVATION Shown as percentage of incline, Elevation is visible in the left-hand LED window. Indicates how steeply inclined the running surface is, to simulate running on a hill. SPEED Shown as Miles/Hour, Speed is visible in the right-hand LED window. Indicates how fast the running surface is moving, to simulate outdoor running. PROFILE MATRIX WINDOW 10 X 21 The Left dots #1-10 will show an Elevation Profile in 10 segments in ORANGE.
T9600HRT FEEDBACK DISPLAY PROFILE MATRIX WINDOW 10 X 21 The Center column will be the Segment Progress Bar. The bar will be displayed in GREEN and shows how much time is left in your current segment. This will take the segment time and divide it into 10 dots and as you complete more of the segment more of the dots are lit. For example: if your workout is 10 minutes long, each segment is 1 minute long. The Segment Progress Bar will then divide that 1 minute into 10 dots of 6 seconds per dot.
T9600HRT FEATURES USER LOG-IN The console on the T9600HRT has a special feature that allows you to Log-In and save all data from your workout. To use this function follow these steps. PRESS USER LOG-IN BUTTON When selected, the green LED next to the button will be lit. Use the Arrow keys to choose a user I.D. number (1-10). This will appear in the Alphanumeric Message Center. Then press SELECT.
T9600HRT FEATURES USER TOTALS BUTTON To use this function you will need to use the same User Log-In code and follow these three steps. PRESS USER TOTALS BUTTON When selected, the orange LED next to the button will be lit. Use the Arrow keys to enter your User I.D. Number. This is the same number that you use to log-in before you begin working out. Then press SELECT. TOTALS ARE DISPLAYED Now your accumulated totals for Distance, Hours, Calories, and Average Speed are displayed.
CHOOSE A PROGRAM Select the desired program by using one of the Quick-Keys or user program keys. You may also press START to enter the Manual mode. CHOOSING A LEVEL Choose Level using Arrow keys and press SELECT. The elevation & speed window will display the programs maximum elevation & speed. The Alphanumeric Message Center will also display “Level1”, etc.. CHOOSING A TIME Choose Time using Arrow keys and press SELECT. The Time window will blink to let the user know what time they have input.
ENTERING YOUR WEIGHT Enter weight using Arrows and press START. The Alphanumeric Message Center window will display “Weight lbs. 150” to let the user know what their Weight is. After you press START the Matrix will display a 3,2,1 count down and “beep”.
GENERAL HEART RATE TRAINING RECOMMENDATIONS To use the Heart Rate Training Program, it is important to determine your Target Heart Rate Zone, using the chart below. After determining your Target Zone, you should use the treadmill in MANUAL mode to see if the Target Zone you have selected is correct. This will give you a good base to start your Heart Rate Training.
WIRELESS CHEST TRANSMITTER Prior to wearing the Strap on your chest, moisten the two rubber contact pads with several drops of water and spread about with your fingers. TRANSMITTER STRAP PLACEMENT Center the Transmitter Strap just below the breast or pectoral muscles, directly over your sternum with the VISION FITNESS logo facing out. Adjust the elastic strap length to avoid bouncing or sliding.
RATE OF PERCEIVED EXERTION Rate of Perceived Exertion (R.P.E.) is one of the easiest ways to monitor exercise intensity. By becoming familiar with the RPE scale, you can continually assess your level of intensity and insure a level of exertion that is comfortable. An increase in exercise intensity is directly related to elevation in exercise heart rate. Consequently RPE can be used alone or together with heart rate when monitoring exercise intensity. RPE SCALE 0 Nothing at all .
T9600HRT HEART RATE TRAINING - FAT BURN HEART RATE TRAINING - ELEVATION ONLY Program default is 32:00 minutes Enter Target Heart Rate, Time, & Weight. The treadmill has a manual mode warm up until you reach your Target Heart Rate. During the warm up mode you control both speed and elevation. This does not count for the program time. Once you reach your Target Heart Rate, the treadmill now controls your Heart Rate by Elevation only to keep you in your Target Zone.
CHOOSE PROGRAM TIME After you have chosen your Target Heart Rate, the time window will show the program default time of 32:00. You may change the Time, using either set of Arrow buttons. Press the SELECT button to enter your Time. The Minimum Time for this program is 5 minutes. If you are ready to begin exercising, press the START button. Optionally, if you wish to enter your weight, proceed to the next step.
WARM UP MODE Now the treadmill is in the manual warm up mode. You are now in control of both the speed and elevation to reach your target Heart Rate Zone. Once a steady Heart Rate within 5+/- Beats Per Minute of your entered Target Zone is found, the console will beep 3 times and then enter the Heart Rate Training mode. PROGRAM MODE Now the treadmill will automatically adjust your elevation to keep you in your Target Zone. This will repeat throughout the program.
COOL DOWN MODE After you have completed your timed workout, the console will display: “Cool Down Mode, Press Stop to complete workout”. This is to let you know that your program has ended. You are now in a manual mode cool down and have control of the Speed and Elevation. This lets you cool down at your own pace. You may now press the SELECT button to view your totals. ENDING THE PROGRAM Once you feel your cool down has elapsed, press the STOP button and the treadmill will stop.
T9600HRT HEART RATE TRAINING - SPEED TRAINING HEART RATE TRAINING - SPEED ONLY Program default is 32:00 minutes Enter Target Heart Rate, Program Time, Work Time, Rest Time, & Weight. The treadmill has a manual mode warm up until you reach your Target Heart Rate. During the warm up mode you control both speed and elevation. This does not count for the program time. Once you reach your Target Heart Rate, the treadmill now controls your Heart Rate by Speed only to keep you in your Target Zone.
CHOOSE PROGRAM TIME After you have chosen your Target Heart Rate, the time window will show the program default time of 32:00. You may change the Time, using either set of Arrow buttons. Press the SELECT button to enter your Time. NOTE: The function window will blink and the time LED will be lit to let you know what time you have input. CHOOSE INTERVAL WORK TIME After you have chosen your Program Time, you will now need to enter your HRT Interval Work Time.
CHOOSE INTERVAL REST TIME After you have chosen your Program Time, you will now need to enter your HRT Interval Rest Time. This is the rest time between your Work Interval. There is no Heart Rate Feedback to control speed. To change the time, use either set of Arrow buttons to enter your Interval Rest Time and press the SELECT button. If you are ready to begin exercising, press the START button. Optionally, if you wish to enter your weight, proceed to the next step.
WARM UP MODE Now the treadmill is in the manual warm up mode. You are now in control of both the speed and elevation to reach your target Heart Rate Zone. Once a steady Heart Rate within 5+/- Beats Per Minute of your entered Target Zone is found, the console will beep 3 times and then enter the Heart Rate Training mode. PROGRAM MODE Now the treadmill will automatically adjust your speed to keep you in your Target Zone. This will repeat throughout the program.
COOL DOWN MODE After you have completed your timed workout, the console will display: “Cool Down Mode, Press Stop to complete workout”. This is to let you know that your program has ended. You are now in a manual mode cool down and have control of the Speed and Elevation. This lets you cool down at your own pace. You may now press the SELECT button to view your totals. ENDING THE PROGRAM Once you feel your cool down has elapsed, press the STOP button and the treadmill will stop.
T9600HRT HEART RATE TRAINING - ENDURANCE HEART RATE TRAINING - ELEVATION & SPEED Program default is 32:00 minutes Enter Target Heart Rate, Time, & Weight. The treadmill has a manual mode warm up until you reach your Target Heart Rate. During the warm up mode you control both speed and elevation. This does not count for the program time. Once you reach your Target Heart Rate, the treadmill now controls your Heart Rate by Speed and Elevation.
CHOOSE PROGRAM TIME After you have chosen your Target Heart Rate, the time window will show the program default time of 32:00. You may change the Time, using either set of Arrow buttons. Press the SELECT button to enter your Time. The Minimum Time for this program is 5 minutes. If you are ready to begin exercising, press the START button. Optionally, if you wish to enter your weight, proceed to the next step.
WARM UP MODE Now the treadmill is in the manual warm up mode. You are now in control of both the speed and elevation to reach your target Heart Rate Zone. Once a steady Heart Rate within 5+/- Beats Per Minute of your entered Target Zone is found, the console will beep 3 times and then enter the Heart Rate Training mode. PROGRAM MODE Now the treadmill will automatically adjust your speed and elevation to keep you in your Target Zone. This will repeat throughout the program.
COOL DOWN MODE After you have completed your timed workout, the console will display: “Cool Down Mode, Press Stop to complete workout”. This is to let you know that your program has ended. You are now in a manual mode cool down and have control of the Speed and Elevation. This lets you cool down at your own pace. You may now press the SELECT button to view your totals. ENDING THE PROGRAM Once you feel your cool down has elapsed, press the STOP button and the treadmill will stop.
FITstrategy™ CUSTOM USER PROGRAMS Design your own Programs by setting the desired Speed and Elevation. All Programs have 10 intervals and a minimum program Time of 10 minutes. By designing your own programs you now can control your fitness goals workout by workout. This allows you to modify your training based on certain events or milestones you may have set for yourself. USER PROGRAM DETAILS PROGRAMMING A USER PROGRAM Select a user program by pressing one of the User Program Buttons.
ENTER SEGMENT SPEED The #1 column will blink. Press Speed Arrows to change the segment column Speed (Speed numeric values changing with red column). NOTE: The Alphanumeric Message Center will scroll: “Press select to move to next interval”. ENTER SEGMENT ELEVATION Then press the Elevation Arrows to change the segment column Elevation (notice Elevation numeric values changing with orange column). NOTE: The Alphanumeric Message Center will scroll: “Press select to move to next interval”.
SAVING SEGMENT DATA Press the SELECT button to store Speed and Elevation, then proceed to the next column. NOTE: Repeat entering segment speed and segment elevation until all 10 segments are completed. ENTERING YOUR WEIGHT After you have completed entering your segment data, you may now enter your Weight. By entering your Weight, the totals for Calories will be adjusted according to your entered Weight.
TROUBLESHOOTING YOUR TREADMILL Our Treadmills are designed to be reliable and easy to use. If, however, you have a problem, these troubleshooting steps may indicate the cause. PROBLEM: The Console does not light up. SOLUTION: Check to make sure the Treadmill is connected to a functioning outlet, and that the Treadmill is turned on. PROBLEM: The Treadmill’s built-in circuit breaker trips repeatedly, shutting-off for no apparent reason.
TROUBLESHOOTING YOUR HEART RATE MONITOR CHEST STRAP PROBLEM: No pulse reading appears SOLUTION: There may be a poor connection between the contact pads and skin. Remoisten electrodes. SOLUTION: Transmitter is not properly positioned. Reposition the chest strap. SOLUTION: Verify that the distance between transmitter and receiver is not beyond the recommended range of 36 inches. PROBLEM: There is an erratic pulse rate. SOLUTION: Chest strap is too loose; readjust according to directions.
COMMON TREADMILL QUESTIONS Q: Are the sounds my Treadmill makes normal? A: All Treadmills make a certain type of thumping noise due to the belt riding over the rollers. This noise will diminish over time, although it might not totally go away. With use, the belt will stretch, causing the belt to ride more smoothly over the rollers. It might appear that one Treadmill is louder another. There are many reasons for this and may not be due to a defect.
TENSIONING THE BELT If the running belt slips when used, use the supplied 8MM Allen wrench to turn the left and right tension bolts clockwise 1/4-turn at a time until the belt no longer slips. CENTERING THE BELT If the running belt is too far to the right side, use the supplied 8MM Allen wrench to turn the right tension bolt clockwise 1/4-turn at a time until the belt remains centered during use.
LIMITED HOME USE WARRANTY VISION FITNESS extends the following exclusive, limited warranty, which shall apply only to the use of the device in the home, for residential, non-commercial purposes only. Any other use of the device shall void this warranty.
LIMITED HOME USE WARRANTY (continued) EXCLUSIVE REMEDY The exclusive remedy for any of the above warranties shall be repair or replacement of defective Parts, or the supply of Labor to cure any defect, provided that Labor shall be limited to one year. All Labor shall be supplied by the local Retailer who sold the Product and the Product must be located within that Retailer’s service area. Products located outside the Retailer’s service area will not be covered by the Labor warranty.
DEVELOPING A FITNESS PROGRAM WARM UP When you exercise you need more oxygen to fuel your muscles. This oxygen is carried to the muscles through blood. The increasing demands of exercise will cause increased breathing rate, heart rate, blood flow and blood temperature. As your blood temperature rises and more oxygen is released, the temperature of your muscles will increase. This allows the muscles to burn calories and create energy for exercise.
FLEXIBILITY Before stretching, take a few minutes to warm-up as stretching a cold muscle can cause injury. When stretching you should start slowly, exhaling as you gently stretch the muscle. Try to hold each stretch for at least 15 to 30 seconds. Don’t bounce when you stretch. Holding a stretch is more effective and less of a risk for injury. Don’t strain or push a muscle too far. If a stretch hurts, ease up. SEATED TOE TOUCH Sit on the floor with your legs together and straight out in front of you.
STANDING CALF STRETCH Standing about 3 feet from a wall, take one step forward with your left foot. Place your hands on the wall in front of you. Your elbows slightly bent, shoulders, hips, and feet are pointed directly towards the wall. Bend your left leg slowly using the movement to control the amount of stretch in the right calf. Your heels should stay on the ground. Slowly bring yourself back to the starting position and switch legs. Alternate for the amount of desired repetitions.
EXERCISE GUIDELINES The American Council of Sports Medicine (A.C.S.M.) recommends the following exercise guidelines, for healthy aerobic activity: Frequency: Exercise 3 to 5 days each week. Warm-up: Warm-up 5 to 10 minutes before aerobic activity. Duration: Maintain your exercise intensity for 20 to 60 minutes. Cool Down: Gradually decrease the intensity of your workout, then stretch to cool down during the last 5 to 10 minutes.
ACHIEVING YOUR FITNESS GOALS An important step in developing a long term fitness program is to determine your goals. Is your primary goal for exercising on your VISION FITNESS Product to lose weight? Improve muscle tone? Relieve stress? Prepare for the spring racing schedule? Knowing what your goals are will help you develop a more successful exercise program.
SAMPLE GOALS: Goal-setting is a popular motivational technique. It’s important to set goals and reward yourself when initiating a new exercise program because you’re attempting to break current patterns and form a new habit. Whether you use this technique or another, make fitness a priority in your life. You can achieve the ultimate reward to yourself: you can establish the exercise habit! Some sample goals may be: •To strengthen my heart by exercising 24 minutes three days a week.
52
53
54
55
vision fitness the vision to succeed 500 South CP Avenue • P.O. Box 280 • Lake Mills. WI 53551 toll free 1.800.335.4348 • phone 1.920.648.4090 • fax 1.920.648.3373 www.visionfitness.com 2001 Vision Fitness. All Rights Reserved. Bio-Radius, Cool-Weave, Easy-8, and HRT are Trademarks of Vision Fitness. 8.01 Part #Z96TM53-OM18.09PRD OM18.