HARDWARE INSTALLATION GUIDE VC58EHi – Standard D1 Box Type IP Camera VC58SMi – 1.3 Megapixel Box Type IP Camera VC58SM3Ti – 3.0 Megapixel Box Type IP Camera Version 1. 0. 2 Released on 1 of Sept., 2011 st Vision Hitech Co., Ltd.
PRECAUTIONS By selecting this product, you have decided to use a professional device that guarantees highest quality and reliability. We would like to thank you very much for your confidence and kindly ask you to read the following instructions carefully before installation and operation in order to take full advantage of all quality features regarding this product.
Table of content Hardware Installation Guide 1. Precautions ---------------------------------------------------------------------------------------------------- 4 2. Limitation of liability ---------------------------------------------------------------------------------------- 4 3. Disclaimer of warranty ------------------------------------------------------------------------------------- 4 4.
1. Precautions Please read the manual carefully before the installation in order to set up the camera correctly and to obtain the best picture quality. Please keep the manual in good condition for your future reference and service application. Installation and services should be only carried out by an authorized personnel according to local safety regulations.
(2) Personal injury or any damage caused by inappropriate use or negligent operation of the user; (3) Unauthorized disassemble, repair or modification of the product by the user; (4) Inconvenience or any loss arising when images are not displayed, due to any reason or cause including any failure or problem of the product; (5) Any problem, consequential inconvenience, or loss or damage, arising out of the system combined by the devices of third party.
5. Name and function of each part 5-1. Front C-Mount lens adaptor Protective cover 5-2. Right side Intelligent Photo sensor Day/Night mechanical filter changer (Inside) Auto IRIS Lens Connector 1/3” Sony super HAD CCDII & WDR chipset Back focus adjustment Knob (Tolerance + / - 0.
5-3. Bottom Fixture 1/4”-20 mounting thread Fixture can be separated and attached on the top side as well. Please use the supplied clamp screws only to change the position of the bracket. Using screws more than 5mm depth can do a serious damage to the inside of this camera. * Use an international standard 1/4”-20 mounting screw to install the camera. 5-4.
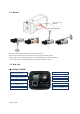
■ VC58SM3Ti Microphone-in(Audio-in) Speaker-out (Audio-out) Status LED (Yellow) Power LED (Green) Network Connector SD Card Insert Hole Reset button Analog Video Out Power Connector Sensor/Alarm Connector RS485 Connector Power Connector: Only use the supplied AC adapter to avoid any possible damage from electric shock. Network Connector: Connect 10Base-T Ethernet or 100Base-TX Fast Ethernet cable. When use PoE, connect Ethernet cable coming from PoE injector or switch.
6. Installation 6-1. Lens Lens is not supplied with the unit. C-Mount or CS-Mount type of lens is useable. Please select a lens that has a good F-Stop number in order to get the best picture quality. Use of DC auto iris lens is recommended to achieve the best results for operating this product effectively. ☞ Caution Please make sure the surface of the lens is always clear. Clean dirt or water drops with soft cloth in order to avoid the picture blooming or reflection. 6-2.
● Take off the Protection cover. ● Assemble the CS-MOUNT lens by turning it clockwise. - When used with an Auto Iris lens, please insert the iris jack into the Iris socket which is located on the right side of the camera. - Please set the lens selection to DC on the OSD setting. Caution - Use the lens as shown in the picture here. When the lens is out of the spec, it could damage the camera inside or may not be correctly fitted with the camera. Use the lens less than 450g.
The standard IEEE 802.3af describes two types of devices: Power Sourcing Equipment (PSE)and Powered Devices (PD). Power sourcing equipment provides power to the powered devices. The network camera represents the powered device, whereas a PoE Injector is a PSE device. The VISION Network Camera models are IEEE 802.3af standard PoE compliant. They can be used with any IEEE 802.3af-compliant PoE injector, PoE switch, PoE mid-span and PoE end-span.
Video Min. Illumination 0.5 Lux with DSSX2 (F1.2, 30IRE, AGC On), Day & Night D/N Output Port, ICR Lens (Not included) Video compression Resolutions C/CS Mount, DC Iris H.264 baseline profile, Motion JPEG Up to 1280 x 720 Frame rate H.264 Up to 30fps with 1280x720 MJPEG Up to 30fps with VGA resolution Video streaming Support multi stream with H.264, MJPEG Adjustable frame rate VBR/CBR in H.
Dimension 66mm(W) X 57mm(H) X 126mm(D) Operating Temperature -25 degree~50 degree Celsius (-13F~122F) Storage Temperature -25 degree~60 degree Celsius (-13F~140F) Software Included Software NVR Lite (16 Channel), IP Installer (Windows Only) Package Package Contents Network Camera, Use Manual, External Power Adaptor, Bracket, Software CD Environment 8-2.
System integration Wireless LAN Intelligent video RTSP, RTP, TCP, UDP, ICMP, DHCP IEEE 802.
MJPEG Up to 30fps at D1 Video streaming Support multi stream with H.264, MJPEG Adjustable frame rate VBR/CBR in H.264 Pan/Tilt/Zoom Digital PTZ Image setting Day & Night Auto White Balance Auto Exposure Privacy Mask Effect - Color, Sharpness, Mirror/V-Flip, etc. Audio Network Output BNC x1, 1.0Vp-p, 75 ohm Composite Video, NTSC/PAL Audio streaming Two-way, full duplex Audio compression G.
Page 16 / 16