Parallel Port Scanner Installation Guide FOR WINDOWS
COPYRIGHT INFORMATION Copyright © 2000 Visioneer, Inc., a wholly owned subsidiary of Primax Electronics LTD. Reproduction, adaptation, or translation without prior written permission is prohibited, except as allowed under the copyright laws. The Visioneer brand name and logo are registered trademarks of Primax Electronics LTD. OneTouch is a trademark of Primax Electronics LTD. The PaperPort brand name and logo are registered trademarks of ScanSoft, Inc. Microsoft is a U.S.
TA B L E O F C O N T E N T S Welcome . . . . . . . . . . . . . . . . . . . . . . . . . . . . . . . . . . . . . . . . . . . . . . 1 What’s in the Box . . . . . . . . . . . . . . . . . . . . . . . . . . . . . . . . . . . . . . . 1 The Parallel Port Scanner . . . . . . . . . . . . . . . . . . . . . . . . . . . . . . . . . 2 What You Need . . . . . . . . . . . . . . . . . . . . . . . . . . . . . . . . . . . . . . . . . 3 Getting the PaperPort Online Documentation . . . . . . . . . . . . . . . . .
WELCOME Congratulations on purchasing the parallel port, flatbed scanner. With your scanner, you can quickly scan paper documents and color photos to place their electronic images on your computer. WHAT’S IN THE BOX Before starting the installation, check the contents of the box to make sure that all parts are included. If any items are missing or damaged, contact the dealer where you purchased the scanner.
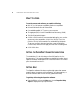
THE PARALLEL PORT SCANNER THE PARALLEL PORT SCANNER 1 Document cover 2 Document pad 3 Glass 4 Reference frame 5 Printer port 6 Host port 7 Power jack 1 Document cover. Close the document cover after placing items on the scanner glass. 2 Document pad. Helps to secure the document in place on the scanner glass. 3 Glass. Place items face down on the glass, aligned at the lower left corner. 4 Reference frame. Place items face down within this frame.
3 PARALLEL PORT SCANNER INSTALLATION GUIDE WHAT YOU NEED To use the scanner and software, you need the following: ■ IBM PC (or 100-percent compatible) Pentium or equivalent ■ Microsoft Windows 98 or Windows 2000 ■ One available parallel (LPT) port on your computer ■ 32 megabytes (MB) or more of available internal memory (RAM) ■ 70 MB of free hard disk space ■ A VGA or SVGA monitor.
CONNECTING THE SCANNER TO THE COMPUTER 4 CONNECTING THE SCANNER TO THE COMPUTER Your parallel port scanner connects to any available parallel (LPT) port. Check your computer’s manual for the parallel port locations. Note: Please follow the sequence of steps in this section. Do not connect the power cable until all other connections are complete. To connect the parallel port scanner: 1. Save any open files, then shut down the power to your computer. 2.
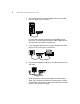
5 PARALLEL PORT SCANNER INSTALLATION GUIDE 4. Plug the other end of the scanner’s parallel cable into the parallel port on the back of your computer. On some older computers the serial port and parallel port both have 25-pin connectors that fit the scanner cable. Please make sure you plug the scanner cable into a parallel port. 5. If you unplugged a printer from the computer’s parallel port earlier, plug it into the “Printer” port on the scanner. 6.
INSTALLING THE SCANNER SOFTWARE 6 7. Turn on your computer. You’re now ready to install the software. INSTALLING THE SCANNER SOFTWARE Install the scanner software after connecting the scanner to your computer. To install the scanner software: 1. Start Microsoft Windows 98 or Microsoft 2000 and make sure that no other applications are running. 2. Insert the CD into your computer’s CD-ROM drive. The CD automatically starts.
7 PARALLEL PORT SCANNER INSTALLATION GUIDE SETTING UP THE SCANNER The steps to set up the scanner identify the type of scanner you have and prepares the PaperPort software to scan with it. To set up the scanner: 1. If the PaperPort software isn’t currently running, double-click the PaperPort icon on the Windows Desktop to start it. The PaperPort Desktop appears. 2. From the File menu, choose Select Source. The Select Source dialog box appears, listing all Twain devices installed on your computer.
SCANNING AN ITEM 8 SCANNING AN ITEM You can scan many types of items, from small business cards to A4-sized pages. Your scanner also has special settings for scanning color photos and text documents. For more information about scanner settings, see “Adjusting Scanner Settings” on page 11. To scan an item: 1. If the PaperPort software isn’t currently running, double-click the PaperPort icon on the Windows desktop to start it. The PaperPort Desktop appears. 2.
9 PARALLEL PORT SCANNER INSTALLATION GUIDE 4. From the list of Scanner Settings labeled “Scan Page For,” select the most appropriate setting for the item you’re scanning. In the example above, the selected setting is “Color Document-Faster.” 5. Click the Preview button. The scanner scans a preview of the item on the scanner glass and displays it in the Scan Manager window. In the following example, the picture being scanned is a close-up of a friendly cow. 6.
SCANNING AN ITEM 10 7. Check the preview image. If you want to change the scanner setting for the item, click one of the options in the list to “Scan Page For.” For example, to scan a black and white image instead of a color photo, select Black & White Photo in the list. See the table in the section “Selecting a Predefined Scanner Setting” on page 12 for a description of these predefined settings. You can also select from the Scan Configuration options. 8. Select the area of the item you want to scan.
11 PARALLEL PORT SCANNER INSTALLATION GUIDE Thumbnail image Note: For additional details about the Scan Manager’s features click the Help button on the Scan Manager. ADJUSTING SCANNER SETTINGS You can adjust the scanner settings to fine tune the scanned item. This section tells you how to: ■ Select a predefined scanner setting. ■ Select scan configuration options. ■ Customize a scanner setting. ■ Adjust the brightness and contrast. ■ Select the area of the item you want to scan.
ADJUSTING SCANNER SETTINGS 12 SELECTING A PREDEFINED SCANNER SETTING In the Scan Manager window, you can select one of the predefined scanner settings from the list “Scan Page For.” The settings are described in the following table. Scan Page For Default Setting To Scan Description Editing Text (OCR) Black-and-white 300 dpi Business letters, contracts, memos, and other documents that you want to edit Enhances the use of OCR software for converting item text to editable text.
13 PARALLEL PORT SCANNER INSTALLATION GUIDE Color Grayscale B&W Selecting the proper scanner setting before scanning produces the best results for a scanned item. The scanner setting determines the resolution of the item and the number of possible shades of gray or color. The symbols next to the setting names indicate the scan mode—color, grayscale, or black and white. The scanner settings affect the speed of the scan and the file size.
ADJUSTING SCANNER SETTINGS 14 Size—The page size for the image. If you want to use one of the preset sizes, click the drop-down arrow and choose the size from the list. If you want to create a custom size, click on the picture window and drag the mouse. A dotted box on the window indicates the page size, and the two number boxes—with the vertical and horizontal symbols next to them—show the actual page size in inches. You can also enter the vertical and horizontal sizes in those two number boxes.
15 PARALLEL PORT SCANNER INSTALLATION GUIDE 4. Click the Save As button. The Save As dialog box appears. 5. Type a name for the new scanner setting. 6. Click Save. The new setting is added to the list of “Scan Page For” options at the top of the dialog box. ADJUSTING THE BRIGHTNESS AND CONTRAST Sometimes an item is scanned with the brightness and contrast set to be too light or too dark. For example, a note written with a light pencil may need to be scanned darker to improve legibility.
ADJUSTING SCANNER SETTINGS 16 3. Drag the Brightness slider to the left to make the item darker or to the right to make the item lighter. 4. Drag the Contrast slider to the left to decrease the contrast or to the right to increase the contrast. 5. Click OK on the Advanced Settings dialog box. Note: For more detailed information on advanced settings, click the Help button on the Scan Manager.
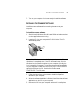
17 PARALLEL PORT SCANNER INSTALLATION GUIDE CLEANING THE SCANNER GLASS Scanning items that have excessive amounts of dirt or dust may dirty the glass. To ensure the best quality scanned item, wipe the scanner glass with a soft clean cloth to rid the glass of dust or other debris.
PARALLEL PORT SCANNER SPECIFICATIONS PARALLEL PORT SCANNER SPECIFICATIONS Bit Depth 36-Bit color (internal), 12-Bit gray (internal), 1-Bit line art/text Scanning resolution Optical resolution: 600 x 1200 dpi Maximum resolution (interpolated): 2400 x 2400 dpi 8.5 x 11.69 inches (21.6 x 29.7 cm) Maximum Item sizes Scanner dimensions Height Width Length Weight Operating temperature Relative humidity Power supply Input voltage/frequency 3.4 inches (8.5 cm) 11.4 inches (29.0 cm) 17.5 inches (45.0 cm) 5.