
User Guide
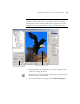

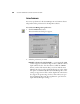

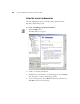
Table Of Contents
- Table of Contents
- Welcome
- What’s in the Box
- The Visioneer 9020 USB Scanner
- What You Need
- STEP 1: Installing the PaperPort Software
- STEP 2: Connecting the Scanner
- STEP 3: Checking Out Your Scanner
- Three Ways to Scan Paper Items
- Scanning Paper Items with the OneTouch Buttons
- Scanning Paper Items from the Button Panel on the Screen
- Scanning 35mm Slides and Negatives
- Configuring the Scanner
- Scanning from the PaperPort Software
- Adjusting the Settings on the Scan Manager Pro
- Troubleshooting
- Cleaning the Scanner Glass
- How to Uninstall Your Scanner
- Contacting Visioneer America Technical Support
- Contacting Visioneer—International Technical Support
- Visioneer PhotoPort 9020 USB Scanner Specifications
52 VISIONEER 9020 USB SCANNER INSTALLATION GUIDE
6. To maintain the selected area’s length-to-width relationship (known
as the aspect ratio), click Maintain Aspect.
Note that as you rotate the area or maintain its aspect ratio, the
width and height measurements change to reflect the new
orientation of the image.
7. When the settings are what you want, click Scan.
8. If you want to remove the selected area and start over, click Remove
on the Scan Info box.
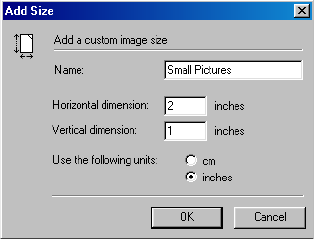
SAVING A CUSTOM SIZE
If you have several items of the same size, such as a group of small
photographs, you can create a custom size and reuse it whenever
scanning those items.
To save a custom size setting:
1. Click Add under the list of sizes.
The Add Size dialog box appears.
2. Type a name and dimensions for the size.
3. Click OK.
The new custom size is now listed in the box at the top of the panel.
Select it in the list to automatically reuse the custom size.