Visioneer® OneTouch® 7600 Series for USB and Parallel Installation Guide
COPYRIGHT INFORMATION PaperPort 5.3 Software for Windows. Copyright ©1998 Visioneer, Inc. All rights reserved. Reproduction, adaptation, or translation without prior written permission is prohibited, except as allowed under the copyright laws.
TABLE OF CONTENTS iii TA B L E O F C O N T E N T S Welcome . . . . . . . . . . . . . . . . . . . . . . . . . . . . . . . . . . . . . . . . . . . . . . 1 Please Use the Proper Section of This Manual . . . . . . . . . . . . . . . . . . 1 What’s in the Box . . . . . . . . . . . . . . . . . . . . . . . . . . . . . . . . . . . . . . . 1 Part 1: Installation . . . . . . . . . . . . . . . . . . . . . . . . . . . . . . . . . . . . . . 2 Installing the 7600 USB Scanner . . . . . . . . . . . . . . . . . . . . . . .
iv TABLE OF CONTENTS Changing the Button Settings . . . . . . . . . . . . . . . . . . . . . . . . . . . . . 21 Selecting Properties . . . . . . . . . . . . . . . . . . . . . . . . . . . . . . . . . . 23 Getting Help with the Buttons . . . . . . . . . . . . . . . . . . . . . . . . . 23 Adjusting Scan Settings and Page Settings . . . . . . . . . . . . . . . . . 24 Scanning from the PaperPort Software . . . . . . . . . . . . . . . . . . . . . . 28 Scanning an Item with the Twain Button . . . . . . . . . . .
WELCOME Congratulations on purchasing your Visioneer OneTouch 7600 flatbed scanner. With your scanner, you can quickly scan paper documents and color photos to place their electronic images on your computer. PLEASE USE THE PROPER SECTION OF THIS MANUAL This manual contains installation instructions for both models of the OneTouch 7600 scanner—the 7600 USB scanner and the 7600 Parallel scanner. Please make sure that you refer to the proper set of instructions for your scanner model.
2 VISIONEER ONETOUCH 7600 SCANNER INSTALLATION GUIDE Part 1: Installation INSTALLING THE 7600 USB SCANNER This section of the manual contains instructions for the OneTouch 7600 USB. Please see “Installing the 7600 Parallel Scanner” on page 8 if you’re using a OneTouch 7600 Parallel.
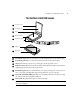
THE ONETOUCH 7600 USB SCANNER THE ONETOUCH 7600 USB SCANNER 1 Document cover 2 Document pad 3 Glass 4 Reference frame 5 Five-Button panel 6 USB port 7 Power jack 1 Document cover. Close the document cover after placing items on the scanner glass. 2 Document pad. Helps to secure the document in place on the scanner glass. 3 Glass. Place items face down on top of the glass, in the upper left corner. 4 Reference frame. Place items face down within this frame.
4 VISIONEER ONETOUCH 7600 SCANNER INSTALLATION GUIDE GETTING HELP The PaperPort software includes a complete set of help topics that answer questions about the scanner and its software. To get help while using the PaperPort software: • Press the F1 key, or from the Help menu, choose PaperPort Help Topics to display the Help Topics window. Tip: If you don’t find the answers in the help or User’s Guide, see the technical support card that you received with your scanner.
STEP 1: INSTALLING THE PAPERPORT SOFTWARE Note: If the PaperPort CD does not automatically start, make sure the CD drive’s door is completely shut. If the CD still doesn’t start, the autorun option on your computer is turned off. Click the Windows 98 icon that shows the drives on your computer. (Usually, the icon is named My Computer.) The window shows the drives available on your computer. Double-click the icon for your CD-ROM drive to see the list of files on the CD. Double-click the file named START32.
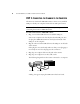
6 VISIONEER ONETOUCH 7600 SCANNER INSTALLATION GUIDE STEP 2: CONNECTING THE SCANNER TO THE COMPUTER The Visioneer OneTouch 7600 USB scanner connects to any available USB port. Check your computer’s manual for its USB port locations. Note: You do not have to shut off the power to your computer when connecting the Visioneer 7600 USB scanner. To connect the Visioneer 7600 USB scanner: 1. Plug one end of the USB cable into an available USB port. Some newer computers also have keyboards with USB ports.
STEP 2: CONNECTING THE SCANNER TO THE COMPUTER 7 When you plug the scanner’s power adapter into a wall outlet an amber light on the front of the scanner comes on indicating that the scanner is receiving power. The light remains amber until the scanner and computer are communicating properly. Then the light turns green. That completes the steps to connect your scanner to the computer. 5. When the software installation is finished, remove the CD from the computer and store it in a safe place. 6.
8 VISIONEER ONETOUCH 7600 SCANNER INSTALLATION GUIDE INSTALLING THE 7600 PARALLEL SCANNER This section of the manual contains instructions for the Visioneer OneTouch 7600 Parallel scanner. WHAT YOU NEED To use the 7600 Parallel scanner and software, you need the following: • IBM PC (or 100-percent compatible) Pentium or higher • Microsoft Windows 95, Windows 98, or Microsoft NT 4.
THE ONETOUCH 7600 PARALLEL SCANNER 9 THE ONETOUCH 7600 PARALLEL SCANNER 1 Document cover 2 Document pad 3 Glass 4 Reference frame 5 Five-Button panel 6 To Printer 7 To Host PC parallel 8 Power jack 1 Document cover. Close the document cover after placing items on the scanner glass. 2 Document pad. Helps to secure the document in place on the scanner glass. 3 Glass. Place items face down on top of the glass, in the upper corner next to the buttons. 4 Reference frame.
10 VISIONEER ONETOUCH 7600 SCANNER INSTALLATION GUIDE GETTING HELP The PaperPort software includes a complete set of help topics that answer questions about the scanner and its software. To get help while using the PaperPort software: • Press the F1 key, or from the Help menu, choose PaperPort Help Topics to display the Help Topics window. The help topics cover the PaperPort software and the scanner.
STEP 1: CONNECTING THE SCANNER TO THE COMPUTER 11 4. Plug one end of the scanner cable into the port on the back of the scanner marked “Host.” 5. Plug the other end of the scanner cable into the parallel port on the back of your computer. On some older computers the serial port and parallel port both have 25-pin connectors that fit the scanner cable. Please make sure you plug the scanner cable into a parallel port. 6.
12 VISIONEER ONETOUCH 7600 SCANNER INSTALLATION GUIDE 7. Plug the power adapter cable into the jack on the scanner. 8. Plug the power adapter into an AC (wall) outlet. The following diagram shows the completed cable connections. When you plug the scanner’s power adapter into a wall outlet an amber light on the front of the scanner comes on indicating that the scanner is receiving power. The light remains amber until the scanner and computer are communicating properly. Then the light turns green. 9.
STEP 2: INSTALLING THE PAPERPORT SOFTWARE 13 STEP 2: INSTALLING THE PAPERPORT SOFTWARE The PaperPort CD includes all the PaperPort software files. The CD also includes the PaperPort User’s Guide, the manual for your PaperPort software. You can read the guide while the CD is running, or print a copy directly from the CD. To install the PaperPort software: 1. Start Microsoft Windows and make sure that no other applications are running. 2. Insert the PaperPort CD into your computer’s CD-ROM drive.
14 VISIONEER ONETOUCH 7600 SCANNER INSTALLATION GUIDE CHECKING IT OUT This section of the manual applies to both models of the Visioneer OneTouch scanner—the 7600 USB scanner and the 7600 Parallel scanner. The OneTouch scanner software adds the scanner icon to the Windows taskbar (at the bottom right corner of the computer screen). If the scanner icon looks like the one shown in the figure, the scanner is properly connected.
CHECKING IT OUT 15 3. Choose About from the shortcut menu. A dialog box confirms that the scanner is connected properly. The About dialog box shown below is for the 7600 USB scanner. The dialog box for the 7600 Parallel scanner is similar. 4. Click OK to close the dialog box. That’s it. Your scanner is ready to scan. See “Scanning By Pressing the OneTouch Buttons” on page 18.
16 VISIONEER ONETOUCH 7600 SCANNER INSTALLATION GUIDE drive or SyQuest drive which must be connected directly to the computer and the scanner then connected to the drive). Plug the scanner into the computer’s parallel port first, then plug the next device into the scanner. • Did you restart the computer after installing the software? If you didn’t restart the computer, it may not have loaded all of the software files. Try restarting your computer.
THREE WAYS TO SCAN 17 Part 2: Scanning THREE WAYS TO SCAN You can scan items by pressing a OneTouch button, clicking a button on the screen, or from the PaperPort software (or other Twain software). • Scan with the Scanner Buttons Press a button on the scanner’s front panel. • Scan from the Screen Click the scanner icon on the Windows taskbar. A panel representing the scanner buttons appears. Click a button on the panel on the screen.
18 VISIONEER ONETOUCH 7600 SCANNER INSTALLATION GUIDE SCANNING BY PRESSING THE ONETOUCH BUTTONS Pressing a scanner button scans the item and then sends the image either to the printer to print, or to a software application on your computer. To scan with a button: • Place an item to scan on the glass, face down, and press one of the scanner buttons. The scanner starts scanning the item. A message just above the Windows taskbar shows the destination application of the scanned image.
SCANNING FROM THE SCREEN 19 SCANNING FROM THE SCREEN Scanning from the screen is just like pressing a scanner button, except you click the button on the screen. The scanner scans the item and then sends the image either to the printer to print, or to a software application on your computer. This method of scanning is especially helpful if the scanner is not located close to your computer. To scan from the screen: 1.
20 VISIONEER ONETOUCH 7600 SCANNER INSTALLATION GUIDE ABOUT THE ONETOUCH BUTTONS The OneTouch buttons are pre-configured to scan items at various settings, and then send the scanned image to a pre-selected software application. You can change the settings for each button except the Stop/Cancel button. See “Changing the Button Settings” on page 21.
CHANGING THE BUTTON SETTINGS 21 CHANGING THE BUTTON SETTINGS Each button setting can be changed to optimize the scanner for the type of scanning you want to do. To change a button’s settings: 1. Press and hold down the button that you want to change (except the Stop/Cancel button). The Preferences dialog box appears. The tabs on the dialog box correspond to the buttons (except Properties). The selections on the dialog box show the current settings for the button.
22 VISIONEER ONETOUCH 7600 SCANNER INSTALLATION GUIDE Select a software application to send the scanned image to that application. Select a setting for scanning the item. Select options for the button. 2. Click the tab of the button you want to change, if it isn’t already selected. 3. Scroll the list of Application to Send Scanned Data To and click the new application you want to use to view and work with the scanned image.
CHANGING THE BUTTON SETTINGS 23 If you want to select a configuration prior to scanning, click the option, Configure before Scanning. Then, when you press a scanner button, the Visioneer Scan Manager appears first and you can select a configuration before scanning. 5. Select the Scanner Button Options for the button. 6. Click OK. Now when you press the scanner button, it scans the image using the new configuration settings and displays the scanned image in the new application.
24 VISIONEER ONETOUCH 7600 SCANNER INSTALLATION GUIDE ADJUSTING SCAN SETTINGS AND PAGE SETTINGS If you’re scanning using a scan configuration that you define yourself, you can adjust that configuration’s scan settings and page settings. For example, if the scanned image is too dark, you can adjust the brightness of the scan setting. Note: You can only adjust the settings for scan configurations that you define yourself.
CHANGING THE BUTTON SETTINGS 25 Note: You cannot edit or change the pre-defined configurations. To make a change, you need to create a new configuration or copy an existing one and give it a new name. 3. If you haven’t defined a configuration yet, click the New button to create a new configuration. You can also select one of the predefined configurations and then click the Copy button to copy it. 4. Click the Edit button. The dialog box for adjusting the scanning for the selected configuration appears.
26 VISIONEER ONETOUCH 7600 SCANNER INSTALLATION GUIDE Resolution—Drag the slider to the right or left to adjust the dots per inch (dpi) of the resolution. The maximum resolution is 600 dpi, the minimum is 50 dpi. The higher the dpi setting, the sharper and clearer the scanned image. However, higher dpi settings take longer to scan and produce larger files for the scanned images. Brightness and Contrast—Drag the sliders to the right or left to adjust the brightness and contrast of the scanned image. 7.
CHANGING THE BUTTON SETTINGS 27 distorted or wavy appearance. The scanner scans the item to compensate for the patterns and dots, and produces a clearer image. The scanning may slow down a bit when this option is selected. You don’t need to select this option when scanning photographs. Gamma—Drag the slider to improve how the colors in a scanned image look on your monitor. Gamma correction allows you to achieve precise color matching.
28 VISIONEER ONETOUCH 7600 SCANNER INSTALLATION GUIDE SCANNING FROM THE PAPERPORT SOFTWARE Instead of using the scanner’s buttons, you can scan directly from the PaperPort software. This is particularly helpful when you’re using PaperPort to file and save your scanned items. Note: You can also scan directly with other software that meets the Twain standards for scanning, which includes many graphics and imaging applications available for your computer.
SCANNING FROM THE PAPERPORT SOFTWARE 29 SCANNING AN ITEM WITH THE TWAIN BUTTON The following procedure provides the basic steps for scanning an item using the Twain button in the PaperPort software. You can scan many types of items, from small business cards to A4-sized pages. Note: Your Visioneer OneTouch scanner is initially set to scan from the PaperPort software with the setting Color Document—Faster. To scan a black-and-white image, select one of the other settings.
30 VISIONEER ONETOUCH 7600 SCANNER INSTALLATION GUIDE Select one of these pre-set options if it’s appropriate for how you want to use the scanned item. If you don’t want to use a pre-set option, select new settings here to manually configure the scan. Click Preview to see what the image will look like. The Preview image appears in the window. If the image is what you want, click Scan. If not, adjust the settings or select a new pre-set option and click Preview again. 4.
SCANNING FROM THE PAPERPORT SOFTWARE 31 Res—This is the resolution setting for the scan in dots-perinch (dpi). The higher the dpi, the sharper the image. But higher dpi settings also produce larger files sizes. Usually the higher resolution settings are used for precision work, such as photographs or fine artwork. Click the drop-down arrow and choose one of the resolution settings from the list. Size—The page size for the image.
32 VISIONEER ONETOUCH 7600 SCANNER INSTALLATION GUIDE 8. When you’re satisfied with the image settings, click the Scan button. The scanner now re-scans the item and displays the final image as a thumbnail on the PaperPort Desktop. Thumbnail Please see the PaperPort Getting Started Guide and PaperPort User’s Guide on the CD for more information about using the PaperPort software.
SCANNING FROM THE PAPERPORT SOFTWARE 33 The predefined scan settings are described in the following table. Scan Page For Default Setting To Scan Description Faxing, Filing, or Copying Black-and-white 200 dpi Newspaper and magazine articles, receipts, forms, and other text items Provides the fastest scan time and smallest file size.
34 VISIONEER ONETOUCH 7600 SCANNER INSTALLATION GUIDE ADJUSTING THE BRIGHTNESS AND CONTRAST Sometimes an item is scanned with the brightness and contrast set to be too light or too dark. For example, a note written with a light pencil may need to be scanned darker to improve legibility. You can adjust the brightness and contrast at which grayscale and color items are scanned. You can also adjust the brightness for black-andwhite items.
CLEANING THE SCANNER GLASS 35 4. Drag the Contrast slider to the left to decrease the contrast or to the right to increase the contrast. See the Help information for more details about the Advanced Settings dialog box. CLEANING THE SCANNER GLASS Scanning items that have excessive amounts of dirt or dust may dirty the glass. To ensure the best quality scanned item, wipe the scanner glass with a soft clean cloth to rid the glass of dust or other debris.
36 VISIONEER ONETOUCH 7600 SCANNER INSTALLATION GUIDE VISIONEER ONETOUCH 7600 SCANNER SPECIFICATIONS Bit Depth Scanning resolution Maximum Item sizes Scanner dimensions Height Width Length Weight Operating temperature Relative humidity Power supply Input voltage/frequency Output voltage/watt Safety and agency certifications Hardware warranty 36-Bit color (internal), 10-Bit gray (internal), 1-Bit line art/text Optical resolution: 600 x 1200 dpi Maximum resolution (interpolated): 2400 x 2400 dpi 8.