
User's Manual


6 VISIONEER ONETOUCH 7600 SCANNER INSTALLATION GUIDE
STEP 2: CONNECTING THE SCANNER TO THE COMPUTER
The Visioneer OneTouch 7600 USB scanner connects to any available
USB port. Check your computer’s manual for its USB port locations.
To connect the Visioneer 7600 USB scanner:
1. Plug one end of the USB cable into an available USB port.
Some newer computers also have keyboards with USB ports. You
can plug the 7600 USB scanner into the keyboard instead of the
USB port on the computer.
2. Plug the other end of the USB cable into the USB port on the back
of the scanner.
If the plug does not attach easily, make sure that you are plugging it
in correctly. Do not force the plug into the connection.
3. Plug the power adapter cable into the jack on the scanner.
4. Plug the power adapter into an AC (wall) outlet.
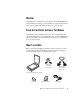
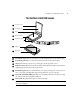
The following diagram shows the scanner connected to a computer.
A dialog box appears saying the USB scanner has been found.
Note: You do not have to shut off the power to your computer when
connecting the Visioneer 7600 USB scanner.
Power cord USB Cable