of 34 CardReader 100 Scanner © Copyright 2003 Visioneer, Inc. Visioneer and Visioneer logo are registered trademarks of Visioneer, Inc. All rights reserved.
of 34 Using Online Help.................................................................................................................... 3 What is the Visioneer Business Card Reader Software? ..................................................... 3 Getting More Information........................................................................................................ 3 Installing the Visioneer Business Card Reader Software and the CardReader 100 Scanner ..........................................
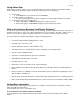
of 34 Using Online Help Online Help is the most complete source of information about the Visioneer Business Card Reader software and the CardReader 100 Scanner. Open Help by choosing Contents from the Help menu. 1) To start Help: a. Select Help on the file menu bar and select Contents. 2) To read the contents of a Help topic: a. Select the desired topic in the left frame to display the corresponding information on the right. 3) To navigate the Help topics already viewed: a.
of 34 Visioneer Web Site Visit our website http:// www.visioneer.com for the latest on products, technical support and more information on other Visioneer products. Registering the CardReader 100 Scanner Register the CardReader 100 scanner during the scanner installation process, or at the Visioneer web site http://www.visioneer.com.
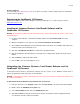
of 34 To uninstall the CardReader 100 Scanner from your system: 1) From the start menu, select Settings and then click on Control Panel to open the Control Panel window. 2) Double-click on the Add/Remove Programs icon. 3) Select CardReader 100 and click on the Add/Remove button. 4) Click Yes and Windows will remove the CardReader 100 scanner and all associated files from the computer’s hard drive.
of 34 Scanner Updates All updates can be found on our website http://www.visioneer.com Getting Technical Support If you cannot diagnose your problem using the topics in this Help system, contact Visioneer Technical Support at: http://www.visioneer.
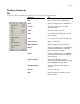
of 34 File Menu Commands File The Visioneer Business Card Reader Software's ‘File’ menu includes the following options: Choose: To: New Create a new business card database Open Open an existing business card database Save As Save the current contacts file under another file name Save Save the current contacts file Print Use the Print wizard to print the selected business cards Scan Use scanner to scan name cards directly Select Scanner… Choose scanner type Merge Database Merge a databas
of 34 Edit The Visioneer Business Card Reader Software's ‘Edit’ menu includes the following options: Choose: To: Select All Select all the business cards in the current database Deselect All Undo selection of all business cards in the current database New Business Card Creates an empty business card in the existing database Delete Business Card(s) Delete the selected business card(s) Edit Category Edit, add, delete or modify existing categories for scanned business cards Edit Shortcuts Edit
of 34 Settings The Visioneer Business Card Reader Software’s ‘Settings’ menu includes the following options: Choose: To: Scan Options Change scanning options such as brightness and contrast OCR Options Replace or append text fields with Optical Character Recognition (OCR) results View Options Select the field names to be displayed for the ‘Database Browser’ Print Label Options Edit the dimensions for printing out the scanned business cards List The Visioneer Business Card Reader Software’s ‘Li
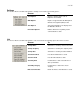
of 34 Card The Visioneer Business Card Reader Software's ‘Card’ menu includes the following options when viewing the card image and details: Choose: To: Rotate Left Flip business card to the left Rotate 180 Rotate business card upside down Rotate Right Flip business card to the right Add to Category Create a new category to organize the business cards Recognize (OCR) Process the business card image to fill in the text fields Dictionary The Visioneer Business Card Reader Software's ‘Dictiona
of 34 Toolbar Commands The Visioneer Business Card Software toolbar includes the following options: Scans a business card with the specified default scanner Creates a new business card Database Deletes the current business card Send Email to the selected business card holder Print business card lists, images and labels Export business card to Outlook Synchronize Palm Address Select previous business card Select next business card Business card image browser Business card database browser Sea
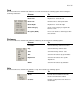
of 34 Open an Existing Database of Business Cards The most recently edited database will be opened when accessing the Visioneer Business Card Reader software. To open a previously saved database of business cards: 1) Select Open from the ‘File’ menu. 2) In the 'Open the data File' window select the file. 3) Click OK. Creating a New Contact The ‘New’ option allows for manual entry of the details of a business card without scanning.
of 34 iii) Gray Jpeg Image – saves the scanned card images as “shades of gray” jpeg images. c) Scan Business Cards Automatically: i) Option selected – after opening the scanning window all business cards will be scanned when they are inserted into the scanner. ii) Option not selected – business cards will not be scanned until clicking on the Scan button in the scanning window – this may be useful as the scanner does not always pull cards through straight, which can affect OCR results.
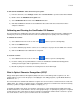
of 34 4) Right-click on the selected text area. 5) From the drop menu, choose the field where the OCR text should be inserted. OCR Options Change the default OCR settings for business card scans prior to processing: 1) Select OCR Options from the ‘Settings’ menu to access the options for scanning, OCR and lists. 2) Click on the OCR Options tab if not already selected. 3) Select the desired options then click on the OK button.
of 34 e) Show OCR Layout – displays the OCR layout boxes on the image and is useful when reprocessing OCR on a particular image. **NOTE: this will set the default options for all cards on which OCR has been processed. Editing a Text Field Make changes to the information in the text fields easily and efficiently. To edit the text fields: 1) Click on the in the text field to be edited. 2) Type in the desired changes. 3) Changes are saved automatically.
of 34
of 34 Deleting Business Card(s) The ‘Delete’ option allows deletion of one or more business cards at the same time. There are two methods for selecting business card(s) to be deleted: 1) In the 'List' view, click on the checkbox next to the business cards to be deleted. OR 2) In the 'Browser' view, left-click to select the business card(s) to be deleted. To select multiple business cards press the CTRL button on the keyboard and left-click the mouse at the same time on each card to be deleted.
of 34 Back-Up and Restore the Business Card Database Visioneer recommends that the Business Card Database be backed-up on a regular basis. This may be helpful if there are any system problems where the data may be lost or the current database may become corrupted. Back-Up a Database 1) Select BackUp Database from the ‘File’ menu 2) Browse to the location where the back-up file is to be saved a) Default file location is c:\program files\VisioneerBCR 1.
of 34 Printing Business Cards The ‘Print’ option allows for printing business card images or contact details. Print one or more card(s) 1) In the ‘Browse’ view select the business card(s) to be printed. a) Left-click to select the business card b) To select multiple business cards press the CTRL button on the keyboard and left-click the mouse at the same time on each card to be printed. 2) In the 'List' view, click on the checkbox next to the business card(s) to be printed.
of 34 Please look at the section ‘List of Name Cards’ for instructions on how to add & remove fields from the ‘List’ view. Note: the business card fields will print in the same order as seen in the ‘List’ view. Print Label Patterns Add, edit and select a print label pattern. 1) Select Print Label Options from the ‘Settings’ menu. 2) The label dimensions window will open. 3) Click the pattern name on the left to modify a current pattern. 4) Click on the Add button and input a name for the new pattern.
of 34 Searching Business Cards The search function allows fast and easy retrieval of business cards. QuickSearch To search for business cards: 1) Enter a keyword in the search textbox on the tool bar 2) The keyword can be any information contained in the business card. 3) If a business card containing the keyword is found, it will be displayed. If not, an empty screen will be shown. 4) More than one keyword can be entered, separated by clicking on AND (AND&) or OR (OR|) button.
of 34 2) Select the fields to be searched by keyword. a) By default, all of the fields will be selected, so the search will be for all business cards containing the keyword in any of the fields. Sorting Business Cards Sorting the business cards allows the information to be viewed easily in the ‘List’ view. To sort the business cards: 1) In the ‘List’ view, click on a field header to sort alpha-numerically. a) Click on the field header one time to sort A to Z.
of 34 List View Options Change the default List view settings: 1) Select List Options from the ‘Settings’ menu to access the options for scanning, OCR and lists. 2) Click on the List Options tab if not already selected. 3) Select the desired options then click on the OK button. a) Available columns – all possible fields in the database to be viewed in the ‘List’ view. b) Show the following in current order – shows the selected fields in the ‘List’ view in the order of the fields top to bottom.
of 34 Classifying Business Cards To classify a business card: 1) Select the business card(s) to be classified. 2) Click Add to Category from the ‘Card’ menu. a) This will open a category options window. 3) Select the desired categories to associate with the business card(s). 4) Click on the OK button. Change options available in Classification 1) Select Edit Category from the ‘Edit’ menu. 2) From the ‘Edit Category’ window categories can be added, modified and deleted.
of 34 Export Contact Information The Visioneer Business Card Reader database may be exported directly to the Outlook and Outlook Express contact list or as specific file types which can be imported into applications which support that file format.
of 34 5) A verification window will request to either export only the selected contacts or all contacts 6) After the export has been completed a notification window will open, click on the OK button 7) The next time Outlook Express opens the contact list will be updated with the information exported from the Business Card Reader database Export to Outlook 1) 2) 3) 4) In the ‘List’ view, select each contact to be exported to Outlook Select Export from the ‘File’ menu Then select Outlook The ‘Sync with
of 34 Export to DBaseIII or CSV file The business card database can be exported as either a DBaseIII or CSV file then imported into programs that support those file formats (e.g.
of 34 8) Open the file in the appropriate application a) DBaseIII files can be imported into applications such as ACT! and Goldmine b) CSV files can be opened in MS-Excel Export to vCard A contact from the Visioneer Business Card Reader database may be exported to a vCard file. 1) 2) 3) 4) 5) 6) In the ‘List’ view, select a contact to be exported as a vCard (.
of 34 Export Image The original image file can be exported to a specific location. The image file type will be the original file type from the business card software (either .tiff or .
of 34 the Palm handheld must be connected to the computer. The Palm Desktop software will be on the installation CD provided with the Palm handheld device. 1) Click on the button or select Synchronization to Palm Device from the ‘File’ menu. i) There may be a warning “Palm conduit just registered, please restart you computer.” Please reboot the computer at that time. b) Click on Export to PDA to export data to the Palm device. c) Click on Import from PDA to import data from the Palm device.
of 34 Sync If a particular record is in both the PC and the Palm database and both records have the minimal match percentage as stated, the application will request selection of which device should be the sync major. (as seen to the right ¾) 3) After selecting either ‘PC Major’, ‘PDA Major’ or ‘Sync (PDA or PC)’ the Palm Sync Status window will open. **NOTE The database images which have been synchronized will not show the OCR layout on the images, unless the images are being processed again.
of 34 3) After initializing the sync function the ‘WinCE Sync’ dialog window will open. a) Select ‘PC Major’, ‘PDA Major’ or ‘Sync’. b) Set the minimum match (similarity) percentage desired. c) Click on the OK button to synchronize the data. PC Major If a particular record is in both the computer and the WinCE database and both records have a minimal match percentage as stated, the system will automatically set the record on the PDA to the one on the computer.
of 34 Synchronization with WinCE BCR 1) Connect the PDA device to the PC via the serial cable. 2) Select Synchronization to WinCE BizCard Finder (WINCE) from the ‘File’ menu to open the Sync to WinCE options. a) Click on Sync With BizCard Finder to browse and select a database file in the WinCE Visioneer BCR software to be synchronized. 3) After selecting the desired database the BizCard Finder (WINCE) options window will open (similar to the following window).
of 34 (as seen to the right ¾) **NOTE The database images which have been synchronized will not show the OCR layout on the images, unless the images are being processed again.