
USB Scanner User's Guide


96 VISIONEER ONETOUCH 7400 USB SCANNER INSTALLATION GUIDE
CREATING MULTIPLE CROP AREAS
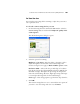
When you click and drag your mouse in the preview window a dotted
outline shows the selected area in the image.
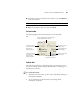
The following figure shows an example of a manually selected area.
Note that the selected area in the example has the number “1” in its
upper left corner indicating it is your first selected area. You can select
up to six separate areas on an image at a time.
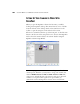
■ To move the dotted outline, put the pointer in the selected area and
drag the mouse.
■ To resize the selected area, put the pointer on a dotted line and drag
the line.
As you drag the dotted line, the menu selection for the image size
changes to Custom to indicate you are customizing the size.
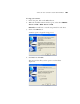
The Scan Info box on the lower left portion of the Advanced
Interface shows the information for the new area. If you selected
multiple areas, tabs on the Scan Info box represent each area. Click
on an area’s tab to see its Scan info.
The Scan Info box shows the size and
position of the area. Note that there are
two tabs at the tope of the scan info
box, one tab for each crop area.
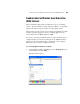
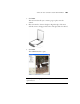
The selected scan areas.
The images that appear in the scanning
application when scanning is finished.