
Installation Instructions

SET-UP
KAMADO CLASSIC B.
KAMADO
CLASSIC
B SERIES
ENGLISH
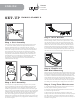
Step 1: Cart Assembly
First remove the bolts, washers and spring washers from the two
“X” connectors carefully. Remove the paper washers and then
begin the assembly for the “X” connectors and legs. Flip cart
upside down for easy assembly. Assemble cart by inserting two “X”
connectors into leg ends, then screw in using the wrench provided.
Place lock washer above flat washer over bolt before screwing
through leg into “X” connector. Screw in casters and tighten nuts
using wrench provided. While assembling, leave screws loose to
allow adjustment in cart. Otherwise it can be difficult to get all of
the screws in. After cart is assembled, confirm all bolts are
tightened, then lift Kamado and set into cart with bottom vent
centered between two legs.
Step 5: Long-Term Maintenance
1. The Wood Side Shelves should be covered when not in use
and may require refinishing from time to time.
2. Routinely check the Spring Assist Band to make sure the 2
5/8" bolts are tight and secure.
3. When moving your grill please remember to make sure
locking casters are in the unlocked position and always pull your
grill. Never Push it. Pull from the Back Hinge. Not the Handle.
Your grill is more likely to tip if you push it and it hits a bump or
indention on the ground.
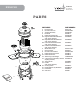
Step 2: Shelf Bracket
Remove the nuts and washers from the bolts welded on the
bottom banding carefully. Remove the paper washers. Place
the side brackets on the bolts and screw side brackets down
tightly with the nuts and washers. Mount shelf brackets over
studs on the sides of the metal bands on the bottom ceramic
grill body with bracket slots facing up. Brackets are stamped
on the back with letters indicating their position (e.g., LF=Left
Front bracket and RB=Right Back bracket). Mount flat washer
then acorn nut on each stud and tighten with wrench provided.
Step 4: Handle and
Side Shelf Mounting
Remove the nuts and washers from the bolts welded on the top
banding carefully. Remove the paper washers, place the handle
on the bolts, and tightly screw the handle down using the nuts
and washers. Attach the handle by placing handle bracket over
studs, opposite the hinge. On each stud use flat washer, then
screw on acorn nut and tighten. Mount side shelves by inserting
the shelf rod into the shelf bracket. Tilting the shelf up slightly
and sliding in or out allows you to deploy or store the shelves.
Step 3: Grill Assembly
Take all parts out of grill before lifting. The grill is heavy and will
require 2 people to lift it into cart and if possible a third person to
help guide the kamado into cart. Using the shelf brackets as lift
handles, lift grill and set it into cart. Make sure the back of the grill
body is resting on the padded back of the rear cart legs. This will help
stabilize the grill when the lid is opened. (Step 3a:) Lift fire bowl into
the ceramic body, and then place the cast iron grate into the fire
bowl. Place cooking grate onto grill with hinged section facing
towards front of grill. (Step 3b:) Close lid and press top vent onto top
of kamado so spring clips are fully engaged, with calibrations facing
the front of the grill.
STEP 2
STEP 3a
STEP 3b
STEP 4
STEP 1STEP 1
STEP 1