
Installation Instructions


SET UP
Step 1:
Cart Assembly
ENGLISH
Model #s RL-K4F1M4 / RL-W4F1M4 / RL-W13D1L4 / RL-K3D1L3 / RL-W3D1L3 / Destin
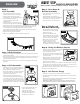
• Remove bolts, washers and locking
washers from the two “X” connectors.
• Remove paper washers and begin
assembling the “X” connectors and legs.
• Please Note: Top & Bottom “X”
connectors must be assembled
simultaneously.
• Assemble cart by inserting the two “X”
connectors into leg ends and install bolts
and washers in the same order they were removed from “X” connectors.
• While assembling, only nger-tighten bolts to allow for adjustment in
cart. Otherwise it can be difcult to get all the bolts inserted.
• Screw in Standard Rubber Wheels to rear Cart Legs and the Locking
Rubber Wheels to the front Cart Legs.
• Tighten nuts using wrench provided.
• After cart is assembled, conrm all bolts are tightened.
Step 3: Grill Assembly
• Take all parts out of grill before lifting. The
grill is heavy and will require two people to
lift and guide the Kamado into cart.
• Be sure the ProZone
TM
is centered between
the two front legs and the grill is resting
against the two back legs.
• Lower re bowl into grill with the ash
drawer opening lined up with the opening
in the main ceramic body. Place cast iron
charcoal grate with attached starter pocket
into re bowl (Step 3a). Align tabs of starter
pocket with electric starter port in re bowl.
Step 2: Shelf Brackets
• Remove nuts and washers from bolts welded on the bottom banding and
remove paper washers.
• Mount shelf brackets over studs with bracket slots facing up. Brackets are
stamped on the back with letters indicating their position (e.g., LF=Left
Front and RB=Right Back).
• Mount at washer then acorn nut on each stud and tighten with wrench
provided.
Step 5: Handle and
Side Shelf Mounting
• Remove nuts and washers from
bolts welded on the top banding
opposite the hinge.
• Remove paper washers and
attach handle bracket over studs.
On each stud place a at washer
and an acorn nut, then tighten.
• Mount side shelves by inserting
the shelf rod into the shelf
bracket. Tilting the shelf up
slightly and sliding in or out allows
you to deploy or store the shelves.
STEP 2
STEP 5
STEP 7a
STEP 7b
Step 7: Ash Drawer Usage
• Once grill is cool, it is safe to remove ash from ash drawer.
• Using bottom knob on ProZone
TM
, lift slightly (Step 7a) and pull drawer
out (Step 7b).
• Once ashes are emptied, reinstall by pushing ProZone
TM
back into grill
body until it drops down back into place.
WARNING: ALWAYS WAIT FOR ASHES TO COOL BEFORE REMOVING
ASH DRAWER. NEVER PULL OUT ASH DRAWER WHILE GRILL IS HOT.
STEP 3b
Step 4: Lava Stone &
Bracket Assembly
• Open grill and take off grill grates to
expose re bowl.
• Spread bracket so it makes an “X”
shape and lower onto re bowl, allowing
the bracket to rest on edge of bowl.
• Lower Lava Stone onto the bracket.
Step 6: Using the Electric Starter
• Place required amount of charcoal inside
re bowl and open all bottom and top
vents to maximize air ow.
• Flip open electric starter door and insert
electric starter as far in as possible. Plug
in electric starter.
• Wait until edges of charcoal turn white
and ames are licking the mound of
charcoal. On average it takes 10-15
minutes to start charcoal.
• Unplug starter and remove from ProZone
TM
. Be careful when removing
electric starter, the element will be very hot. After use, let element rest
on support and cool completely away from children.
NOTE: Do not plug the electric starter in while it is raining unless you’re in a
safe and securely covered area.
STEP 1STEP 1
STEP 1
SIGNATURE SERIES PLAZA
STEP 3a
• Place cooking grates onto grill
with hinged section facing
towards front of grill.
• Close lid and press top vent
onto grill with calibrations
facing the front (Step 3b).
STEP 4