
User Manual

D-303370 CLIP PG2 Installation Instructions 3
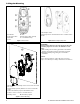
2.3 Bracket Mounting
Note: When mounting using the bracket, the back tamper becomes
inoperative.
1
1. Drill two 7 mm (1/4") holes at the marked locations
Figure 10. Drilling Holes
1
2
* **
A
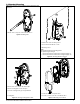
1. Drill two holes in the mounting surface.
2. Secure the bracket with two screws.
A. Mounting surface
Note:
The bracket provides two mounting options
For optimum angle coverage:
∗ use these two holes to increase the coverage range by 5•°
∗∗ use these two holes to increase the coverage range by 10•°
Figure 11. Mounting Bracket to Surface
1
3
2
A
1. Place the base slots over the two bracket pins.
2. Place the locking plate over the two pins.
3. Secure the locking plate by pressing downward.
A. Locking plate
Figure 12. Securing Locking Plate to Base
1
2
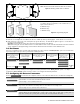
1. Position the PCB correctly in the base.
2. Insert the screw to secure the cover with the base.
Figure 13. Mounting Cover to Base