
User guide


10 DE5450P
The options are: jam detect ON and jam detect OFF.
If the jam detect ON option is selected, the system will
not allow arming under jamming conditions..
Upon selecting Location 17, the display will change to:
17:JAM DETECT
Select the desired option as outlined in Para. 5.1 C above.
5.18 Two-way Voice
Here you determine whether two-way voice communi-
cation will be allowed or not.
The two options are: enable 2-way and disable 2-way.
Upon selecting Location 18, the display will change to:
18:TWO-WAY VOICE
Select the desired option as outlined in Para. 5.1 C above.
5.19 PGM / X-10 Time
Here you determine the pulse duration (length of
activation time) for the PGM output and the X-10 units.
The available options are: 5 s, 30 s, 2 min, 4 min and
toggle. “Toggle” means that one command will activate
the output and the following command will deactivate it.
Upon selecting Location 19, the display will change to:
19:PGM/X-10 TIME
Select the desired option as outlined in Para. 5.1 C above.
5.20 Lighting Lockout Time
This memory location is different from the others,
because you do not select one of several options. Here
you enter daytime limits between which lighting devices
will be off, regardless of other settings or commands.
Lockout Time takes precedence over timed activation
for the X-10 units and the PGM output (see Section 7). In
case of discrepancy, the lockout prevails.
Upon selecting Location 20, the display will change to:
20:LOCKOUT TIME
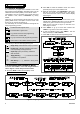
A. Click <OK>. The display will read:
start- HH:MM A
B. Click <OK>. The display will change to:
start- 00:00 A
C. Enter the time at which you wish the lockout state to
begin (usually at dawn).
Note: AM and PM are selected by clicking “#” and “
✶
“,
respectively.
Once the viewed time is correct, regardless of the
cursor position, click <OK> twice. The display will
change to:
stop- HH:MM P
D. Click <OK>. The display will change to:
stop- 00:00 P
D. Enter the time at which you wish the lockout state to
end (usually at dusk). With the correct time on display,
regardless of the cursor position, click <OK> twice. The
display will revert to “stop - HH:MM P”.
E. Click <HOME> to return to “20: LOCKOUT TIME”.
5.21 Latchkey Arming
Here you determine whether the system can be armed in
the latchkey mode. If the system is armed this way, a
“latchkey” message will be sent to specific telephones
upon disarming by a “latchkey user” (users 5 through 8 or
keyfob transmitters 5 through 8). This mode is useful
when parents at work want to be informed of a child’s
return from school.
The options are: Latchkey ON and Latchkey OFF.
Upon selecting Location 21, the display will change to:
21:LATCHKEY
Select the desired option as outlined in Para. 5.1 C above.
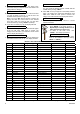
5.22 “Not Active” Time
Here you determine the time limit for reception of signals
from sensors used to monitor the activity of sick, elderly
or crippled people. If no device detects and reports
movement at least once within the defined time limit, a
“not-active” alert will be initiated.
The options are: 3, 6, 12, 24, 48, 72 hours and
canceled.
Upon selecting Location 22, the display will change to:
22:NOT ACTIVE
Select the desired option as outlined in Para. 5.1 C above.
5.23 Back Lighting
Here you determine whether the back lighting of the
keypad will remain on at all times or will come on when a
key is pressed and go off within 10 seconds if no further
keystrokes are sensed.
The two options are: always on and off after 10 s.
In UL installations, “off after 10 s” must be selected to
save battery power.
Upon selecting Location 23, the display will change to:
23:BACK LIGHT
Select the desired option as outlined in Para. 5.1 C above.
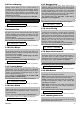
When done, Location 1 will be re-selected (see Para. 5.2)
01:ENTRY DELAY 1
Having thus completed a full cycle of all 23 panel attributes,
you may now continue by programming the communication
parameters (see Section 6).
If at this point you wish to return to the
installer’s menu, click <AWAY>. This will get
you back to:
<OK> TO EXIT
You may now review and select any other
mode on the installer’s menu (by clicking
<NEXT> or <BACK>).