
User guide


DE5450P 5
4
44
4. DEFINING ZONE TYPES
. DEFINING ZONE TYPES. DEFINING ZONE TYPES
. DEFINING ZONE TYPES
4.1 Preliminary Guidance
This mode allows you to attribute one of 9 zone types to
any one of the 29 wireless zones offered by the Power-
Max. In addition it allows you to assign a name to each
zone and determine whether the zone will operate as a
chime zone while the system is in the disarmed state.
A list of factory defaults is printed on the following page.
You may fill out the blank columns even before you start
and proceed to program according to your own list.
To reach the DEFINE ZONES mode, proceed as follows:
A. Upon gaining access to the installer menu (see Section
1), the display will read “1. NEW INSTL CODE”.
B. Click <NEXT> twice. The 3rd mode will be selected:
3. DEFINE ZONES
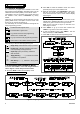
Should you wish to get an overall view of the entire
zone definition process, refer to Figure 3. You may
even use the chart as your only guide along the
programming process, instead of going through the
written step-by-step procedure.
Remember!
1. A delay zone is also a perimeter zone by definition.
2. All interior zones become follower zones during the exit
and entry delays.
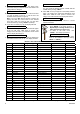
ZONE NAME LIST
1 .
Attic
2 .
Back door
3 .
Basement
4 .
Bathroom
5 .
Bedroom
6 .
Child room
7 .
Closet
8 .
Den
9 .
Dining room
10 .
Downstairs
11 .
Emergency
12 .
Fire
13 .
Front door
14 .
Garage
15 .
Garage Door
16 .
Guest room
17 .
Hall
18 .
Kitchen
19 .
Laundry room
20 .
Living room
21 .
Master bath
22 .
Master Bdrm
23 .
Office
24 .
Upstairs
25 .
Utility room
26 .
Yard
27 .
Custom 1
28 .
Custom 2
29 .
Custom 3
Figure 3. DEFINE ZONES Flow Chart
4.2 Zone Definition Procedure
Once “3. DEFINE ZONES” is viewed, proceed as follows:
A. Click <OK>. The display will read:
Zone No. __
B. Suppose that you wish to define (or re-define) Zone No.
7. All you have to do is select the zone by entering
<0>
$
<7>
$
<OK>, thereby changing the display to:
Zone No. 07
If there is no dark box at the far right, the zone has not
learned a device ID as yet. If there is a dark box, the
zone is already linked to a specific wireless device.
C. Click <OK>. The display will read:
Z07: TYPE _
D . You can now enter the number of a specific zone
definition (see list in Figure 3) and click <OK>. If, for
example, you enter <5>
$
<OK>, the display will read:
5.24h silent
Note: If you click <OK> without entering a number, the
display will show the current definition of the selected
zone, with a dark box at the far right. You may then
review all definitions by clicking <NEXT> repeatedly.
E. To accept the definition on display, click <OK>. A dark
box will appear at the far right: