
User`s guide


10 DE5450U
Recording a spoken message for other users of
the alarm system
Listening to a recorded message left by another
user of the alarm system
Enabling / disabling the chime function in chime
zones
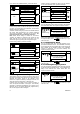
3.2 Adjusting the Speech Volume
The following diagram shows how to increase the loudness
by clicking the <1> key (assuming that the volume was at
minimum to begin with).
Action Resultant Display Sound
VOLUME+
VOLUME+
VOLUME+
(max)
VOLUME+
The following diagram shows how to decrease the
loudness with the <4> key (assuming that the volume was
at maximum to begin with).
Action Resultant Display Sound
(max)
VOLUME–
VOLUME–
VOLUME–
VOLUME–
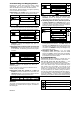
3.3 Voice ON/OFF
You can switch spoken announcements on and off by
alternate clicking of the <7> key, as shown below.
Action Resultant Display Sound
VOICE ON
VOICE OFF
READY HH:MM
Note: The system will maintain the “Voice OFF” state until
subsequent selection of “Voice ON’.
3.4 Recording a Message
You can leave a verbal message for other users of the
alarm system. Face the panel, press
and keep it
pressed. When the display reads TALK NOW, start
talking. The 5 dark boxes will slowly disappear one by
one, from right to left, as shown in the diagram below.
Action Resultant Display Sound
(constant)
RECORD A MESSAGE
Talk
TALK NOW
None
Talk
TALK NOW
Talk
TALK NOW
Talk
TALK NOW
Talk
TALK NOW
Stop talking
RECORDING ENDED
Once the last of the boxes disappears (20 seconds later),
RECORDING ENDED will be displayed.
When you release the button, the display will revert to the
normal status-displaying mode, but will also indicate that a
message is waiting. For example:
READY HH:MM
(alternating)
READY MSG
To check your own message, listen to it within one minute
from the end of recording (see Para. 3.5). This way the
MSG indication will not be erased.
3.5 Message Playback
To listen to a message left by another user of the system:
Click
and listen. PLAY will be displayed and the
message will be played back over the built-in loudspeaker.
When the playback ends, the display will revert to the
normal status-displaying mode. If more than 1 minute
elapsed after recording, the MSG indication will disappear.
3.6 Chime ON/OFF
You can disable / enable the chime zones by alternate
clicking of the <8> key, as shown below:
Action Resultant Display Sound
CHIME ON
CHIME OFF
READY HH:MM
CHIME lights steadily when “chime on” is selected
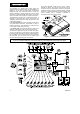
4. ELECTRICAL APPLIANCE CONTROL
4.1 Control Options and Pushbuttons
The system allows manual or automatic remote control of
up to 7 electrical devices (lights, radio/TV, tape recorders,
fans etc.). This requires an optional X-10 controller and 7
remote X-10 units (see fig. 2). ON / OFF control codes are
communicated via the regular household electrical wiring.
Besides the X-10 units (numbered 1 to 7), it is possible to
control a device connected to the PGM output (unit No. 8).
While programming the system, your installer determines
ON and OFF times for each remote controlled device. He
also determines which zone sensors will switch the remote
controlled appliances on and off. However, the decision
whether the remote controlled appliances will respond
as programmed is up to you (see table below).
Key Function
Manual activation of lights or other household
electrical appliances.
Manual deactivation of lighting or other
household electrical appliances.
Selecting the active automatic control method:
Sensors: Appliances are controlled by
sensors (assigned by the installer for this).
Timer: Appliances are controlled by timer (ON
and OFF times are defined by the installer).
Both: Appliances are controlled by sensors
as well as by timer.