_Magic SO RIGHT Chef AT HOME. _M Microwave Oven Use and Care Manual Introduction .... Precautions to Exposure to Excessire Microwave IMPORTANT SAFETY INSTRUCTION Never operate the oven when it is empty or without the 91ass turntable, Installatio Operating Before _commendations.., Basics .............................. 8-12 You Call ......
Introduction Congratulations on your purchase of an over-the range microwave oven. For best results, we suggest reading this guide carefully. You will find instructions on the proper maintenance of your microwave. operation and PRECAUTIONS TO AVOID POSSIBLE EXPOSURE TO EXCESSIVE MICROWAVE ENERGY A. Do not attempt to operate this oven with the door open since open-door operation can result in harmful exposure to microwave energy. It is important not to defeat or tamper with the safety interlocks. B.
IMPORTANT SAFETY When using electrical appliances, basic safety precautions should be followed, including the followilrg: ,ik INSTRUCTIONS 12. Do not operate this appliance if it has a damaged cord or plug, if it is not working properly or if it has been damaged or dropped. 13. This appliance should be serviced only by qualified service persomM. (ontact nearest authorized service f:acility for examination repah" or adjustment. electric shock, fire, injuD- to persons or WARNING.
IMPORTANT SAFETY INSTRUCTIONS cont. 23. To avoid exposure to dangerous high voltage, DO NOT REMOVE THE SPLATTER SHIELD inside the oven eaviD,. 24. Liquids, such as water, coffee, or tea are able to be overheated beyond the boiling point without appearing to be boiling due to surface tension of the liquid. Visible bubbling or boiling when the container is renaoved from the microwave oven is not ahvays present.
Installation Recommendations Remove all packing materials both omside and inside the Do not under any circumstance oven before using the oven. The oven requires free movement of air for proper operation. Do NOT block air vents located by the top air gill galdunderneath the oven. third (gound) prong from the power cord. Do not use an adapter plug with this appliance. See pages 1 and 2 of the Installation Mamml for acceptable extension cord specifications.
Touch Control Panel The Touch Control Panel allows you to set the oven controls It's designed to be easy to use and understand. 1. DISPLAY - Displays time of day, time or temperature during cooking flmctions, power level being used, cooldng mode and instructions. 2. POPCORN - Touch this pad to cook prepackaged microwave popcorn weighing 3.5 ounces. The oven will start automatically. (Page 12) 3. BEVERAGE - Touch this pad to reheat a beverage. The oven will start automatically. (Page 13) 4.
< MCO160UW / MCO160[ B / MCO160[ Q / MCO160S > 1\3/; F''\ FAVORITE CHOICE ADD MINUTE -- ,i0)-- _ '_,3;'-- 4 R {{ 7 8 -- POWE. LEVEL f }>, / 9 WARM ................... ......... J (-- 0"% VENT_AN_ 2t_ • Each time a pad is touched, a BEEP will sound. • When CANCEL/OFF Pad is touched during oven operation, the oven will stop, however, all proga'ammed inlbrmation is retained. To clear all information, touch the CANCEL/OFF Pad again.
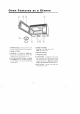
Oven Features at 1. DOOR HANDLE - Pull to open door. Door must be securely latched fbr oven to operate. 2. DOOR LATCHES 3. WINDOW with METAL SHIELD Screen allows cooking to be viewed while keeping microwaves confined in oven. 4. TOUCH CONTROL PANEL and DIGITAL DISPLAY - For detailed information on each feature, see Touch Control Panel section, page5. - a Glance 5. HOOD CONTROLS Vent Fan - Press High, Low or Off Light - Press On or Off 6. GREASE FILTERS 7. COOKTOP LIGHT 8.
Operating Time.of.Day Basic Basics Time Clock Instructions 1. Touch the CLOCK Pad. 1. Touch by touching the PAD. the TIME • After plugging m the oven or after a power outage, "88:88" will be displayed. Touch the CANCEL/OFF PAD and set the clock following the directions For example, • If set, the time of day will ahvays be displayed when no other cooking function is being used. • 3. Touch The time of day remms to the cun'ent time when the oven turns of£ time lbr 5 minutes the START Pad.
Operating Power Level The power levels Basics Cooking Add Guide on your microwave oven can be compared to the surface units on a range. High (power level 10) or full power is the fastest way to cook and gives you 100% power. Each power level gives you microwave energy for a certain percent of time, for example, power level 7 is microwave energy 70% of the time. Most of your cooking will be done on High (Power Level 10).
Auto Use Defrost the defrost poultry setting Conversion for defrosting and fish fi'om 0.1 poun& If weight is in ounces1 to 2-oz. 3 to 4-oz. 5-oz. 6 to 7-oz. 8-oz. 9 to 10-oz. 11 to 12-oz. 13-oz. 14 to 15-oz. meats, to 6.0 pounds. Basic Instructions 1. • Touch the AUTO DEFROST Pad once tbr meat. "dF-l" Will be displayed. • Touch the AUTO DEFROST Pad twice tbr poultly. "dF-2" will be displayed. • Touch the AUTO DEFROST Chart Pad three then weight is converted to tenths-of-a-pound. 0.l 0.2 0.
Operating Defrost Basics by Time Guide Items and Weight Time (Power Level 3) Defrosting Time Standing Procedures and Techniques @ound Beefl lb. (hound Beef2 lbs. Beef Roast, boneless 3 lbs. Steaksil" thick Pork 10-12 miu. 18-20 miu. 26-28 miu. 7-8 min. 5 min. 8-12 rain. 7-10 min. 5-7 lnin. Break apart and remove thawed portions with ibrk. Break apart and remove thawed portions with fork. Turn over pal't wax. Shield ends or thirmer areas with foil. Separate and rearrange once.
Two This Stage feature Cooking lets you program two sequential using two different operations such as defi'osting and cooldng or cooldng Basic power levels. It automatically changes power settings and cooking time. Instructions 1. Touch the TIME COOK Pad. 5. Touch the TIME COOK Pad again. 2. Touch the appropriate number pads to enter the cooking time. The selected time will be displayed. 6. Touch the appropriate number pads to enter the cooking time for the second stage of cooking.
Special Dinner Features Plate Baked Basic Instructions 1. Touch the DINNER 2. The Display PLATE Basic Instructions 1. Touch the BAKED Pad. • • • • • will show "12". • The programmed time (2:40) will show in the Display. • Place meat and dense vegetables to the outside of the plate. • Place delicate foods in the center of the plate. • (:over the plate with wax paper to hold steam around most foods except rare meats or vegetables with crisp exteriors.
To Program Favorite Choice and Clock Display: Signal Sound, Touch Pad "OPt" FAVORITE CHOICE Auto Basic Instructions 1. Touch the AlTO four times • Touch Signal number • • Sound: * See the following chart or tke Cooking Label on the front of the oven caviiy. Clock Display Auto Cook has preset times and power levels for *bur food categories: Soup, Fresh Vegetables, Muffins and Fish Fillets. • The DISPLAY counts down the cooking time. On/Off: Auto Touch number pad 4.
Special Auto Features Start Tips on setting The AUTO START feature allows you to pro_am your oven to begin cooking at a preset time of day - up to a delay of 11 hours and 59 minutes. You can program two sequential operations using two di_t_'ent power levels. Basic Instructions 1. Touch the TIME 2. 3. 4. 5. COOK • • • If you hear the fan start when vou touch the START Pad, you have not set the oven properly. Touch the CANCEL/OFF Pad and start over.
Control Lockout The oven operation can be locked to prevent microwave from accidentally being turned All oven functions can be locked. the on. FAN Pad. the CANCEL/OFF The Display Pad for shows "Loc" 4. Touch the START and the To Cancel To Cancel: Pad and hold for and hold Pad for three seconds. "Loc" disappears Display and the oven beeps. from the Using the Vent CANCEL/OFF Pad. Note...
Care and Microwave Cleaning Oven Interior Glass The oven interior should be cleaned after each use with a damp cloth to keep it free from grease and soil buildup. Smbbom soils can be removed with a plastic scrub pad. When cleaning interior surfaces and surfaces of door and oven that come together when the door is closed, use only mild, non-abrasive soaps or detergents applied with a sponge or soft cloth.
The Exhaust Feature To Remove The exhaust hood feature on your microwave oven is equipped with two metal filters which collect grease. When the tan is operationg, air is drawn up through the filters and is then discharged tln'ough the venting to the outside or through the charcoal filters if not vented to the outside. METAL FILTER Reusable The reusable least once COOKTOP LIGHT Grease Grease Filter To remove grease filter, grasp the "finger hold" on the filter and slide to the rear.
Care Light and Bulb Cooktop To replace night light: Cleaning Replacement Light Oven the combination cooktop 1. Disconnect power at main breaker or pull plug. fuse light/ Light To replace oven light: 1. Disconnect power at main breaker or pull plug. or circuit fuse or circuit 2. Remove the top grill by taking out the 2 screws that hold it in place. (See Figures 3.) 2. Remove screw on right side of light compartment cover and lower cover until it stops. (See Figures 1 and 2.) 3.
Common Questions and Answers QaA Q.Can I open operating? the door when the oven is Q. What do the various A. Short beep beeps mean? any pad is touched. A.The door can be opened anytime during the cooking operation. The oven will automatically stop cooking and the time setting will maintain until the door is closed and the START Pad is touched. Three short beeps Q.
Before Check You the following Call to be sure a service If noting on the oven operates: If the interior • check for a blown circuit fuse or a tripped main circuit breaker. • • check if oven is properly connected to electric circuit in honse. • check that controls • check that the cooking If the oven interior • are set properly. • moisture: refer to your recipe fbr proper cooking procedures. light does not work: The light bulb may be loose or defective.
Magic Chef SO RIGHT AT HOME, TM Microwave Oven Warranty Daewoo Electronics America,inc. warrants each new Microwave Oven to be free from defects in material and workmanship and agrees to remedy any such defect or to furnish a new part(s) (at the company's option) for any part(s) of the unit that has failed during the warranty period. Parts and labor expenses are covered on this unit for a period of one year after the date of purchase. In addition Daewoo Electronics America,inc.