
User`s manual


11
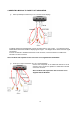
OVERVIEW ON SET-UP PROCEDURES
Below is an overview of the MiniD400 installation procedures, (A detailed explanation is found in
Chapter 5 - Hardware Installation.)
(1) Insert a SD MEMORY.
(2) Connect MIiniD400 to a TV set or monitor.
(3) Connect camera to MiniD400.
(4) Connect optional accessories (sensors or alarm).
(6) Connect the power.
(7) Turn the power on.
(8) Start TV Monitoring and recording.
Chapter 4: Getting Started
General Operating Advice:
● Make sure that a SD Memory is inserted and a camera is properly connected.
(See Chapter 5 -Hardware Installation)
● The SD Memory Format setting must be set (Refer to Chapter 5 – SD Memory Installation for more
information.) Otherwise, MiniD400 may not recognize the SD Memory.
● The firmware used in MiniD400 is compatible with your computer’s operating system (i.e. Windows).
Therefore, you can take the SD memory card from this MiniD400 and install it in your computer to view
recorded video. (Refer to the PC Viewer manual.)
● MiniD400 offers you the flexibility to choose a recording frame rate (maximum rate: 25 frames per second).
A faster frame rate provides more natural recorded video images. However, it requires more SD Memory
storage. You may reduce the frame rate (minimum rate: 1 frame per second) to fit longer recording sessions in
consideration of your SD card capacity.
● If a camera is normally connected to MiniD400 it enters the default operational state: VIEW mode. In this
mode, MiniD400 does not record nor play the recorded stream. It just shows the Live images from camera
connected to MiniD400
● The default recording value for the MiniD400 is set at 25 frames per second with normal video quality.
If you use the supplied 1GB SD Memory card, the MiniD400 can continuous record for approximately 2 hours.
● There is an exception to entering the VIEW mode at start up. If the power is turned off while MiniD400 is
performing emergency recording (i.e. a power failure), it will automatically enter recording mode when the
MiniD400 reboots.
Refer to Chapter 5 - Hardware Installation for more information on installation procedures.